MCCD-29469 CD MP3 MICROSYSTEM WITH USB USER MANUAL Please read and keep these instructions
Important safety instructions – please read carefully and keep for future reference To reduce the risk of fire or electric shock, do not expose this product to water, rain or moisture. To prevent the risk of electric shock, do not remove the cover or back of this product. In case of product failure, only qualified personnel can repair. There are no user-serviceable parts inside.
Electric supply - Please unplug the product in case of prolonged non-use. - This product is intended to be used under temperate climate and should not be used under tropical climate. - If the supply cable is damaged, it must be replaced by the manufacturer or qualified after-sales personnel to avoid any danger. - This product must be connected to an electrical supply 230V ~ 50Hz. - The plug must be accessible after installation.
INTRODUCTION Thank you for choosing this Schaub Lorenz product.
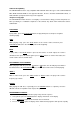
LOCATION OF CONTROLS 1、POWER ON/OFF 9、EQ 2、REMOTE CONTROL SENSOR 10、CD/FM 3、PLAY 11、CD/USB 4、PAUSE 12、RIPPING 5、STOP 13、DISPLAY 6、PREV 14、HEADPHONE 7、NEXT 15、VOL ADJUST 8、USB 16、Amplifier Output 17、FM antenna 5
18、OPEN/CLOSE 1. 2. 3. 4. 5. 6. 7. 8. 9. 10. 11. 12. 13. 14. 15. 16. 17. 18. 19. 20.
INSTALL THE REMOTE CONTROL BATTERY 1. Remove the battery door. 2. Install 2pc ``AAA`` battery into the battery bracket (batteries not provided). Make sure that the + symbol is respected 3. Close the battery door. Note: 1. Battery chemicals can cause a rash. If the batteries leak, clean the battery compartment with a cloth. If chemicals touch you skin, wash immediately. 2. If the remote control is not going to be used for an extended period of time, remove the batteries. 3.
song is needed, press the 1 and 6 buttons. VOLUME ADJUSTMENT Press the VOL-/+ buttons on the remote control to turn up or down the volume of this unit. You can also turn the VOLUME KNOB on the front panel to control volume. CD RIPPING While playing the CD disc, press RIPPING button, “REC” will appear and flash on the display screen, then the CD’s audio track that you have selected will be ripped into MP3 format and stored in the USB device, succeeding the USB sequential order.
Audio CD Compatibility The CD-RIPPING function is only compatible with Audio CD. Other disc types such as CD-R/-RW, CD MP3, DVD and Audio DVD are not supported. Besides, the discs in CD-G and DTS-CD formats, or Audio CD with special protections may not be supported. Respect for Copyright The CD-RIPPING function must be used legally. It is intended for strictly personal and private use. More specifically, it is forbidden to duplicate or disseminate any artistic works without the authors’ authorization.
4. Press PLAY/PAUSE to start playing. To cancel program play, Press STOP . Note: when you operate this function, please make sure the mode is STOP. Otherwise you would just find the selections to set the play mode RANDOM While playing the CD disc, press the RANDOM button to play the disc in random. AUTO While in radio mode, press the AUTO button to search the bands automatically. PREVIOUS/NEXT While playing the CD disc, press or button to go to the previous or next song.
PLAYING USB Press the “CD/USB” button to switch to CD / USB playback. NOTE: If in FM mode ,please press CD/FM first to switch to CD mode before switch to USB. Connecting a USB device 1) Insert a USB key inside the connector. 2) Press the CD / USB key to start. Remark: Depending on the capacity of the device, the reading can take more than 1 minute. The unit cannot read my USB device. - Once you have plugged your device to the unit, you may need to switch on the USB device before it can operate.
pressing the number buttons. For example: press 10+ button once, 5 button once, you may select the 15th band. Press the CH- or CH+ button, the band will be switched up or down. 3) Automatically search bands: press the AUTO button, this unit will start to search bands from the lowest part to highest part automatically. Meanwhile the searched bands will be saved orderly. Press STOP button to stop searching. 3.
TROUBLE SHOOTING Please use the following methods to solve the following problems while using this unit.