
operation manual

19
4. Placez un carton derrière la machine et faites-la
baculer vers l‘arrière avec précaution jusqu‘à ce
que la machine repose sur le boîtier.
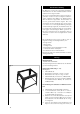
5. Placez le châssis pré-assemblé (Fig.2) sous la
plaque de base (E) de la scie à ruban, vissez les 4
boulons à 6 pans M8 x 45 équipés de 8 rondelles
de 8 mm, de 4 rondelles-ressort et de 4 écrous à
la main. (Fig. 2.1)
6. Placez la machine montée sur le châssis de base
sur une surface plane et serrez fermement toutes
les vis.
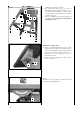
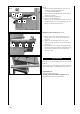
Montage du plateau, Fig. 4
1 Faites passer le ruban de scie dans la fente de la
table. Placez la table par rapport à son support
de telle manière que la vis de fixation puisse être
introduite au travers du support (a).
2 Fixez la table en serrant l’écrou papillon (F) à fond.
3 Vérifiez que le ruban de scie tourne librement et
ne touche pas la table.
Fig. 5
Faites pivoter le plateau à la position 0° et serrez
l’écrou papillon (F).
under the base plate (E) of the band saw; screw
it into place by hand with 4 hex bolts M8x45, 8
washers, 4 circlips and 4 hex nuts. (Fig. 2.1)
6. Set the machine with the base on a level surface
and tighten all the screws and nuts firmly.
Installation of the tabletop, Fig. 4
1 Place the band saw blade through the slot on the
machine table. Place the machine table on the
table guide so that the fixing screw fits through
the bracket (a).
2 Screw the machine table tight with the wing nut
(F).
3 Check that the bandsaw blade runs freely and
does not touch the table.
Fig. 5
Swing the table surface into the 0° position and tight-
en the wing nut (F).