
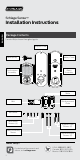
Installation Guide


6
ENGLISH
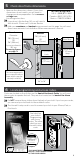
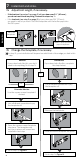
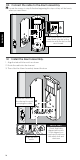
7 Install bolt and strike.
7a Adjust bolt length, if necessary.
• If the backset (see step 5 on page 5) of your door was 2C\,” (60 mm),
you do not need to do anything. Proceed to step step 7b.
• If the backset (see step 5 on page 5) of your door was 2C\v” (70 mm),
you need to adjust your bolt. Twist the faceplate until the button pops into
the 2C\v” space.
Twist the
faceplate.
Make sure the button
pops into place.
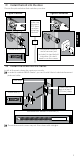
7b Change the faceplate, if necessary.
»
In step 7c, your installation will depend on which kind of door edge you had in this
step.
No Mortise
If your door looks like this, complete
the steps below.
1. Use a flathead screwdriver to pry
the faceplate off.
2. Remove the backplate.
Mortise
If your door looks like this, you don’t
need to do anything. Go to step 7c.
OR
Alternate Mortise
Use the square-corner faceplate if
desired.
1. Use a flathead screwdriver to pry
the faceplate off.
OR
2. Press the square-corner faceplate
into place. The faceplate may
not stay in place until screws are
installed in next step.
4. Go to step 7c, Figure B.
3. Go to step 7c, Figure A.
3. Slide the round faceplate into place.