
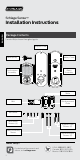
Installation Guide


8
ENGLISH
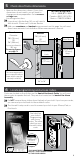
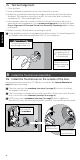
7e Test bolt alignment.
1. Close the door.
2. Insert a flathead screwdriver into the slot in the bolt, as shown.
3. Rotate the screwdriver toward the door edge to extend the bolt into the hole in
the frame. This operation should be smooth. You should be able to rotate the
screwdriver 90˚, fully extending the bolt.
4. If the operation was not smooth, or if the bolt did not fully extend, adjust your
frame and/or door preparation. Go to answers.schlage.com and watch the video
Proper Alignment of Door and Frame for a Smoothly Operating Lock for further
instructions.
5. Retract (unlock) the bolt before continuing to step 8.
»
If the deadbolt continues to rub against the strike, contact Customer Support for
an alternate strike with an additional .060” (2 mm) clearance.
Retract the bolt
before continuing
to step 8.
CAUTION
Test from the inside to
avoid being locked out!
If you can rotate the
screwdriver a full
90˚, then the bolt is
fully extended.
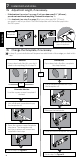
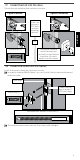
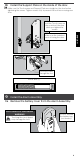
8 Install the Touchscreen Assembly.
8a Install the Touchscreen on the outside of the door.
Always remove the spacer for a 1Z\x” (38 mm) crossbore. See Spacer Removal on
page 14 before continuing.
»
The clips snap into the crossbore (see step 5 on page 5) to assist in holding
the keypad on the door.
»
The Touchscreen Assembly should install smoothly. If it does not, check that the
bolt is set to the correct backset (see step 7a on page 6).
»
NOTE: If you have a crossbore (see step 5 on page 5) that is slightly less
than 2Z\,” (54 mm), the lock may not install smoothly. You can remove the spacer.
Clips snap into
the crossbore.
Align the tab
with the notch.
Route the cable
under the bolt.