Touchscreen Deadbolt with Alarm User’s Guide
CONTENTS Warranty and FCC/IC Statements.............. 3 Lock Setup................................................ 3 Lock Parts................................................. 4 Locking and Unlocking.............................. 5 Locking from the Outside..................... 5 Locking from the Inside........................ 5 Unlocking from the Outside................. 5 Unlocking from the Inside.................... 5 My Codes................................................ 10 Best Practices............
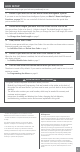
LOCK SETUP Follow these steps to get your lock set up and ready to use. 1 Decide if you want to use the Nexia Home Intelligence System. If you want to use the Nexia Home Intelligence System, see Nexia™ Home Intelligence Functions on page 12. You can control all of the lock functions from the portal after you’ve enrolled your lock. 2 Decide what length you want the User Codes for the lock to be. You can set User Codes to be from 4 - 8 digits in length. The default length is 4 digits.
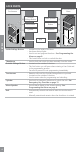
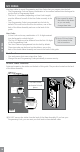
LOCK PARTS DOOR EXTERIOR Touchscreen DOOR INTERIOR Alarm Outside Schlage Button Alarm Speaker Touchscreen Inside Schlage Button Cylinder Thumbturn Bolt ENGLISH 4 • Located on the inside of the door. • Has three distinct lights. • Used to set and program the alarm. See Programming the Alarm on page 8. • This button does not lock or unlock the door. Thumbturn • Used to lock and unlock the door manually from the inside. Outside Schlage Button • Located on the outside of the door.
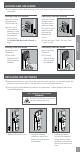
LOCKING AND UNLOCKING Locking from the Outside Unlocking from the Outside Press the Outside Schlage Button. The lock will lock. Press the Outside Schlage Button and then enter a valid User Code. The green success check mark will light and the deadbolt will unlock. LLIf the Lock & Leave feature is disabled, a valid User Code must be entered to lock the door. See Enable/Disable Lock & Leave on page 7. LLIf the red error X lights, the User Code was not valid.
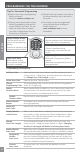
PROGRAMMING THE TOUCHSCREEN Tips for Successful Programming LLWant to see a video of programming before you begin? Browse to answers.schlage.com. LLDefault Codes are located on the back of the Alarm Assembly, and on the back of this guide. LLThe lock comes preset with a unique default Programming Code and two unique Default User Codes. You can either use these codes to operate your lock or change them using the instructions in this guide.
Programming Procedures LLExtend the deadbolt before beginning. LLDetermine how long you want your User Codes to be BEFORE adding any User Codes. If you change the User Code length after adding User Codes, all existing User Codes will be deleted! LLIf you make a mistake, press the Outside Schlage Button to leave Programming Mode, and then start over. Programming Mode will automatically time out after 30 seconds of inactivity.
PROGRAMMING THE ALARM Powering the Alarm The alarm is turned off by default. After installation, you’ll need to turn on your alarm. LLProgram the alarm using the Inside Schlage Button, shown below. LLNot sure your alarm is turned on? Simply press and release the Inside Schlage Button once. It will beep and light up to confirm it is activated. If it does not, try turning the alarm on again, and check the batteries. LLFor videos and more, browse to answers.schlage.com.
Changing the Alarm Mode After you power on the alarm, it will be preset to the Forced Entry mode, by default. If you want to change the mode, follow these simple steps: LLThe alarm must first be powered on before changing the alert setting! Release after first flash (about 2 seconds) Press and release the button until the LEFT light is lit. Tamper Press and release the button until the MIDDLE light is lit. Forced Entry Press and release the button until the RIGHT light is lit.
MY CODES Use these tables to record Programming and User Codes that you program into the lock. • The Programming Code can be any combination of six numbers entered into the keypad to put the lock in Programming Mode. • The first 4 - 6 numbers (depending on User Code Length) must be different from all of the User Codes currently in the LLUse a pencil to enter lock. the codes in the boxes • One Programming Code is programmed into the lock by so you can easily default.
DATE PROGRAMMING CODE USER NAME Example: John Smith USER CODE 1234 1. 2. 3. 4. 6. 7. ENGLISH 5. 8. 9. 10. 11. 12. 13. 14. 15. 16. 17. 18. 19. 20. 21. 22. 23. 24. 25. 26. 27. 28. 29. 30.
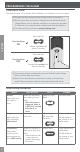
FACTORY DEFAULT RESET When should you perform a Factory Default Reset? • When you want to move the lock to a different door. • If you have forgotten your Programming Code, you can restore the default codes. WARNING Locate the default Programming and User Codes on the back of this guide or the back of the Alarm Assembly before beginning! Default Programming and User Codes will be restored. All existing User Codes and current Programming Code will be erased.
ENGLISH The lock must be set up again after the reset is complete: 1. Open the door if it is not already open. 2. Press the Outside Schlage Button. 3. Enter one of the Default User Codes into the lock. See Default Codes Locations on page 10. 4. The lock will perform a setup routine. Wait until the bolt stops moving before continuing. Z-Wave Function Descriptions Enroll the Lock Turns the Z-Wave radio on and enrolls the lock. Verify Lock Enrollment Verifies that the lock is enrolled in a Z-Wave network.
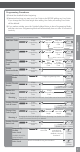
TROUBLESHOOTING PROBLEM LIGHTS — I need to delete a User Code that I don’t remember. — — Cannot add a new User Code. — Yellow dot flashing 2 beeps 2 Red — Yellow dot flashing 2 beeps 2 Red — Yellow dot flashing 2 beeps 2 Red Cannot delete all User Codes. — Yellow dot flashing User Code does not unlock lock. User Code cannot be entered after Outside Schlage button is pressed.
SOUNDS LIGHTS SOLUTION Outside yellow dot flashing Battery is low and should be replaced. See Replacing the Batteries on page 5. Inside Schlage Button flashes every 5 seconds 3 Red when Outside Schlage Button is pressed. Pressing Outside Schlage button when deadbolt is unlocked does not cause deadbolt to relock. — 3 Red Battery is critical and must be replaced. See Replacing the Batteries on page 5. — — Deadbolt will not extend or retract as expected.
If you have questions about any part of installation or programming, don’t return the Touchscreen Deadbolt with Alarm to the store. Our Schlage Customer Service representatives are ready to help. Toll-Free: Live Chat: 1.888.805.9837 schlage.com To learn more about this product, scan the code with your smartphone. Download the app at scanlife.com. Si tiene dudas acerca de cualquier parte de la instalación o programación, no devuelva el cerrojo de pantalla táctil con alarma a la tienda.