Touchscreen Deadbolt with Alarm Installation Guide
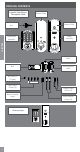
PACKAGE CONTENTS Camelot Style Shown Throughout Guide Support Plate Key Battery Cover Touchscreen Assembly Alarm Assembly ENGLISH Strike Bolt Reinforcement Plate Set Screw (2) (1 spare) Bolt/Strike Screws (4) Alarm Assembly Screw Century Style 2 Support Plate Screws (2) Reinforcement Screws (2)
LET’S GET STARTED! Once you have all your tools together, please follow each step carefully and in order. Because this is an electronic lock, the order of steps is very important. If you skip a step, you may have to perform a factory default reset and start over.
1 Check current door/frame alignment. Because the bolt on this lock is extended automatically, it is important that the door and frame are aligned. Use this checklist to determine if your current alignment will work without any adjustment. I can lock the door without pushing, pulling or lifting the door. My door alignment— the ability to lock the door easily and smoothly— stays the same with changing seasons.
3 Check door/frame dimensions. • Measure the dimensions shown. If your door dimensions do not match, you will need to change your door preparation. Go to answers.schlage.com for drilling instructions. LLIf your door is thicker than 1C\v”, you will need a thick door kit. Please call Customer Service: Toll-Free Calling From: U.S.A.: (888) 805-9837 Canada: (800) 997-4734 Mexico: 018005067866 LLRemember your backset measurement. You will need this for the next step. Either measurement is normal.
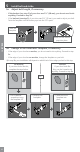
5 Install bolt and strike. 5a Adjust bolt length, if necessary. • If the backset (see step 3) of your door was 2C\,” (60 mm), you do not need to do anything. Proceed to step 5b. • If the backset (see step 3) of your door was 2C\v” (70 mm), you need to adjust your bolt. Twist the faceplate until the button pops into the 2C\v” space. Twist the faceplate. Make sure the button pops into place. ENGLISH 5b Change to the round bolt faceplate, if necessary.
5c Install the bolt into the door. Chose the picture below that matches your door. Mortise No Mortise Make sure the word TOP faces up when installing the bolt. OR 5d Use a block of wood and a hammer (not included) to tap the bolt into place. You don’t need to use the screws. ENGLISH Actual Size (2) Install the strike into the frame. Install all the parts shown for maximum security. LLIn order to maintain BHMA Grade 1, you must install the included reinforcement plate and strike.
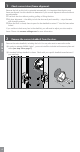
5e Test bolt alignment. 1. Close the door. 2. Insert a flathead screwdriver into the slot in the bolt, as shown. 3. Rotate the screwdriver toward the door edge to extend the bolt into the hole in the frame. This operation should be smooth. You should be able to rotate the screwdriver 90˚, fully extending the bolt. 4. If the operation was not smooth, or if the bolt did not fully extend, adjust your frame and/ or door preparation. Go to answers.schlage.com for further instructions. 5.
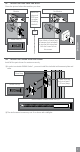
6b Install the Support Plate on the inside of the door. LLMake sure the Touchscreen and Support Plate are straight on the door before tightening the screws. Tighten screws fully to prevent the lock from moving over time. P TO Make sure the indented circle is facing the door. ENGLISH Have someone hold the Touchscreen on the outside of the door while you tighten the screws. Route the cable through the slot. Actual Size (2) 7 Install the Alarm Assembly.
7b Connect the cable to the Alarm Assembly. LLLocate the screws in step 7d before beginning this step so they will be handy when you need them. The connector fits only one way. Match the white dot on the connector with the white dot on the circuit board. ENGLISH 7c Install the Alarm Assembly. 1. Align the tab with the notch as shown. 2. Route the cable into the channel. 3. Then slide the Alarm Assembly towards the door. Align tab with notch.
7d Secure the Alarm Assembly to the Support Plate. Install the lower screw first. Actual Size Actual Size 8-32 x .187 UP FHMS (1 spare is included) Do not turn the thumbturn at this time. Testing will be completed after the lock is completely installed. 8 Install the Batteries. 8a Install the batteries into the battery tray. 1. Unsnap the connector. 2. Remove the battery tray. 3. Install four high-quality alkaline AA batteries. LLLithium batteries may cause undesirable operation. 4.
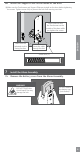
9 Set up the Lock. 1. Open the door if it is not already open. 2. Press the Outside Schlage Button. 3. Enter one of the Default User Codes into the lock (see step 4 on page 5). 4. The lock will perform a setup routine. Wait until the bolt stops moving before continuing. LLIf the Touchscreen did not light up during this step, you may have a power problem. Install fresh batteries and make sure the battery wires are connected (see step 8a on page 11).
10b Extend the bolt (lock) using the Touchscreen. 1. Unlock the door using the thumbturn if you have not already. 2. Take the key with you! Go outside and close the door. 3. Press the Outside Schlage Button. 4. The bolt should extend. Did the bolt extend (is the door locked)? NO YES Did the bolt take two tries to extend? NO YES Alignment is correct. The lock has both a low power and high power mode. It will try low power first and then high power when unsuccessful.
11 Continue to the User’s Guide. Your lock is installed and functional. Continue to the User’s Guide for complete information about how to configure and operate the lock and alarm.
SPACER REMOVAL ONLY if your door has a 1Z\x" (38 mm) crossbore, remove the spacer as shown. 1Z\x" (38 mm) 1. Remove screw. 2. Rotate and remove spacer. 3. Replace screw. ENGLISH Crossbore NEED HELP? Please call customer support before returning the product to the store. Toll-Free Calling From: U.S.A.: (888) 805-9837 Canada: (800) 997-4734 Mexico: 018005067866 Visit our web site for videos, FAQs and more: answers.schlage.
If you have questions about any part of installation or programming, don’t return the Touchscreen Deadbolt with Alarm to the store. Our Schlage Customer Service representatives are ready to help. Toll-Free: 1.888.805.9837 Live Chat: schlage.com Si tiene dudas acerca de cualquier parte de la instalación o programación, no devuelva el cerrojo de pantalla táctil con alarma a la tienda. Nuestros representantes del Departamento de Servicio de Asistencia al Cliente de Schlage están listos para ayudarlo.