
Installation Guide


INSTALLATION — Shower base with Schluter
®
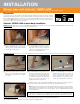
-KERDI-DRAIN-H 27
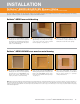
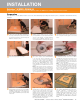
Dry fit the Schluter
®
-KERDI-SHOWER-CB
compensation board and KERDI-SHOWER tray. If
necessary, cut the tray and compensation board to
size. Take measurements for the drain flange and
ABS/PVC outlet pipe locations.
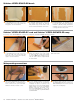
Place the KERDI-SHOWER-CB compensation
board and solidly embed in the mortar.
Apply Schluter SET
®
, ALL-SET
®
, FAST-SET
®
, or
unmodified thin-set mortar to the top of the KERDI-
SHOWER-CB compensation board using a 1/4" x
3/8" (6 mm x 10 mm) square- or U-notched trowel.
Place the KERDI-SHOWER tray and solidly embed
in the mortar.
1
4
7
Mark and cut compensation board for the KERDI-
DRAIN-H flange opening using the template
provided (maximum 5" (125 mm) diameter). Mark
and cut a 2-3/4" (70 mm) – 3" (76 mm) maximum
wide slot for the ABS/PVC outlet pipe. Do not
exceed the maximum to ensure proper tile support.
2
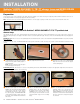
Dry fit the plumbing components. Measure and
cut a section of pipe to connect KERDI-DRAIN-H
to the odor trap using the detachable center
section of the tray, or foam spacers included with
the drain, as a spacer. Proper slope MUST be
maintained to ensure adequate drainage. Prepare
the pipe and KERDI-DRAIN-H with cleaner,
primer, and ABS or PVC cement per the solvent
cement manufacturer’s installation instructions and
connect.
Note: Schluter Systems strongly recommends a
leak test be performed on the connection between
the drain and the waste line prior to continuing with
the remainder of the installation whenever possible.
Refer to local plumbing/or building codes for any
specific requirements in your area.
5
Apply Schluter SET
®
, ALL-SET
®
, FAST-SET
®
, or
unmodified thin-set mortar to the bonding flange
and recess area in the tray with a 1/4" x 3/16"
(6 mm x 5 mm) V-notched trowel or the KERDI-
TROWEL. The thin-set mortar must be mixed to a
fairly fluid consistency, but still able to hold a notch.
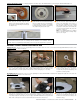
Embed the KERDI membrane collar in the bond
coat and work the membrane onto the KERDI-
DRAIN bonding flange and shower base to ensure
full coverage and remove air pockets.
8
Apply Schluter SET
®
, ALL-SET
®
, FAST-SET
®
, or
unmodified thin-set mortar to the substrate using a
1/4" x 3/8" (6 mm x 10 mm) square- or U-notched
trowel.
3
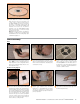
Apply Schluter SET
®
, ALL-SET
®
, FAST-SET
®
,
or unmodified thin-set mortar to the KERDI-
SHOWER-CB compensation board and to the top
and bottom of the detached center section of the
KERDI-SHOWER tray. Slide the center section into
place below the drain to ensure solid and uniform
support of the bonding flange.
Note: If mosaic tiles (tile format less than 2" x
2" (50 mm x 50 mm)) will be used on the shower
tray, the shower tray seam is located over the pipe
cut-out, or the tray will be exposed to heavy loads
the slot in the compensation board must be filled
with a sand mortar or dry-pack to ensure proper
support of the tile assembly.
6
Seal inside corners by abutting adjacent sheets
and installing KERDI-BAND with Schluter SET
®
,
ALL-SET
®
, FAST-SET
®
, or unmodified thin-set
mortar, centered over the joint. Install KERDI-
KERECK prefabricated waterproofing corners at
all inside and outside corners. When using the
KERDI-BOARD-SC curb, seal the curb to the
base and walls using KERDI-KERECK and KERDI-
BAND.
9
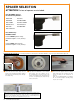
Preparation
Plywood, OSB or concrete subfloor must be clean, even, and load bearing. Any leveling must be done prior to compensation board and shower tray
installation.
Schluter
®
-KERDI-DRAIN-H
Please refer to Schluter
®
-Systems' installation videos in addition to reading the instructions below.
INSTALLATION