
Installation Guide

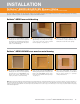
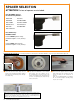
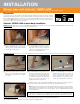

Grate:
Place the height adjustment collar inside the
lateral adjustment ring and snap the grate into
place. Note: For the 6" (150 mm) grates, the
height adjustment collar is integrated with the
grate. For the residential adaptor kit, there is no
lateral adjustment ring.
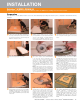
1
Fill the step in the bonding flange with thin-set
mortar and back-butter the underside of the
grate to ensure full support. Place the assembly
into the mortar and install the surrounding tiles,
ensuring full coverage.
2
Position the grate to match the joint pattern of
the tile covering and press flush with the tile
surface. Remove all excess setting material
immediately. Note: Protect the visible surface of
the grate from contact with setting and grouting
materials. In particular, anodized aluminum is
sensitive to alkaline materials.
3
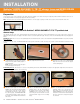
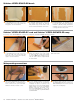
Tileable Covering Support:
Fill the step in the bonding flange with
thin-set mortar. Place the tile spacer in the lateral
adjustment ring and press the assembly into the
mortar. Install tiles up to the tile spacer, ensuring
full coverage. Embed the tiles on the integrated
tabs on the lateral adjustment ring, which provide
for a flush transition to the covering support.
Position the tile spacer to match the joint pattern
of the tile covering. The tiles may be held back
from the spacer as required to match the layout.
Remove all excess setting material.
1
Apply tile to the top of the covering
support using Schluter SET
®
, ALL-SET
®
,
FAST-SET
®
, or unmodified thin-set mortar.
The tile may overhang the covering support
provided that a drainage opening of at least 3/16"
(5 mm) is provided.
2
After the tile is set and grouted, remove the tile
spacer and insert the tiled covering support into
the lateral adjustment ring.
3
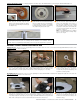
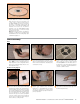
Grate assembly
Apply Schluter SET
®
, ALL-SET
®
, FAST-SET
®
,
or unmodified thin-set mortar to the bonding
flange and recess area in the tray with a 1/4"
x 3/16" (6 mm x 5 mm) V-notched trowel or
the KERDI-TROWEL. The thin-set mortar must
be mixed to a fairly fluid consistency, but still
able to hold a notch. Embed the KERDI collar
membrane in the bond coat and work the
membrane onto the KERDI-DRAIN bonding
flange and shower base to ensure full coverage
and remove air pockets.
Note: When using the stainless steel drain, the
membrane is adhered to the bonding flange
with KERDI-FIX; clean the bonding flange prior
to KERDI-FIX application.
4
INSTALLATION — Shower base with Schluter
®
-KERDI-DRAIN 29