
Installation Guide


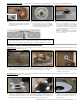
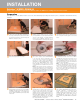


Remove the clamping ring from the installed
drain and save the bolts. Align the bolt
pattern of the clamping ring with the adaptor
ring and punch the matching inserts through
the adaptor ring.
1
Apply a continuous 1/4" - 3/8" (6 mm - 10
mm) bead of KERDI-FIX to the installed
drain flange. Place the adaptor ring on
the installed drain, re-insert the bolts, and
tighten evenly. Make bolts finger-tight plus
1/4 turn; over tightening may warp the ring
and result in leaks.
2
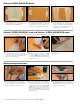
Slide the adaptor flange into the adaptor ring
and ensure full support under the adaptor
flange with mortar. The mortar bed is then
placed according to the instructions on
page 25.
Note: For the KERDI-DRAIN 7-1/2" Adapter
Kit, the extended adapter bonding flange
may be cut to length.
3
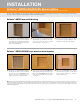
Clamping Ring Drain Installed: If a clamping ring drain is installed, replace with KERDI-DRAIN or convert using the KERDI-DRAIN adaptor kit.
Note: Schluter
®
-Systems strongly recommends a leak test be performed on the
connection between the drain and the waste line prior to continuing with the
remainder of the installation whenever possible. Refer to local plumbing and/or
building codes for any specific requirements in your area.
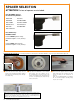
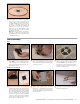
SPACER SELECTION
ATTENTION! 2 sizes of spacers are included.
Use the GREY spacers
for shower tray models:
KST915BF
KST965BF
KST1220BF
KST965/1525
KST1830
KST1220/1830
For shower tray
KST965-1525S:
Use the WHITE spacers if tray
perimeter height is 1-1/2" (38 mm)
OR
Use the GREY spacers if tray
perimeter height is 1-1/8" (28 mm)
KST1525
KST965/810BF
KST915/1220BF
KST1220/1525
KST965NABF
26 SPACER SELECTION