
Installation Guide

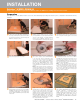


If necessary, cut the KERDI-BOARD-SC to length using a utility knife and KERDI-SHOWER-SR using a handsaw.
1
1
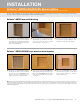
Apply Schluter SET
®
, ALL-SET
®
, FAST-SET
®
,
or unmodified thin-set mortar to the floor
and to the edge of the shower base and
walls using a 1/4" x 3/8" (6 mm x 10 mm)
square- or U-notched trowel.
Apply Schluter SET
®
, ALL-SET
®
, FAST-SET
®
,
or unmodified thin-set mortar to the floor
and walls using a 1/4" x 3/8" (6 mm x 10
mm) square- or U-notched trowel.
2
2 3
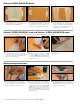
Press the curb or ramp firmly into place.
Check the underside of the curb or ramp
to ensure that full coverage and support
is achieved. Note: When setting tile on the
curb, the surface must be sloped towards
the shower drain.
Press the bench firmly into place and check
the underside and backsides to ensure that
full coverage and support are achieved.
Verify that the slope on the surface of the
bench is directed toward the shower base.
Schluter
®
-KERDI-BOARD-SC curb and Schluter
®
-KERDI-SHOWER-SR ramp
Schluter
®
-KERDI-BOARD-SB bench
Note: Schluter
®
-KERDI-BOARD can be used to
build custom curbs.
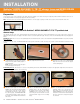
Install KERDI-BAND and KERDI-KERECK
and KERDI-KERS-B (for triangular bench)
to cover all seams and corners, ensuring a
minimum 2" (50 mm) overlap, and work the
membrane into the mortar to achieve full
coverage and remove air pockets.
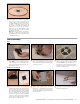
28 INSTALLATION — Shower base with Schluter
®
-KERDI-DRAIN
Waterproofing connections
Seal inside corners by abutting adjacent sheets
and installing KERDI-BAND with Schluter SET
®
,
ALL-SET
®
, FAST-SET
®
, or unmodified thin-set
mortar, centered over the joint. Install KERDI-
KERECK at all inside and outside corners.
1
When using KERDI-SHOWER-SR, repeat the
process to install the membrane over the ramp.
Seams in the membrane are constructed by
overlapping the edges by 2" (50 mm) or by
abutting adjacent sheets and installing KERDI-
BAND centered over the joint. Install KERDI-
KERECK at all inside and outside corners.
When using KERDI-BOARD-SC, seal the curb
to the base and walls using KERDI-KERECK
and KERDI-BAND.
2
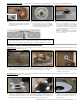
Completely fill the step in the shower tray
and adjacent plywood area up to the hole for
the KERDI-DRAIN with thin-set mortar. Press
KERDI-DRAIN firmly into the mortar to ensure full
support of the bonding flange.
3