
Installation Guide


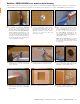

Apply Schluter SET
®
, ALL-SET
®
, FAST-SET
®
,
or unmodified thin-set mortar to the underside
of the grate frame and place it in the channel
body ensuring full coverage and support of
the frame. Insert the foam spacers in the grate
frame to reinforce it during the remainder of
the installation.
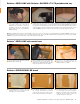
Once all seams and corners have been
completely sealed, the assembly is waterproofed
and ready to be tiled. Apply a uniform layer of
Schluter SET
®
, Schluter ALL-SET
®
, Schluter
FAST-SET
®
, or unmodified thin-set mortar and
comb using a trowel that is appropriate for the
size of the tile. Be sure the trowel groves in the
thin-set are all going the same direction, as
shown in the photo above.
Note: A water test is strongly recommended
before setting tile to verify a successful
installation. Wait 24 hours minimum after the
membrane installation is complete to allow
for final set of thin-set mortar and ensure
waterproof performance at seams and
connections. Refer to local plumbing codes for
any specific requirements in your area.
1
1
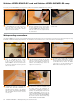
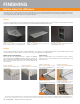
Slide the plastic height adjustment spacers with
threaded bolts onto the tabs along the inside
of the grate frame to adjust the elevation of the
frame. The spacers may be adjusted simply by
turning the bolts by hand. The elevation should
be set such that the frame will be flush with the
surface of the tile covering.
2
Solidly embed the tiles in the setting material,
making sure to observe the open time of the
bonding mortar. If the mortar skins over prior to
tile installation, remove and reapply.
2
Note: Protect the visible surfaces of the grate frame and grate from contact with setting and grouting materials. Setting and grouting materials must be
removed immediately.
Grate
Tiles
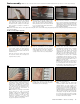
Peel the protective foil off the cover strip and
adhere the strip to the bonding flange adjacent
to the wall(s). Position the strip along the
edge of the channel. The cover strip hides
and protects the KERDI surface under the tile
installed in step 3.
When the shower base will be tiled beyond
the ends of the channel, the cover strip is not
required at these locations.
1
Insert the tile spacers into the channel body.
Install the surrounding tile on the adjoining
walls and shower base up to the spacers
using Schluter SET
®
, ALL-SET
®
, FAST-SET
®
,
or unmodified thin-set mortar, ensuring full
coverage. Remove all excess setting material.
2
Tileable Covering Support (Grate D)
Tile is bonded to the covering support using
Schluter SET
®
, ALL-SET
®
, FAST-SET
®
, or
unmodified thin-set mortar. The tile is installed
flush with the front side of the covering
support to provide the drainage opening and
overhanging the back side of the covering
support to cover the bonding flange along the
wall. When the ends of the channel body are
located adjacent to walls, the tile is installed
overhanging the end of the support to cover the
bonding flange along the walls. Measure and
cut the tile such that an approximate 1/16" (1
mm) gap is left at the walls.
Note: When the shower base is tiled beyond
the ends of the channel, the tile on the ends of
the covering support can be cut to either match
the grout joints of the surrounding floor covering
or to provide a perimeter drainage opening.
3
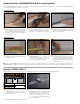
Grate assembly
Install the tiles on the shower base using Schluter
SET
®
, ALL-SET
®
, FAST-SET
®
, or unmodified
thin-set mortar, ensuring full coverage. Make final
adjustments to ensure the grate frame is flush with
surrounding tiles. Remove foam tile spacers and
plastic height adjustment spacers with threaded
bolts following tile installation.
3
Periodically remove and check a tile to ensure that
full coverage is being attained.
Note: Coverage may vary with mortar
consistency, angle at which the trowel is held,
substrate flatness, etc. If full coverage is not
achieved, remove and reapply, making sure to
verify proper mortar consistency and application.
For large-format tiles, e.g., 12" x 12" (305 mm x
305 mm) and larger, back-buttering the tiles with a
skim coat of thin-set mortar is a useful way to help
ensure proper coverage. The skim coat can fill in
the concave area on the back of the tile (ceramic
tiles are not perfectly flat) and improve contact with
the mortar combed on the substrate.
3
Note: The tabs of the drain strainer must be installed in the KERDI-LINE channel body v-grooves to ensure proper drainage.
INSTALLATION — Grate assembly 33