
Installation Guide


Any leveling of the floor must be done
prior to the installation of the shower tray.
If necessary, cut the tray to size prior to
application. The shower base can also be
extended beyond the tray using dry-pack
mortar, which is in turn covered with the
KERDI membrane.
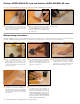
1
Cut the flat end of the KERDI-SHOWER-LT/-LTS tray to fit around the channel support. Apply
Schluter SET
®
, ALL-SET
®
, FAST-SET
®
, or unmodified thin-set mortar to the substrate using a 1/4"
x 3/8" (6 mm x 10 mm) square- or U-notched trowel. Slide the KERDI-SHOWER-LT/-LTS under
the edge of the channel body flush with the surface of the channel support, making certain to
solidly embed the tray in the mortar. Check the underside of the tray to ensure that full coverage
is achieved. Note: The thin-set mortar used in this step is to bed and support the tray only.
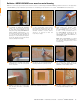
2
Place a mortar screed opposite the installed
KERDI-LINE channel body.
1
Fill the remainder of the shower base with
mortar and slope the mortar bed at 1/4"
(6 mm) per 12" (305 mm) using the bonding
flange and a perimeter screed as guides.
2
Schluter
®
-KERDI-LINE with Schluter
®
-SHOWER-LT/-LTS prefabricated tray
Schluter
®
-KERDI-LINE with mortar base
Note: When KERDI-LINE is placed at an intermediate location (e.g., center of a shower), it is recommended that the KERDI-SHOWER-LT trays be cut
by equal amounts from the ends to ensure a consistent height of the first course of tile. When KERDI-LINE is placed adjacent to the wall, cut the KERDI-
SHOWER-LTS trays from the thicker end to ensure a flush transition at the drain.
As soon as the mortar bed can be
walked upon, waterproofing with the
KERDI membrane can begin.
3
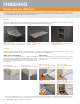
1
Apply Schluter SET
®
, ALL-SET
®
, FAST-SET
®
,
or unmodified thin-set mortar to the floor
and walls using a 1/4" x 3/8" (6 mm x 10
mm) square- or U-notched trowel.
2 3
Press the bench firmly into place and check
the underside and backsides to ensure that
full coverage and support are achieved.
Verify that the slope on the surface of the
bench is directed toward the shower base.
Schluter
®
-KERDI-BOARD-SB bench
Install KERDI-BAND and KERDI-KERECK
and KERDI-KERS-B (for triangular bench)
to cover all seams and corners, ensuring a
minimum 2" (50 mm) overlap, and work the
membrane into the mortar to achieve full
coverage and remove air pockets.
INSTALLATION — Shower base with Schluter
®
-KERDI-LINE 31