
Installation Guide


The waterproofing is carried to the height of the showerhead (at minimum). KERDI or KERDI-BOARD application on ceiling is optional for bathtub surrounds.
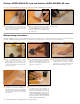
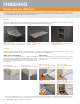
Bathtub surround
Please refer to Schluter
®
-Systems' installation videos in addition to reading the instructions below.
INSTALLATION
Clean any dust or other debris from the
surface of the solid backing. Dampen
particularly dry and porous substrates in
order to help prevent premature drying or
skinning of the thin-set mortar.
1
Place painter’s tape to protect the tub deck.
Apply Schluter SET
®
, ALL-SET
®
, FAST-SET
®
,
or unmodified thin-set mortar to the solid
backing using a 1/4" x 3/16" (6 mm x
5 mm) V-notched trowel or the KERDI-
TROWEL. Completely fill the 1/4" (6 mm)-
wide gap between the solid backing and
tub with KERDI-FIX or other suitable sealant.
Note: When the solid backing is installed
above the tub flange, apply KERDI-FIX to
the tub flange and spread using a small
notched trowel.
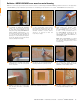
2
Apply KERDI-BAND waterproofing strips or
5" (125 mm)-wide cut sections of KERDI
waterproofing membrane. Solidly embed the
membrane in the mortar and KERDI-FIX to
ensure full coverage and remove air pockets.
3
Schluter
®
-KERDI over solid backing
Apply Schluter SET
®
, ALL-SET
®
, FAST-
SET
®
, or unmodified thin-set mortar to
the solid backing and previously applied
KERDI-BAND. Embed the KERDI in the
thin-set mortar and work the membrane onto
the entire surface to ensure full coverage and
remove air pockets.
4
Seams in the membrane are constructed
by overlapping the edges of KERDI by
2" (50 mm) or by abutting adjacent sheets of
KERDI and installing KERDI-BAND, centered
over the joint.
5
Any penetrations through the KERDI
membrane (e.g., mixing valve, shower head,
etc.) must be sealed with KERDI-SEAL-PS/-
MV, KERDI-FIX, or other suitable sealant.
6
Seal connections to knee walls using KERDI-
KERECK-F preformed corners and Schluter
SET
®
, ALL-SET
®
, FAST-SET
®
, or unmodified
thin-set mortar.
7
Once the entire membrane, including seams,
corners, and knee walls have been completely
bonded and, therefore, waterproofed,
the assembly is ready to be tiled. For tile
installation instructions, see page 33.
8
The thin-set mortar used for bonding KERDI to walls and ceilings must be appropriate for the substrate and must penetrate and engage the membrane
fleece. The mortar must be mixed to a fairly fluid consistency, but still able to hold a notch.
KERDI-SEAL-PS/-MV KERDI-FIX
Note: See page 23 for KERDI-BOARD-SN
shower niche installation instructions.
36 INSTALLATION — Bathtub surround — Schluter
®
-KERDI