
Installation Guide


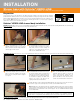

INSTALLATION — Schluter
®
-KERDI-BOARD-SN Shower Niche 23
Schluter
®
-KERDI-BOARD-SN Shower Niche
Please refer to Schluter
®
-Systems' installation videos in addition to reading the instructions below.
INSTALLATION
The exact order of installation can vary from that shown below, provided all fastening and waterproofing measures are performed properly. The following
represents Schluter
®
-Systems' recommendations for simple and reliable installation.
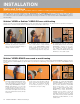
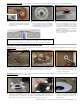
Determine desired location and trace around
the outside of the KERDI-BOARD-SN flange,
making sure the lines are level and plumb.
Cut and remove the wallboard such that the
niche will be supported on both sides by the
studs or other wall framing.
1
Insert the niche and fasten to the studs using
wood or metal screws, placing the fasteners
approximately 1/4" (6 mm) from the edges
of the niche. Fasten all corners and limit
fastener spacing to 12" (30 cm) o.c.
2
Apply the KERDI membrane over the wall
surface as described on page 22. Once
the membrane is solidly embedded, cut the
membrane to match the niche opening.
3
Schluter
®
-KERDI over solid backing
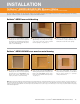
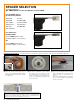
Determine desired location and trace around
the outside of the KERDI-BOARD-SN flange,
making sure the lines are level and plumb.
Cut and remove the KERDI-BOARD such
that the niche will be supported on both
sides by the studs or other wall framing.
1
Insert the niche and fasten to the studs using
wood or metal screws and KERDI-BOARD-ZT
washers, placing the fasteners along the seam
between the KERDI-BOARD and the niche.
Fasten all corners and limit fastener spacing to
12" (30 cm) o.c.
2
Seal the seams between the niche and
walls using KERDI-BAND with Schluter
SET
®
, ALL-SET
®
, FAST-SET
®
, or unmodified
thin-set mortar ensuring a 2" (50 mm)
overlap in all directions.
3
Schluter
®
-KERDI-BOARD over wood or metal framing
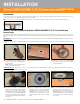
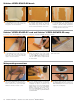
Note: When using the prefabricated shelf, determine the desired height of the shelf and mark with a level line. Set tile up to that line on the back and sides of
the niche. Butter the sides and back of the shelf with Schluter SET
®
, ALL-SET
®
, FAST-SET
®
, or unmodified thin-set mortar and solidly embed it in the niche,
resting on the previously installed tile. The shelf may be raised at the back to create a slope, or the tile may be set on a slope, to prevent water from pooling
in the finished application.