
Installation Guide


Shower walls may be made waterproof using KERDI/KERDI-DS or KERDI-BOARD prior to construction of the shower base.
The waterproofing is carried to the height of the showerhead (at minimum). KERDI or KERDI-BOARD application on ceiling is optional for showers.
For continuous-use steam rooms, KERDI-DS is applied to walls and ceilings. For intermittent use steam showers, KERDI or KERDI-BOARD is applied to
walls and ceilings.
22 INSTALLATION — Walls and Ceilings
Walls and Ceilings
Please refer to Schluter
®
-Systems' installation videos in addition to reading the instructions below.
INSTALLATION
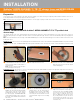
Clean any dust or other debris from the
surface of the solid backing. Dampen
particularly dry and porous substrates in
order to help prevent premature drying or
skinning of the thin-set mortar.
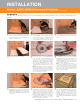
1
Apply Schluter SET
®
, ALL-SET
®
, FAST-SET
®
,
or unmodified thin-set mortar using a
1/4" x 3/16" (6 mm x 5 mm) V-notched
trowel or the KERDI-TROWEL. Embed
KERDI or KERDI-DS in the mortar and work
the membrane onto the entire surface to
ensure full coverage and remove air pockets.
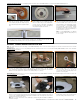
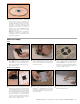
2
Seams in the membrane are constructed
by overlapping the edges by 2" (50 mm) or
by abutting adjacent sheets and installing
KERDI-BAND, centered over the joint.
Any penetrations through the membrane
(e.g., mixing valve, shower head, etc.)
must be sealed with KERDI-SEAL-PS/-MV,
KERDI-FIX, or other suitable sealant.
3
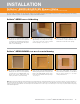
Schluter
®
-KERDI or Schluter
®
-KERDI-DS over solid backing
Schluter
®
-KERDI-BOARD over wood or metal framing
The thin-set mortar used for bonding KERDI/KERDI-DS to walls and ceilings must be appropriate for the substrate and must penetrate and engage the
membrane fleece. The mortar must be mixed to a fairly fluid consistency, but still able to hold a notch.
Note: Schluter
®
-Systems does not require taping joints between drywall panels before installing Schluter
®
-KERDI/KERDI-DS. However, if local code requires
taping joints, latex based primer must be applied over the taped joints prior to installing the KERDI/KERDI-DS membrane.
KERDI-BOARD can be mounted vertically or
horizontally on framing with appropriate screws
(i.e., coarse thread wood screw for wood
studs and self-tapping for metal studs) and
corresponding KERDI-BOARD-ZT washers.
Minimum board thickness = 1/2" (12.5 mm)
for studs spaced at 16" (40.6 cm) o.c.; 3/4"
(19 mm) for studs spaced at 24" (61.0 cm) o.c.
Screws must reach a depth of at least 3/4" (20
mm) in wood studs and at least 3/8" (10 mm)
in metal studs.
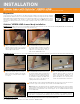
1
Abut panels over the center of the studs.
Screws may be placed between adjacent
panels such that the washers fasten both
panel edges. The maximum allowable
on-center fastener spacing is 12" (30 cm)
for walls and 6" (15 cm) for ceilings. When
fastening a washer in a corner, the washer
should be installed as close to the inside
corner as possible.
2
KERDI-BOARD joints, corners, and fastener
penetrations are sealed with KERDI-BAND
and KERDI-KERECK corners, ensuring a
minimum 2" (50 mm) overlap. Apply Schluter
SET
®
, ALL-SET
®
, FAST-SET
®
, or unmodified
thin-set mortar using a 1/4" x 3/16"
(6 mm x 5 mm) V-notched trowel or the
KERDI-TROWEL. Embed KERDI-BAND/-
KERECK in the mortar and work the
membrane onto the surface to ensure full
coverage and remove air pockets. Any
penetrations through the panel (e.g., mixing
valve, shower head, etc.) must be sealed
with KERDI-SEAL-PS/-MV, KERDI-FIX, or
other suitable sealant. When installing KERDI-
BAND in a corner, it may be necessary to use
the 7" (178 mm) band to accommodate the
2" (50 mm) requirement beyond the screws.
3
Grab bars, wall-mounted toilets, or other heavy objects must be anchored in the structure or solid blocking behind KERDI-BOARD. Installation instructions
for other applications of KERDI-BOARD (e.g. fully embedded or spot-bonded over solid backing) can be found in the 12.1 Schluter
®
-KERDI-BOARD technical
data sheet.
KERDI-SEAL-PS/-MV
KERDI-SEAL-PS/-MV
KERDI-FIX
KERDI-FIX