
Installation Guide


INSTALLATION — Shower base with Schluter
®
-KERDI-DRAIN 25
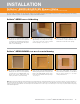
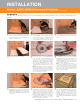
Remove the clamping ring from the installed
drain and save the bolts. Align the bolt pattern
of the clamping ring with the adaptor ring and
punch the matching inserts through the adaptor
ring.
1
Apply a continuous 1/4" - 3/8" (6 mm - 10 mm)
bead of KERDI-FIX to the installed drain flange.
Place the adaptor ring on the installed drain,
re-insert the bolts, and tighten evenly. Make
bolts finger-tight plus 1/4 turn; over tightening
may warp the ring and result in leaks.
2
Slide the adaptor flange into the adaptor ring
and ensure full support underneath with mortar
or the detachable center section of the foam
tray. Depending on the installed drain elevation,
it may be necessary to install KERDI-BOARD,
tile backerboard, water-resistant gypsum
backerboard, or similar prior to the tray to ensure
the desired height is achieved. Install the tray as
per the instructions on page 24.
Note: For the KERDI-DRAIN 7-1/2" Adapter
Kit, the extended adapter bonding flange may
be cut to length.
3
Clamping Ring Drain Installed: If a clamping ring drain is installed, replace with KERDI-DRAIN or convert using the KERDI-DRAIN adaptor kit.
Schluter
®
-KERDI-DRAIN with mortar bed
Note: The small, round holes in the outer edges of the KERDI-DRAIN flange are a result of the manufacturing process and are not meant to be used to screw the
flange into place.
Plumbing Access: If there is access to the plumbing from below and the waste line can be connected after installing KERDI-DRAIN, the drain can be installed in
conjunction with the mortar bed.
No Plumbing Access: When there is no access to the plumbing from below, KERDI-DRAIN is installed to the appropriate height and connected to the waste line
prior to the installation of the shower base.
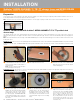
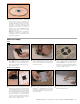
Measure and cut a section of pipe to connect KERDI-DRAIN to the odor trap using the foam spacers
included with the drain as a spacer. When installing KERDI-DRAIN over wood substrates, the minimum
thickness of mortar required at the perimeter of the bonding flange is 1" (25 mm). Prepare the odor trap, cut
section of pipe, and KERDI-DRAIN with cleaner, primer and ABS or PVC cement per the solvent cement
manufacturer’s instructions and connect.
Note: As soon as the mortar bed can be walked upon, waterproofing with the KERDI or KERDI-DS
membrane can begin.
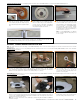
1
Pack loose mortar under the drain up to the inlet
hole to ensure solid and uniform support of the
bonding flange and level. The mortar bed is then
placed according to the instructions above.
2
Place a ring of loose mortar up to the inlet hole in the floor and firmly press the drain into the mortar
and level. The bonding flange must be fully supported to prevent damage to the tile assembly
(e.g., cracked grout around drain). When installing KERDI-DRAIN over wood substrates, the minimum
thickness of mortar required at the perimeter of the bonding flange is 1" (25 mm).
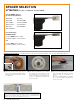
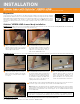
1
The screed is then placed flush with the top
of the bonding flange of the KERDI-DRAIN.
Slope the mortar bed at 1/4" (6 mm) per
12" (305 mm) using the bonding flange and a
perimeter screed as guides.
2
Note: Schluter
®
-Systems strongly recommends a leak test be performed on the connection between the
drain and the waste line prior to continuing with the remainder of the installation whenever possible. Refer
to local plumbing and/or building codes for any specific requirements in your area.