
Installation Guide

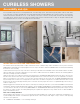

Waterproofing connections
The KERDI-SHOWER-LT/-LTS trays are provided with integrated waterproofing. When using a mortar bed, the shower base must be made waterproof using
the KERDI or KERDI-DS waterproofing membrane. The membranes can be installed as soon as the mortar bed can be walked upon.
Apply Schluter SET
®
, ALL-SET
®
, FAST-
SET
®
, or unmodified thin-set mortar
to the shower base with a 1/4" x 3/16"
(6 mm x 5 mm) V-notched trowel or the
KERDI-TROWEL. The thin-set mortar must
be mixed to a fairly fluid consistency, but still
able to hold a notch.
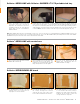
1
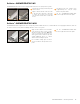
Embed KERDI or KERDI-DS in the bond
coat and work the membrane onto the entire
surface to ensure full coverage and remove
air pockets. The membrane is carried to the
stainless steel bonding flange and to the
edges of the shower base.
2
3
5
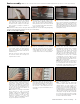
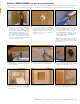
When using KERDI-BOARD-SC, seal the
curb to the base and walls using KERDI-
KERECK and KERDI-BAND.
When using KERDI-SHOWER-R, seal all
adjacent connections (e.g., between the
shower tray and ramp, etc.) using KERDI-
BAND centered over the joint with Schluter
SET
®
, ALL-SET
®
, FAST-SET
®
, or unmodified
thin-set mortar. Seams in the membrane are
constructed by overlapping the edges by 2"
(50 mm) or by abutting adjacent sheets and
installing KERDI-BAND centered over the
joint. Install KERDI-KERECK at all inside and
outside corners.
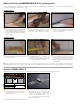
The KERDI collar on KERDI-LINE is integrated
with the adjoining waterproofing assembly
using Schluter SET
®
, ALL-SET
®
, FAST-SET
®
,
or unmodified thin-set mortar. The KERDI
collar must be cut and folded where the
KERDI-LINE is installed adjacent to walls.
4
Seams in the membrane are constructed by
overlapping the edges by 2" (50 mm) with
Schluter SET
®
, ALL-SET
®
, FAST-SET
®
, or
unmodified thin-set mortar or by abutting
adjacent sheets and installing KERDI-BAND
with unmodified thin-set mortar, centered
over the joint.
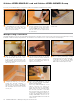
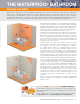
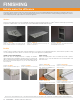
If necessary, cut the KERDI-BOARD-SC to length using a utility knife and KERDI-SHOWER-R using a handsaw.
1
Apply Schluter SET
®
, ALL-SET
®
, FAST-SET
®
,
or unmodified thin-set mortar to the floor
and to the edge of the shower base and
walls using a 1/4" x 3/8" (6 mm x 10 mm)
square- or U-notched trowel.
2
Press the curb or ramp firmly into place.
Check the underside of the curb or ramp
to ensure that full coverage and support
is achieved. Note: When setting tile on the
curb, the surface must be sloped towards
the shower drain.
Schluter
®
-KERDI-BOARD-SC curb and Schluter
®
-KERDI-SHOWER-R ramp
Note: KERDI-BOARD can be used to build
custom curbs.
32 INSTALLATION — Waterproofing the shower base