
Installation Guide
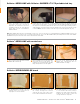
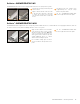

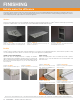

KERDI-BOARD can be mounted vertically
or horizontally on framing with appropriate
screws (e.g., coarse thread wood screw
for wood studs and self-tapping for metal
studs) and corresponding KERDI-BOARD-ZT
washers. Minimum board thickness = 1/2"
(12.5 mm) for studs spaced at 16" (40.6 cm)
o.c.; 3/4" (19 mm) for studs spaced at 24"
(61.0 cm) o.c. Screws must reach a depth of
at least 3/4" (20 mm) in wood studs and at
least 3/8" (10 mm) in metal studs.
1
Abut panels over the center of the studs
or other solid backing. Screws may be
placed between adjacent panels such that
the washers fasten both panel edges. The
maximum allowable on-center fastener
spacing is 12" (30 cm) for walls and
6" (15 cm) for ceilings.
2
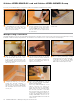
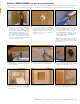
Place painter’s tape to protect the tub deck.
Apply Schluter SET
®
, ALL-SET
®
, FAST-
SET
®
, or unmodified thin-set mortar to
the KERDI-BOARD using a 1/4" x 3/16"
(6 mm x 5 mm) V-notched trowel or
the KERDI-TROWEL. Completely fill the
1/4" (6 mm)-wide gap between the
KERDI-BOARD and tub with KERDI-FIX or
other suitable sealant.
Note: When KERDI-BOARD is installed
above the tub flange, apply KERDI-FIX to
the tub flange and spread using a small
notched trowel.
3
Schluter
®
-KERDI-BOARD over wood or metal framing
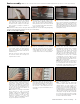
Apply KERDI-BAND waterproofing strips.
Solidly embed the membrane in the mortar
and KERDI-FIX to ensure full coverage and
remove air pockets.
4
KERDI-BOARD joints, corners, and fastener
penetrations are sealed with KERDI-BAND,
ensuring a minimum 2" (50 mm) overlap.
5
Any penetrations through the panel
(e.g., mixing valve, shower head, etc.)
must be sealed with KERDI-SEAL-PS/-MV,
KERDI-FIX, or other suitable sealant.
6
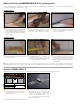
Seal connections to knee walls using KERDI-
KERECK-F preformed corners and Schluter
SET
®
, ALL-SET
®
, FAST-SET
®
, or unmodified
thin-set mortar.
7
Grab bars or other heavy objects must be anchored in the structure or solid blocking behind KERDI-BOARD. Installation instructions for other applications
of KERDI-BOARD (e.g. fully embedded or spot-bonded over solid backing) can be found in the 12.1 Schluter
®
-KERDI-BOARD technical data sheet.
Note: See page 23 for KERDI-BOARD-SN
shower niche installation instructions.
KERDI-SEAL-PS/-MV
Once all seams, corners, and knee walls
have been completely sealed, the assembly
is waterproofed and ready to be tiled.
8
INSTALLATION — Bathtub surround — Schluter
®
-KERDI-BOARD 37