
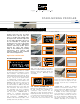
Use and Care Manual


3
STAIR-NOSING PROFILES
Material Properties and
Areas of Application
Schluter
®
stair-nosing profiles are resistant
to most chemicals encountered in tiled
environments. In special cases, the
suitability of a proposed type of material
must be verified based on the anticipated
chemical, mechanical, and/or other stresses.
Exceptions and special consider-ations are
listed below.
Stainless steel profiles are roll-formed,
resulting in a slightly different contour from
those made of extruded brass or aluminum.
Stainless steel can sustain high mechanical
stresses and is particularly well suited for
applications requiring resistance against
chemicals and acids; for example in the
food industry, breweries, dairies, commercial
kitchens, and hospitals, as well as in
residential applications. Typically, the profiles
are formed using stainless steel 304 (1.4031
= V2A). For more severe chemical exposure,
such as de-icing salts and chemicals used
in swimming pools, we recommend the use
of stainless steel 316 L (1.4404 = V4A),
which offers even higher corrosion resistance
than the 304. Even stainless steel cannot
withstand all chemical exposures, such as
hydrochloric acid, hydrofluoric acid or certain
chlorine, chloride, and brine concentrations.
Aluminum profiles must be tested to verify
their suitability if chemical stresses are
anticipated. Cementitious materials, in
conjunction with moisture, become alkaline.
Since aluminum is sensitive to alkaline
substances, exposure to the alkali (depending
on the concentration and duration of
exposure) may result in corrosion (aluminum
hydroxide formation). Therefore, it is important
to remove mortar or grout residue from visible
surfaces. In addition, ensure that the profile
is solidly embedded in the setting material
and that all cavities are filled to prevent the
collection of alkaline water.
Anodized aluminum profiles feature
an anodized layer that retains a uniform
appearance during normal use, but is not
color-stable in exterior applications. The
surface is susceptible to scratching and
wear and may be damaged by grout or
setting material. Therefore, these materials
must be removed immediately. Otherwise, the
description regarding aluminum applies.
Thermoplastic rubber inserts are highly
resistant to chemicals and can withstand
chemical stresses typically encountered in tiled
environments.
Mineral grain coated treads are resistant to
heavy mechanical stresses and can withstand
chemical stresses typically encountered in
tiled environments. They can be used for
interior and exterior applications, except for
the transparent tread that has limited UV
resistance and is intended for interior use only.
Cutting Profiles
Observe all safety instructions and
standards as directed by the cutting tool
manufacturer, including protective eyewear,
hearing protection, and gloves.
Always measure carefully and dry fit the
profiles, corners, and connectors to ensure
proper fit and alignment prior to setting tile.
Aluminum profiles may be cut using any of
the following options:
• Hacksaw with a bimetal blade and the
highest teeth per inch (TPI) available.
• Variable-Speed Angle Grinder set to
the lowest speed using the Schluter
®
-
PROCUT-TSM cutting wheel.
• Chop saw or Miter Saw with a non-
ferrous blade.
Regardless of the cutting tool used, remove
any burrs from the cut end of the profile
with a file or similar before installation.
Stainless steel profiles may be cut using
any of the following options:
• Variable-Speed Angle Grinder set to
the lowest speed using the Schluter
®
-
PROCUT-TSM cutting wheel.
• Band Saw with a metal cutting blade.
Regardless of the cutting tool used, remove
any burrs from the cut end of the profile
with a file or similar before installation.
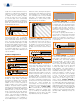
Installation
RONDEC-STEP and SCHIENE-STEP
1. Select the profile according to the tile
thickness and format and the sub-
assembly thickness.
2. Using a notched trowel, apply thin-set
mortar over the area where the trapezoid-
perforated anchoring leg will be placed.
3. Press the perforated anchoring leg of
profile into the thin-set mortar and align.
4. Trowel additional thin-set mortar over the
perforated anchoring leg to ensure full
coverage and support of the tile edges.
5. Solidly embed the tiles so that the tiled
surface is flush with the top of the
profile; the profile should not be higher
than the tiled surface, but rather up to
approximately 1/32" (1 mm) lower.
6. Set the tile to the integrated joint spacer,
which ensures a uniform joint of 1/16" –
1/8" (1.5 – 3 mm).
7. Fill the joint completely with grout or
setting material.
8. Work with materials and tools that will not
scratch or damage sensitive surfaces.
Setting materials must be removed
immediately, especially from aluminum.
Note: Matching corners are available for
RONDEC-STEP. Matching corners and
connectors are available for the stainless steel
version of SCHIENE-STEP only, depending
on the vertical leg length.
RONDEC-STEP corners are held in place
with thin-set mortar. Fill the ends of the profile
with thin-set mortar prior to inserting the
accessories.
SCHIENE-STEP corners and connectors are
installed using KERDI-FIX, silicone, or similar
adhesive. Prior to application, any contact-
inhibiting substances (e.g., grease, etc.) must
be removed. The accessories should overlap
the profiles by at least 3/8" (10 mm). The
accessories must be slid on the profiles
during profiles installation (cannot be placed
over the profiles after installation).
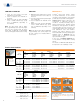
TREP-FL, TREP-SE/-S/-B, TREP-E
and TREP-G
1. Select profile size according to tile
thickness and format.
2. Install riser tile flush with the stair
tread surface.
3. Using a notched trowel, apply thin-set
mortar along edge area above riser.
4. Fill cavities on the underside of the profile
with thin-set mortar.
5. Press the trapezoid-perforated
anchoring leg of the profile into the thin-
set mortar, making sure the front edge of
the support section is aligned flush with
the riser tile (Exception: TREP-E, TREP-
FL and TREP-G are installed such that
the front edge of the profile overlaps the
riser tile). Full coverage must be obtained
at the edge area to ensure support of the
profile.
6. Trowel additional thin-set mortar over the
anchoring leg and the stair tread surface
to ensure full coverage and support of the
tile edges.
7. Solidly embed the tread tiles so that the
tiled surface is flush with the top of the
profile.
8. A joint of approx. 1/16" - 1/8" (1.5 -
3 mm) should be left between the tile and
the profile.
9. Fill joint completely with grout or
setting material.
Notes: When using TREP-TAP, apply
Schluter
®
-KERDI-FIX or similar adhesive
to the riser and insert the cover profile in
the support section of TREP-S/-B prior to
installing the stair-nosing profile. TREP-TAP
should not be used where it can extend past
the bottom of the riser.