
Installation Guide


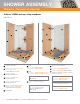


SHOWER ASSEMBLY — Schluter
®
-KERDI waterproofing membrane 7
Areas of Application
• Interior showers.
• Over wood or concrete subfloors. See the Base information under
Requirements (below) for details.
• Areas requiring disabled access/curbless applications; see detail K-SHBF on
page 12.
Limitations
• Certain glass tiles may not be compatible with bonded waterproof membranes
and/or may require special setting materials. Consult glass tile manufacturer
and Schluter
®
-Systems for more information.
• Certain moisture sensitive stones, e.g., green marble, or resin-backed
tiles may not be appropriate for use in wet areas such as showers
or may require special setting materials. Consult stone supplier and
Schluter
®
-Systems for more information.
• Do not use sawn lumber curbs on concrete subfloors subject to
moisture migration.
Requirements
• Plywood, OSB, or concrete subfloor must be clean, even, and load bearing.
• The structure must be designed and built to meet the building code
requirements applicable in your area. This may require the services of a
qualified design professional (e.g., architect, engineer, etc.).
• Solid backing – gypsum wallboard, cementitious backer unit, fiber-cement
backerboard, fiber-reinforced water-resistant gypsum backerboard, coated
glass mat water-resistant gypsum backerboard, Portland cement mortar,
concrete, or masonry.
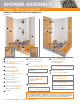
• Base – KERDI-SHOWER-T/-TS/-TT/-LT/-LTS or Portland cement mortar bed.
• Curb – KERDI-BOARD-SC, KERDI-BOARD, concrete, masonry block, or
sawn lumber sheathed with solid backing (see above).
• Bench – KERDI-BOARD-SB, KERDI-BOARD, concrete, masonry block, or
sawn lumber sheathed with solid backing (see above).
• KERDI-DRAIN/-LINE shall be properly supported.
• KERDI-DRAIN/-LINE shall be connected to the waste line; use ABS cement
for ABS drains, PVC cement for PVC drains, a no-hub coupling for stainless
steel drains with no-hub outlets, and thread sealing compound or tape for
stainless steel drains with threaded outlets.
• KERDI waterproofing membrane shall be installed up to the height of the
showerhead at minimum.
• In enclosed shower areas, install KERDI waterproofing membrane on all
surfaces, including the ceiling, door jambs and the door header.
• It is the specifier's responsibility to treat and address all penetrations through
the KERDI membrane or KERDI-BOARD (e.g., showerhead, mixing valve,
etc.) in the installation. All penetrations must be treated with KERDI-SEAL-
PS/-MV seals, KERDI-FIX or suitable sealant.
• When using the stainless steel KERDI-DRAIN bonding flange, use
KERDI-FIX to bond KERDI to the drain.
• All horizontal surfaces (e.g., benches, curbs, window sills, shelves, etc.) must
be sloped toward the shower drain.
Substrate Preparation
• Verify that subfloor panels and solid backing are properly fastened to framing
members.
• Any leveling of the subfloor must be done prior to installing
KERDI-SHOWER-T/-TS/-TT/-LT/-LTS/-R and KERDI-BOARD-SC/-SB.
Solid Backing Materials
• Gypsum wallboard – ASTM C1396/C1396M
• Cementitious backer unit – ANSI A118.9 or ASTM C1325
• Fiber-cement backerboard – ASTM C1288
• Fiber-reinforced water-resistant gypsum
backerboard – ASTM C1278
• Coated glass mat water-resistant gypsum backerboard – ASTM C1178
• Portland cement mortar – ANSI A108.1B
• Concrete
• Masonry
Setting and Grouting Materials
• Unmodified thin-set mortar – ANSI A118.1
• Grout – ANSI A118.3, A118.6, A118.7
Installation Specifications
• Solid backing panels – follow manufacturer’s instructions
• Portland cement mortar bed – ANSI A108.1B
• Tile – ANSI A108.5
• Grout – ANSI A108.6, A108.10
Other Considerations
• When KERDI-SHOWER-T/-TS/-TT/-LT/-LTS tray dimensions do not match
the dimensions of the shower compartment, the tray may be cut or extended
with dry pack mortar.
• When KERDI and tile are installed on the ceiling, the solid backing and
fasteners must be able to support the load of the tile and setting and grouting
materials.
• A water test is strongly recommended before setting tile to verify a successful
installation. Wait 24 hours minimum after the membrane installation is
complete to allow for final set of thin-set mortar and ensure waterproof
performance at seams and connections. Refer to local plumbing codes for
any specific requirements in your area.
• Schluter
®
-Systems profiles may be used to finish and protect outside corners
and eliminate the use of sealant at inside corners; see page 40.
• Schluter
®
-SHOWERPROFILE-S/-R profiles eliminate the need for cutting
wedges of tile by covering the exposed wall area where the floor slopes to
KERDI-LINE.
• Schluter
®
-SHELF-E/-W/-N are alternatives to tiled shelves that can be easily
installed on walls and in corners and niches; see page 40
• Where a waterproof floor adjacent to the shower is desired, DITRA or DITRA-
HEAT uncoupling membranes shall be installed. Floor/wall connections shall
be sealed with KERDI-BAND.
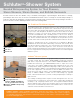
Showers – Ceramic or stone tile
K-SH-K-23
Schluter
®
-KERDI waterproofing membrane