
Use and Care Manual

2
RESILIENT SURFACE COVERING PROFILES
2
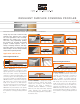
Stair-nosing
Schluter
®
-VINPRO-STEP is a finishing
and edging profile for resilient floor covering
(e.g. LVT) installations on stairs. The profile is
available in anodized aluminum. VINPRO-STEP
features a tapered anchoring leg, with unique
holes spaced evenly along the length of the
profile for use with fasteners. The anchoring
leg can also be bonded to the substrate using
adhesive such as Schluter-KERDI-FIX. The
profile features a 1/4" (6 mm) wide sloped top
flange to hide the cut edge of the resilient floor
covering, providing a finished look. The top
flange is grooved to add slip resistance to the
horizontal surface. The vertical leg covers the
edge of the subassembly and top of the riser.
Schluter
®
-VINPRO-RO is a finishing and
edging profile for resilient covering (e.g. LVT)
installations on stairs and outside wall corners.
The profile is available in anodized aluminum.
VINPRO-RO features a tapered anchoring
leg, with unique holes spaced evenly along
the length of the profile for use with fasteners.
The anchoring leg can also be bonded to the
substrate using adhesive such as Schluter-
KERDI-FIX. The top of the profile features a
symmetrically rounded edge with 1/4" (6 mm)
radius. The profile extends in both directions
to hide the exposed edge of the resilient
surface and the subassembly.
Material Properties and Areas of
Application
Schluter profiles are resistant to most
chemicals encountered in resilient flooring
surface environments. In special cases, the
suitability of a proposed type of material must
be verified based on the anticipated chemical,
mechanical, and/or other stresses. Exception
and special considerations are listed below.
Aluminum profiles must be tested to
verify their suitability if chemical stresses
are anticipated. Aluminum is sensitive to
alkaline substances and exposure to the
alkali (depending on the concentration and
duration of exposure) may result in corrosion
(aluminum hydroxide formation). Therefore,
it is important to remove adhesive, grout, or
cementitious residue from visible surfaces
promptly.
Anodized Aluminum profiles feature
an anodized layer that retains a uniform
appearance during normal use, but is not
color-stable in exterior applications. The
surface is susceptible to scratching and
wear and may be damaged by grout or
setting material. Therefore, these materials
must be removed immediately. Otherwise, the
description regarding aluminum applies.
Cutting Profiles
Observe all safety instructions and standards
as directed by the cutting tool manufacturer,
including protective eyewear, hearing
protection, and gloves. Always measure
carefully and dry fit the profiles to ensure
proper fit and alignment prior to setting the
resilient covering.
Aluminum profiles may be cut using any of the
following options:
• Hacksaw with a bimetal blade and the
highest teeth per inch (TPI) available
• Variable-Speed Angle Grinder set to
the lowest speed using the Schluter-
PROCUT-TSM cutting wheel
• Chop saw or Miter Saw with a non-ferrous
blade
Regardless of the cutting tool used, remove
any burrs from the cut end of the profile with
a file or similar before installation.
Installation
VINPRO-S, VINPRO-U, VINPRO-STEP,
and VINPRO-RO
1. Select the profile according to resilient
covering thickness and format. It is
recommended to choose a profile height
up to a 0.5 mm greater than the covering
thickness.
2. Place the profile in its desired position,
and mark the edges of the profile onto the
substrate.
3.
a. Adhesive Installation
Apply Schluter KERDI-FIX or an
equivalent adhesive to the backside
of the anchoring leg, according to the
manufacturer's installation instructions.
Press the anchoring leg onto the
substrate, and align to the desired
position. Be sure to remove any excess
adhesive promptly.
b. Fastened Installation
Align the profile in the desired position
and fasten to the substrate through
the holes in the anchoring leg.
Recommended screw: #6 / M3.5 flat
head screws, minimum length - 3/4"
(19 mm). Be sure to install the fasteners
so that the screw head is flush with
the anchoring leg surface, preventing it
from transferring through to the finished
surface.
For concrete substrates: The use of
anchors is recommended. First, place
the profile in its desired position and
mark the hole locations onto the
substrate. Next, drill pilot holes at the
marked locations and install the anchors
according to the manufacturer's
instructions. Be sure that the anchor
size is suitable for the selected fastener
prior to the installation.
4. A patching/leveling compound can be
used to eliminate inconsistencies in the
floor and anchoring leg if required. Please
refer to the patching/leveling compound
manufacturer's installation instructions.
5. Install resilient surface covering according
to the manufacturer's installation
instructions, with recommended edge
spacing. Be sure to cut the adjacent
surface covering accordingly to fit within
the pocket of the profile.
6. When installing with adhesives or grouting
materials, remove any residue from the
visible surface of the profile quickly.
VINPRO-T
1. To ensure proper support of the lateral
crosspiece, ensure the joint width is less
than 1/2" (12.5 mm).
2. The joint cavity must be at least 1/8" (3
mm) deep and free of debris. Substances
that inhibit adhesion must be removed
from the sides of the joint.
3. Fill the joint with elastomeric sealant such
as Schluter-KERDI-FIX or similar. Insert
the vertical leg of VINPRO-T in the joint so