
User guide


Installin
g
and Confi
g
urin
g
the Module
840 USE 115 00 Version 1.0
19
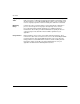
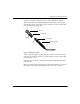
Turn the lockin
g
rin
g
to ali
g
n an arrow with the ke
y
. Then ali
g
n the ke
y
with the
ke
y
wa
y
. As a result, the lockin
g
tab,
g
roove and lock should also be ali
g
ned.
Slide the clasp up to the lockin
g
rin
g
. Grippin
g
the cable with the clasp, plu
g
the
cable into the lower
(
receive
)
cable connector. If it does not connect easil
y
, reali
g
n
the ke
y
with the arrow and tr
y
a
g
ain.
Turn the cable to the ri
g
ht, so that the tab locks securel
y
. You ma
y
leave the fiber
cable clasp on the cable for future use, but slide it off the boot of the cable to allow
the module door to close.
Repeat this process with the remainin
g
strand of cable and the upper
(
transmit
)
cable connector.
When connectin
g
the cable to the hub, make sure that the strands are crossed. The
transmit port of one device should be linked to the receive port of the other.
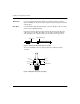
Figure 13 Attaching the Cable
Lockin
g
Tab
Lockin
g
Rin
g
Fiber Cable Clasp
Keyway
Connector
Key