
Installation Guide


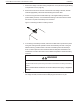
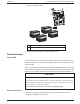
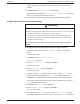

Table Of Contents
- Audience
- Safety Information
- Introduction
- Installation
- Troubleshooting
- Specifications

1. Remove the charge controller’s wiring compartment cover (see Removing the Wiring
Compartment Cover on page 26).
2. Remove a knockout from the back or either side of the charge controller, and then
install an appropriately-sized strain relief bushing for the BTS cable.
3. Connect the ring terminal on the BTS directly to the negative battery terminal or
positive battery terminal, or use the adhesive backing on the sensor back to attach
the sensor to any side of the battery to be monitored.
Figure 15Attaching the BTSto a battery terminal
4. If connecting to the battery terminal, make sure the BTS does not prevent the power
wiring from making the best possible contact with the battery terminal. If using the
adhesive backing, install the BTS on the side of the battery below the electrolyte
level. It is best to place the sensor between batteries and place the batteries in an
insulated box to reduce the influence of the ambient temperature outside the battery
enclosure.
WARNING
HAZARD OF ELECTRIC SHOCK
The BTS cable must not pass through the same conduit used for PV wiring and battery
cables.
Failure to follow these instructions can result in death, serious injury, or equipment
damage.
5. Pass the other end of the BTS cable through the knockout and strain relief bushing on
the charge controller, and then insert the BTS plug into the BTS RJ-11 port.
Conext MPPT 80 and MPPT 100 Installation Guide Installation
43 This document is for use by qualified personnel 990-91319