
Installation Guide


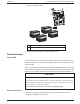

Table Of Contents
- Audience
- Safety Information
- Introduction
- Installation
- Troubleshooting
- Specifications

which you want to copy. Scroll to select the charge controller with the device number
that matches the first charge controller you configured, and then press Enter again.
The settings are automatically copied from the selected charge controller.
NOTE: The Copy from command will not give you any indication that it has
completed its task. To check that the charger settings have been copied properly,
view some of the settings you originally configured.
4. Repeat steps 1 to 3 for the remaining charge controllers.
5. After you have finished configuring, press the Enter, up arrow, and down arrow
buttons simultaneously to hide the Advanced Settings menu item.
Starting the Charge Controller
To start the charge controller:
1. Turn on the charge controller battery breaker.
2. Close the PV array disconnect switch.
If the PV array voltage exceeds the minimum start voltage, the charge controller begins
charging and the On/Charging LED starts flashing.
If the PV array voltage is not above the start voltage, the charge controller is powered but
not charging. The On/Charging LED stays solid green.
Installation Conext MPPT 80 and MPPT 100 Installation Guide
990-91319 This document is for use by qualified personnel 48