
Installation manual


Commissioning
4–2 975-0601-01-01 Revision B
This chapter is for use by qualified personnel and authorized service personnel only.
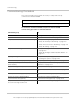
Commissioning Procedure
This section provides the procedure necessary to safely and correctly
commission the Xantrex GT500.
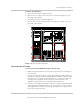
To commission the Xantrex GT500, complete the Xantrex GT500
commissioning procedure as summarized below.
NOTICE
It is important to record any issues encountered while following this procedure.
Commissioning Step See
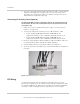
Record the serial number and location. “Starting the Commissioning Test” on page 4–3.
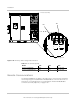
Inspect the Xantrex GT500. “Inspect the Xantrex GT500” on page 4–3.
Verify AC, throat connection kit, and DC wiring. • “Verify AC Wiring” on page 4–3.
• “Verify AC Auxiliary Power Wiring” on page 4–3.
• “Verify Throat Connection Kit Wiring” on page 4–4.
• “Verify DC Wiring” on page 4–5.
Verify AC and DC voltages. • “Verify AC Voltages and Re-install the AC Barriers”
on page 4–5.
• “Verify DC Voltages and Re-install DC Barrier” on
page 4–7.
Apply grid voltage. • “System Startup” on page 4–9.
• “Starting the System” on page 4–10.
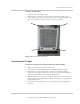
Check the front panel display and keypad. “Verify Display and Keypad Operation” on page 4–10.
Confirm operational parameters (AC, DC, and
power tracker).
“Verify AC, DC, and Power Tracking Operational
Parameters” on page 4–11.
Apply DC voltage, and operate inverter. “Operate Inverter” on page 4–12.
Perform automatic disconnection test. “Perform Automatic Disconnection Test” on page 4–
13.
Revise protection settings (if required). “Revise Protection Settings (If Required)” on page 4–
13.
Activate the Xantrex RS485/Modbus
Communications Kit (optional).
“Activating the Xantrex RS485/Modbus
Communications Kit (Optional)” on page 4–13.
Complete the commissioning, and then submit
the Commissioning Test Record.
“Complete Commissioning” on page 4–14.