
Schneider Electric XW-MPPT-60 User Manual


Installation
2–18 975-0400-01-01 Revision H
This manual is for use by qualified personnel only.
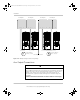
Connecting the Charge Controller
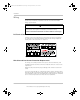
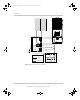
The following procedure is illustrated in Figure 2-10.
To connect the solar charge controller:
1. Ensure the PV array disconnect and battery disconnect are turned off.
2. Ground the solar charge controller. Connect a grounding conductor between
an solar charge controller ground lug and the system ground (as shown in
Figure 2-10).
3. Connect the PV array negative (–) output to the solar charge controller terminal
marked
PV
–.
4. Connect the PV array’s positive (+) output to the PV array disconnect.
5. Route another positive (+) cable from the other end of the PV disconnect to
the solar charge controller terminal marked
PV +.
6. Connect the negative (–) battery cable to the solar charge controller terminal
marked
BAT
–.
7. Connect a positive (+) cable from the solar charge controller terminal marked
BAT + to the battery disconnect.
WARNING
ELECTRIC SHOCK HAZARD
The PV array will produce a hazardous voltage with even a small amount of
light. Appropriate measures must be taken to prevent electric shock.
If the PV-GFP is enabled, do not connect the battery negative to ground.
Bonding the battery negative to ground disables the unit’s internal PV ground-
fault protection. For more information, see “Grounding” on page 2–9. See
Figure 2-10 for correct routing of the battery negative.
Failure to follow these instructions can result in death or serious injury.
NOTICE
EQUIPMENT DAMAGE
Do not connect the PV negative and battery negative terminals together
anywhere in the system, including the XW Power Distribution Panel or other
DC disconnect. The PV negative and battery negative must be connected to
separate terminals as marked on the unit.
Failure to follow these instructions can damage the equipment.
975-0400-01-01_Rev-H(XW-MPPT60-150).book Page 18 Thursday, November 23, 2017 11:48 AM