MANUAL DE INSTRUCCIONES CHROMIA 32AZJ1 PVR / CHROMIA 39AZJ1 FHD PVR Por favor, lea estas instrucciones antes de poner en marcha el televisor y consérvelas por si necesitase consultarlas más adelante.
PRECAUCIONES • • • • • • • • • • • • • • • • • • Lea detalladamente y conserve estas instrucciones para su futura referencia. Preste atención a todas las advertencias. Siga todas las instrucciones. Este aparato ha sido fabricado según la CLASE II No utilice el aparato cerca del agua, el aparato no debe exponerse a goteos ni salpicaduras, y no se podrán colocar sobre el aparato objetos que contengan líquidos, como jarrones. Limpie el aparato únicamente con un paño seco.
• • • • • • • • Las imágenes estáticas durante un periodo prolongado pueden ocasionar daños permanentes en la pantalla. Asegúrese de no visualizar imágenes estáticas en el televisor LED durante más de dos horas, ya que podría ocurrir que apareciesen restos de las imágenes, lo cual se denomina pantalla con imágenes "quemadas". Para evitar la aparición de dichos restos de imágenes, por favor reduzca el "contraste" y el "brillo" de la pantalla cuando visualice imágenes estáticas.
• • Mover el televisor con ambas manos. Colocar el televisor sobre una superficie estable y lisa, dejando un espacio de al menos 10 cm alrededor de él y de 30 cm desde la parte superior del televisor hasta la pared o el mueble. Asegúrese de que el televisor esté colocado cerca de la pared para evitar que se caiga cuando lo mueva. • Para evitar que el televisor se vuelque, la base incorpora un orificio para atornillar el televisor a la mesa.
ÍNDICE 1. Conexión y preparación del televisor ............................................2 1.1 Accesorios.................................................................................2 1.2 Instalación del pie .....................................................................2 1.3 Instalación del kit de montaje mural (opcional) .........................2 1.4 Teclas e interfaces.................................................................... 3 1.5 Mando a distancia ...............................
TV LED EN COLOR 1. Conexión y preparación del televisor 1.1 Accesorios * Manual de usuario x 1 * Mando a distancia x 1 * Batería (UM‐4/R03P/AAA) x 2 1.2 Instalación de la peana: V shape+glass V shape+glass 32" 39" 1. Coloque el televisor con el panel frontal orientado hacia el paño sueve o almohadilla sobre una mesa. 2. Coloque primero la pegatina de PVC en el eje giratorio. 3. Introduzca el pie en el orificio inferior del televisor. 4.
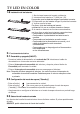
TV LED EN COLOR 1.4 Teclas e interfaces El diseño y las especificaciones se basan en productos reales estándar. MENU CH+ CHVOL+ VOLSOURCE POWER 1. Ventana del sensor remoto 2. Indicador de corriente 3. Altavoz 4. Interruptor de encendido 5. Tecla de menú 6. Tecla para avanzar el canal ("+") 7. Tecla para retroceder el canal ("-") 8. Tecla para subir el volumen ("+") 9. Tecla para bajar el volumen ("-") 10. Tecla de fuente 11. Tecla de modo de espera ("Standby") 12.
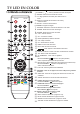
TV LED EN COLOR 1.5 Mando a distancia 1. STANDBY ( ): Activa y desactiva el modo de espera. 2. SOURCE: Selecciona la fuente de la señal. 3. 0~9: Siga pulsando las teclas para seleccionar un STANDBY SOURCE FREEZE P.MODE S.MODE TV/RADIO EXIT canal. DISPLAY: Visualiza la información del vídeo y audio actuales. 5. RECALL: Vuelve al canal anterior. 6. FREEZE: Congela la imagen. 4. 7. TV/RADIO: Selecciona el modo de televisión o de radio. 8. P.MODE: Selecciona el modo de imagen. 9. S.
TV LED EN COLOR 1.6 Instalación de las baterías 1. Abra la tapa trasera del mando a distancia. 2. Introduzca dos baterías nº7 (AAA) de 1,5V. Compruebe que las baterías tengan la polaridad correcta. 3.Compruebe que las bateías tengan la polaridad correcta. 4. Vuelva a poner la tapa. Por favor, quite las baterías del mando a distancia si lo no va a utilizar durante un tiempo. Si el mando a distancia no funciona correctamente, por favor lleve a cabo las siguientes comprobaciones.
TV LED EN COLOR DTV ATV AV SCART YPbPr MultiMedia PC HDMI2 HDMI3 HDMI1 Cuando seleccione la fuente de la señal, la pantalla mostrará la información correspondiente. Modo televisor 1 _ _:_ _ TV PAL DK Mono Cuando no hay señal de la fuente seleccionada, el mensaje de aviso que visualizará será el recogido en la imagen. Puede cambiar el canal del televisor o pulsar el botón SOURCE para cambiar la fuente. Sin señal 2.
TV LED EN COLOR 2.5 Instalación automática Si encienden por vez primera el televisor y no hay ningún canal guardado en la memoria del televisor, aparecerá el menú "Instalación automática" en la pantalla.
TV LED EN COLOR 2.6 Funciones del menú 2.6.1Menú IMAGEN Este capítulo describirá la función Imagen en el menú principal. 1.1 Menú Imagen Se abrirá el menú principal al pulsar el botón “MENU” en el mando a distancia. El foco se desplazará a los elementos incluidos en el menú Imagen al pulsar el botón "RIGHT" y, de este modo, se podrán configurar las funciones de Imagen.
TV LED EN COLOR 2.6.2 Menú AUDIO Este capítulo describirá la función Audio en el menú principal. 2.1 Menú Audio Se abrirá el menú principal al pulsar el botón “MENU” y, a continuación, al pulsa el botón "abajo" en el mando a distancia. El foco se desplazará a los elementos incluidos en el menú Audio al pulsar el botón "RIGHT" y, de este modo, se podrán configurar las funciones de Audio.
TV LED EN COLOR 2.6.3 Canales de TV 3.
TV LED EN COLOR 3.2.1.1 Eliminar/Omitir/Bloquear canales 1) Pulse la tecla “UP (▲)” y “DOWN (▼)” para seleccionar los canales que desea eliminar y después pulse la tecla de color "ROJO, "VERDE" o "AMARILLO" para marcarlos de la siguiente forma: 2) Después de marcarlos, pulse la tecla "MENU" para guardar los resultados. 3.2.1.2 Intercambiar canales Seleccione el programa que desee cambiar de posición y pulse la tecla "AZUL", el programa seleccionado parpadeará.
TV LED EN COLOR 3.2.3 País 1) Seleccionar el país. 3.2.4 Búsqueda automática 3.2.4.1 Modo de señal digital Seleccione el elemento "Búsqueda automática" para entrar en la interfaz de usuario de búsqueda automática del siguiente modo: Modo "Todo": seleccione el elemento "Todo" para explorar todos los canales digitales transmitidos por el modo de señal actual y, a continuación, cambie a la exploración automática de todos los canales analógicos del país seleccionado.
TV LED EN COLOR 3.2.5 Búsqueda manual de canales digitales 3.2.5.1 Modo de señal digital Seleccione la opción "Búsqueda manual de canales digitales" para entrar en la búsqueda manuales de canales en el origen DTV y la interfaz del usuario que tendrá el siguiente aspecto: Seleccione el número de canal con la tecla "DERECHA" o introduciendo el número directamente. La potencia y la calidad de la señal se muestran en la parte inferior.
TV LED EN COLOR Introduzca estos parámetros y, a continuación, seleccione la opción "Buscar" para entrar en la sintonización de canales analógicos. Se abre un cuadro de diálogo en la parte inferior izquierda: Pulse “Izquierda(◄)” para realizar una búsqueda de canales en la frecuencia inferior y “Derecha(►)” para realizar una búsqueda de canales en la frecuencia superior.
TV LED EN COLOR 2.6.4 Descripción de las funciones 4.1 Bloqueo La subpágina Bloqueo incluye tres secciones: Bloqueo de canales, Bloqueo parental y Cambio del código PIN, tal y como se muestra en la siguiente imagen. 1) Las operaciones del menú Bloqueo se muestran en la siguiente tabla: Opción LockChannel Valor On: activa el bloqueo de canales. El usuario necesita introducir una contraseña para ver los canales bloqueados.
TV LED EN COLOR 2.6.5 Menú Configuración 5.
TV LED EN COLOR 2.7 Uso de la función de Teletexto (opcional) Nota: Cuando pulse las teclas de la función del Teletexto del mando a distancia, si en la pantalla se visualiza "NO HAY TTX", esto quiere decir que la función relacionada no puede utilizarse. El Teletexto es un servicio gratuito que ofrece la mayoría de los canales de televisión que ofrece noticias informativas de actualidad, el tiempo, programas de televisión, información bursátil, subtítulos, y muchas otras secciones.
TV LED EN COLOR Reveal Pulse este botón una vez para visualizar la información oculta como, por ejemplo, la solución de adivinanzas, puzles o una prueba. * Vuelva a pulsar este botón para ocultar las respuestas que han aparecido. * Mix * Púlselo repetidamente para activar el Teletexto Mezcla de Teletexto con el programa de televisión Modo Teletexto.
TV LED EN COLOR 2.8.2 USB remoto TXT EPG TIMESHIFT 1. : Pulse una vez para pausarlo, vuelva a pulsarlo para reproducir. 2. : Detiene la reproducción y vuelve a la lista de archivos. FAV.LIST SUBTITLE AUDIO RECORD MIX INDEX SIZE CANCEL HOLD REVEAL SUBPAGE 2.8.3 Función USB 3. : Pulse los botones para buscar visualmente hacia atrás a una velocidad de x2, x4, x8 y x16. 4. : Avance rápido. 5.
TV LED EN COLOR 1.2.1 Reproducción Pulse la tecla "PLAY" para iniciar la reproducción. Acciones de las teclas 1) : Igual que la tecla "PLAY" del mando a distancia, para empezar a reproducir imágenes en el modo de diapositivas 2) Igual que la tecla "PAUSE" del mando a distancia, para pausar el archivo que se está reproduciendo. 3) : Igual que la tecla "STOP" del mando a distancia, para detener la muestra de las diapositivas y volver al explorador de archivos.
TV LED EN COLOR 2. Música 2.1Formato admitido MUSIC File Exit Audio .mp3 MP3 .wma WMA .m4a/.aac AAC 2.2Introducción de las funciones Marque el elemento "MÚSICA" en el menú principal de multimedia pulsando la tecla "DERECHA" / "IZQUIERDA", a continuación, pulse la tecla "ENTER" para entrar en la página música, que tendrá el siguiente aspecto: Acciones de las teclas 1) RED: Eliminar la carpeta/archivo resaltado.
TV LED EN COLOR 3 Introducción de las funciones Marque el elemento "PELÍCULA" en el menú principal de multimedia pulsando la tecla "DERECHA" / "IZQUIERDA", a continuación, pulse la tecla "ENTER" para entrar en la página de película, que tendrá el siguiente aspecto: Acciones de las teclas 1) RED: 2) GREEN: Eliminar la carpeta/archivo resaltado. Añadir/eliminar todos los archivos de fotos en/de la lista de reproducción.
TV LED EN COLOR 4 eBook 4.1 Formato admitido Solo se admite el formato .txt para eBook. 4.2 Introducción de las funciones Marque el elemento "eBook" en el menú principal multimedia pulsando la tecla "DERECHA" / "IZQUIERDA", a continuación, pulse la tecla "ENTER" para entrar en la página eBook, que tendrá el siguiente aspecto: Acciones de las teclas 1) RED: Eliminar la carpeta/archivo resaltado.
TV LED EN COLOR 3.
TV LED EN COLOR 4. Modos de señales compatibles A. Modo VGA Resolución 640 x 480 800 x 600 1.024 x 768 Frecuencia horizontal (KHz) 31,50 35,16 37,90 48,40 Frecuencia vertical (Hz) 60,00 56,25 60,00 60,00 Nota: Le aconsejamos que utilice un cable de conexión VGA de no más de 5 metros para garantizar una calidad adecuada de las imágenes. B. Modo YPbPr Resolución 480i 480p (720x480) 576i 576p (720x576) 720p (1.280x720) 1080i C. 1080P (1.920x1.
TV LED EN COLOR 5. Detección y resolución sencilla de problemas Si la pantalla falla o la calidad cambia de manera drástica, verifique la pantalla de acuerdo con las siguientes instrucciones. Recuerde comprobar los periféricos para determinar el origen del fallo. Síntoma Solución No se enciende el aparato (el - Compruebe que ambos extremos del cable de alimentación indicador de la corriente no están bien enchufados en el enchufe y que el enchufe de la se ilumina).
Todas las informaciones contenidas en este manual de usuario (imágenes incluidas) son de mera referencia y pueden verse sujetos a errores tipográficos o de otra índole que podrían hacerlas diferir del producto real.
PRECAUTION 1. 2. 3. 4. 5. 6. Read these instructions. Keep these instructions. Heed all warnings. Follow all instructions. This apparatus with CLASS construction . Do not use this apparatus near water, the apparatus shall not be exposed to dripping or splashing and that no objects filled with liquids, such as vases, shall be placed on the apparatus. 7. Clean only with dry cloth. 8. Do not install this apparatus in windtight places such as the wall-unit. Do not block any ventilation openings. 9.
CAUTION Danger of explosion if battery is incorrectly replaced. Replace only with the same or equivalent type. Batteries shall not be exposed to excessive heat such as sunshine, fire or the like. Used batteries should not be thrown into the garbage can, please leave them at an appropriate depot. CAUTION Where the MAINS plug or an appliance coupler is used as the disconnect device, the disconnect device shall remain readily operable.
IMPORTANT INFORMATION If a television is not positioned in a sufficiently stable location, it can be potentially hazardous due to falling. Many injuries, particularly to children, can be avoided by taking simple precautions such as: ● Using cabinets or stands recommended by the manufacturer of the television. ● Only using furniture that can safely support the television. ● Ensuring the television is not overhanging the edge of the supporting furniture.
● Place the TV on a firm and flat surface,leaving a space of at lease 10cm around the set and 30cm from the top of the set to the wall or cabinet.Ensure the TV is positioned close to the wall to avoid it falling when pushed. ● To avoid the TV overturning,when installed,it must with screw through screw hole on the base for fixing TV on the desk Screw hole Top view ● When you turning the TV set,do not hold the top side of the TV set ,you should hold the bottom side .
CONTENTS 1. Connection and Preparation of TV............................................. 2 1.1 Accessories ......................................................................... 2 1.2 Installation of Stand............................................................. 2 1.3 Installation of Wall Mount Kit(Optional)................................ 2 1.4 Keys and Interfaces............................................................. 3 1.5 Remote Control......................................................
LE D COLOR TV V shape+glass V shape+glass 32" 39"
LE D COLOR TV 1.4 Keys and Interfaces The design and specification takes actual products as the standard MENU 1. Remote sensor window 2. Power indicator 3. Speaker 4. Power switch 5. Menu key 6. Program “+” key 7. Program “-” key 8. Volume “+” key 9. Volume “-” key 10. Source key 11. Standby key 12. Power plug input 13.EARPHONE output 14.HDMI1 input 15.HDMI2 input 16.HDMI3 input 17. SCART input 18.RF input 19.COAXIAL 20.Mini AV input 21.CI input 22.Mini YPbPr input 23.PC(VGA) input 24.PC AUDIO input 25.
LE D COLOR TV 1.5 Remote Control STANDBY SOURCE FREEZE P.MODE S.MODE TV/RADIO EXIT TXT TIMESHIFT EPG FAV.LIST SUBTITLE AUDIO RECORD MIX INDEX SIZE CANCEL HOLD REVEAL SUBPAGE 1. STANDBY( ): Standby turn on and off. 2. SOURCE: Select the signal source. 3. 0~9: Continue to press the keys to select a channel. 4. DISPLAY: Display the information of current video and audio. 5. RECALL: Return to previous channel. 6. FREEZE: Freeze the picture. 7. TV/RADIO:Select the TV or Radio mode. 8. P.
LE D COLOR TV 1.6 Installation of Batteries 1. Open the back lid of the remote control. 2. Install two 7#(AAA)1.5V batteries. Ensure the correct polarity of the batteries. 3. Cover the back lid. Please take out of the batteries from the remote control for long time of no use. If the remote control doesn't work properly, please carry out the following checks. - Check the TV is turned on. - Check the polarity of the batteries are correct. - Check the batteries are not drained.
LE D COLOR TV DTV ATV AV SCART YPbPr Media PC HDMI3 HDMI2 HDMI1 When selecting the signal source, the screen will display the information. TV mode 1 TV _ _:_ _ PAL DK Mono When there is no signal from the selected source, the warning message will be displayed as per illustration. Either change the channel in TV mode or press SOURCE button to change source. No Signal 2.
LE D COLOR TV 2.5 Auto Installation If this is the first time you are turning on the TV and there are no programs in the TV memory, the “Auto Installation” menu will appear on the screen.
LE D COLOR TV 2.6 Menu Functions 2.6.1 PICTURE Menu This chapter will describe the function of Picture in mainmenu. 1.1Picture Menu It will open the mainmenu by pressing down the button “MENU” on the remote. The focus will move to the sub items in the Picture menu by pressing down the button “RIGHT” and then functions in the Picture can be set.
LE D COLOR TV 2.6.2 Sound Menu This chapter will describe the function of Sound in mainmenu. 2.1Sound Menu It will open the mainmenu by pressing down the button “MENU” and then press the button “down” on the remote. The focus will move to the sub items in the Sound menu by pressing down the button “RIGHT” and then functions in the Sound can be set.
LE D COLOR TV 2.6.3 TV Channel 3.1Channel User Interface Press “Menu” “Down(▼)” “Down(▼)” “Right(►)” to enter channel operation user interface in ATV/DTV/Radio Source as follows: There are following functions in this page: Channel Management: To manage (Delete//Swap/Lock/Skip) all channels; Favorite Management: To manage (Add/Delete) Favorite channels; Country: To select country.
LE D COLOR TV 3.2.1.1Delet/Skip/Lock Channel 1) Press “UP (▲)” and “DOWN (▼)” key to select the programs to be deleted and press “RED”, “GREEN” or “YELLOW” key to mark them as following: 2) After marking press “MENU” key to save the result. 3.2.1.2Swap Channel Select the program to be swapped and press “BLUE” key, the selected program will wink and them select another program and press “BLUE” key to swap them. 3.2.
LE D COLOR TV 3.2.3Country 1) Select the country. 3.2.4Auto Search 3.2.4.1 Air signal mode Select “Auto Search” item to enter auto search user operation interface as following: All Mode: Select “All” item to scan all digital channels carried by current signal mode firstly and then switch to scan all analog channels in selected country automatically.
LE D COLOR TV 3.2.5Digital Manual Search 3.2.5.1 Air signal mode Select “Digital Manual Search” item to enter air channel manual search in DTV source and the user operation interface as following: Select channel number by “RIGHT” key or entering number directly. The strength and the quality shows at the bottom. Press “ENTER” key on “Start” item to start current channel search. The manual searching UI and the auto searching UI are the same. 3.2.
LE D COLOR TV Enter these parameters and then select “Search” item to enter analog channel tune. A dialog popup on left bottom: Press “Left(◄)” to search channel carried in lower frequency and “Right(►)” key to search channel carried in higher frequency. Press “MENU” key to return to “Channel-Analogue Manual Search” page and press “RED” key to save the scanned channel to database. User also can select “Fine Tune” item to fine tune current channel and the UI shows as the last picture.
LE D COLOR TV 2.6.4 Function Description 4.1Lock The Lock sub page includes three parts:Lock Channel,Parental Lock,Change Pin Code as shown in the following picture. (Hotel Mode is Optional) 1) Operations in Lock Menu are shown in the following table Option Lock Channel Value On: turn on Lock Channel. User need to enter password to watch the channels which are locked. Also need to enter password when user tries to change settings in items like “reset system”/”reset database” etc.
LE D COLOR TV 2.6.5 Setup Menu 5.
LE D COLOR TV 2.7 Using the Teletext Function (Optional) Note: When pressing the Teletext function keys on the remote control, if the word “NO TTX” is displayed onscreen, it means the related function can’t be used. Teletext is a free service broadcast by most TV stations which give up-to-theminute information news,weather,television programs, share price,subtitles,and many other topics. To operate TELETEXT ※ Select a TV station on which Teletext is being transmitted.
LE D COLOR TV Reveal ※ Press this button once to display concealed information,such as solutions of riddles,puzzles or a quiz. ※ Press this button again to conceal the revealed answers. Mix ※ Press repeatedly to turn on Teletext Teletext blending with TV program Teletext mode. Size ※ Press repeatedly to double the character size in the following order:Upper half of the page, Lower half of the page, Return to normal size. SUBPAGE ※ Press this button to enter the sub page mode.
LE D COLOR TV 2.8.2 USB Remote 1. 2. TXT EPG TIMESHIFT FAV.LIST SUBTITLE AUDIO RECORD MIX INDEX SIZE CANCEL HOLD REVEAL SUBPAGE : Press one time to pause,press again to playback. : Stop the playback and return to flelist. 3. : Press the buttons to visually search backward at 2X - 4X - 8X - 16X speed. 4. : Skipforward. 5. : press the buttons to visually search forward at 2X - 4X - 8X - 16X speed. 6. : Skipbackward. 2.8.3 USB Function . Multimedia 1. Photo 1.
LE D COLOR TV 1.2.1 Playback Press "PLAY" key to start playback. Key Operation 1) : Same as "PLAY" key on remote, to start playing pictures in slide show mode 2) : Same as "PAUSE" key on remote, to pause the playing file 3) : Same as "STOP" key on remote, to stop sliding show, and return to the file browser 4) : Same as "|<<" / ">>|" key on remote, to play the previous or next file directly 5) : To rotate the playing picture(0 º、90 º、180 º、270º). 6) : To zoom the playing picture.
LE D COLOR TV 2. Music 2.1 Format Supported MUSIC File Exit Audio .mp3 MP3 .wma WMA .m4a/.aac AAC 2.2 Function Introduction Highlight the “MUSIC” item in multimedia mainmenu by press “RIGHT” / “LEFT” key, then press “ENTER” key enter music page, as follow: Key Operation 1) 2.2.1 RED: Delete the focused folder/file. 2) GREEN: 3) ENTER: 4) CH+/-: Add/Del all photo files to play list. Add/Del highlight files to play list. Page up/Page down. 5) Play the files in play list.
LE D COLOR TV 3. Function Introduction Highlight the “MOVIE” item in multimedia mainmenu by press “RIGHT” / “LEFT” key, then press “ENTER” key enter movie page, as follow: Key Operation 1) 2) RED: Delete the focused folder/file. Add/Del all photo files to play list. GREEN: 3) ENTER: 4) CH+/-: Add/Del highlight files to play list. Page up/Page down. 5) Play the files in play list. PLAY: 3.1Playback Press "PLAY" key to start playback.
LE D COLOR TV 4. eBook 4.1 Format Supported Only txt format eBook is supported. 4.2 Function Introduction Highlight the “eBook” item in multimedia mainmenu by press “RIGHT” / “LEFT” key, then press “ENTER” key enter eBook page, as follow: Key Operation 1) RED: Delete the focused folder/file. 2) GREEN: Add/Del all photo files to play list. 3) ENTER: 4) CH+/-: Add/Del highlight files to play list. Page up/Page down. 5) Play the files in play list. PLAY: 4.2.
LE D COLOR TV CHROMIA 32AZJ1 PVR CHROMIA 39AZJ1 FHD PVR 39 32 60W 74W PAL B/G D/K I, SECAM B/G D/K,DVB-T/C Antenna Input (D Type) x 1 VGA (D-Sub 15 Pin Type) x 1 HDMI Connector x 3 Mini Y Pb Pr Input Terminals x 1 Mini AV Input RCA Terminals x 1 Stereo Audio x1(Phone J ack for VGA) USB x 1 SCART x 1 CI x 1 1 set of Coaxial output RCA Terminals 1 set of EARPHONE output Outline Size (LxWxH)(mm) without stand with stand Working Temperature Working Humidity 887x45x514 887x210x562
LE D COLOR TV 4. Supported Signal Modes A. VGA Mode Resolution 640 x 480 800 x 600 1024 x 768 Horizontal Frequency (KHz) 31.50 35.16 37.90 48.40 Vertical Frequency (Hz) 60.00 56.25 60.00 60.00 Note: You’re suggested to use the VGA connecting cord of not more than 5 meters to ensure the appropriate picture quality. B. YPbPr Mode Resolution 480i 480p(720x480) 576i 576p(720x576) 720p(1280x720) 1080i 1080P(1920x1080) C. Horizontal Frequency (KHz) 15.734 31.468 15.625 31.25 37.50 45.00 28.13 33.75 67.50 56.
LE D COLOR TV 5. Simple Troubleshooting If the display fails or the performance changes dramatically, check the Display in accordance with the following instructions. Remember to check the peripherals to pinpoint the source of the failure. Symptom Solution Power cannot be turned -Check that both ends of the power cable are on.(Power indicator plugged into the socket appropriately and the wall does not light.) socket is operational. No Input Signal -Check that the signal line is connected properly.
All informations contained in this user manual (images included) are for your reference only and might be affected by misprints or other kind of errors that could make them differ from the real product.