
Installation Guide


3-26 975-0691-01-01 Revision B
Initial Startup of the Battery Monitor
Note: Use the front panel display for first installation. Do not connect the Xanbus
cables initially because system functions on other Xanbus devices could be
affected as the Battery Monitor initializes.
To turn on the Battery Monitor:
1. Insert the pre-scaler cable into the RJ45 analog-signal port. The Battery
Monitor will power on using battery power.
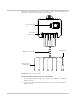
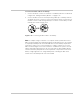
2. Wait for up to two minutes while the LCD display and Power LED (Figure 3-1)
flash intermittently during the startup and initialization sequence.
3. When the Power LED stops blinking, Hold the OK button for 3 seconds to
enter Setup Mode.
4. When the display reads StAt, press the > key twice. The display should now
switch to read FUnc.
5. Press OK. The display should read F1.0
6. Press OK then use the arrow buttons to adjust Function F1.0 so that it is set
to the float charge voltage level of your battery charger. (i.e. 52.8 V).
7. Press OK, navigate to Function F2.0 then use the arrow buttons to adjust
Function F2.0 to the nominal battery capacity value of your battery system.
(i.e. 200 Ah).
Figure 3-1 Location of front panel power LED indicator