
Conext Gateway Installation
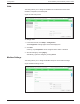

Upgrading Firmware
You can perform firmware upgrades for your Conext Gateway and Xanbus-enabled
devices when they are available for download.
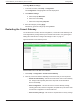
There are three upgrade procedures, namely:
n "Installing Conext Gateway Upgrades From a USB Drive" below
n "Installing Conext Gateway Upgrades Remotely" on the facing page
n "Upgrading Other Device Firmware" on the facing page
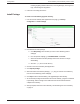
Installing Conext Gateway Upgrades From a USB Drive
Follow the procedure below to change the Conext Gateway firmware to an updated
version.
To update the firmware:
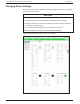
1. Using a laptop computer, format a USB drive and open a web browser.
2. Go to http://solar.schneider-electric.com and download the latest Conext Gateway
firmware version (contained in a ZIP file).
3. Navigate to Products > Battery Based Inverters > Accessories > Conext
Gateway
4. Click DOWNLOADS > Firmware > FWYYYYMMDD-Gateway VX.XX BNXXXX
(865-0326).ZIP
5. Pick the firmware version (V) with a higher number and also a higher build number
(BN). The ZIP file is approximately 35 MB.
6. Extract the .epkg file from the ZIP file into the root directory of the USB drive
(supplied with the unit).
7. To initiate the update to the firmware:
a. Insert the USB drive into the port on the Conext Gateway.
b. The Conext Gateway will beep once and the LED will blink while the the
firmware is copied to the Conext Gateway and the upgrade is performed. This
can take 5–10 minutes.
c. If the update takes more than 10 minutes, make sure that the .epkg file is
copied correctly into the root directory.
Important: Once the USB drive is inserted, Do not turn off the Conext Gateway.
8. Once the firmware upgrade is done, the Conext Gateway emits two beeps. and the
LED indicator stops blinking.
9. Remove the USB drive.
10. Manually reboot the Conext Gateway using the power switch to complete the
firmware upgrade process.
Conext Gateway Conext Gateway Owner's Guide Configuration
45 975-0806-01-01