Istruzioni per luso PIANO Sommario IT Italiano, 1 GB English,13 NL Nederlands, 39 FR Français, 25 IT Installazione, 2-5 Posizionamento Collegamento elettrico Collegamento gas Targhetta caratteristiche Caretteristiche dei bruciatori ed ugelli Descrizione dellapparecchio, 6 Vista dinsieme Avvio e utilizzo, 7-9 Consigli Consigli Consigli Consigli TG 631 E TG 640 TG 640 GH TG 641 GH TG 642 GH TG 751 GH TG 752 GH TG 753 G GH TG 753 V GH pratici pratici pratici pratici per per per per luso l'uso l
Installazione lesterno così da permettere levacuazione dal basso delle eventuali fughe di gas. Pertanto i bidoni di GPL, siano essi vuoti o parzialmente pieni, non debbono essere installati o depositati in locali o vani a livello più basso del suolo (cantinati, ecc.). É opportuno tenere nel locale solo il bidone in utilizzo, collocato in modo da non essere soggetto allazione diretta di sorgenti di calore (forni, camini, stufe, ecc.) capaci di portarlo a temperature superiori ai 50°C.
Dietro nessun punto superi di 50°C la temperatura ambiente. IT Linstallatore è responsabile del corretto collegamento elettrico e dellosservanza delle norme di sicurezza. Posizione gancio per top H=40mm Avanti Usare i ganci contenuti nella "confezione accessori" Nel caso in cui il piano non sia installato su di un forno incasso, è necessario inserire un pannello di legno come isolamento. Esso dovrà essere posizionato ad una distanza minima di 20 mm. dalla parte inferiore del piano stesso.
IT schiacciato. Utilizzare esclusivamente tubi conformi alla Norma UNICIG 9891 e guarnizioni di tenuta conformi alle Norme Nazionali in vigore. Controllo Tenuta Regolazione aria primaria dei bruciatori I bruciatori non necessitano di nessuna regolazione dellaria primaria. Regolazione minimi 1. Portare il rubinetto sulla posizione di minimo; Ad installazione ultimata controllare la perfetta tenuta di tutti i raccordi utilizzando una soluzione saponosa e mai una fiamma. 2.
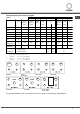
Caratteristiche dei bruciatori ed ugelli Tabella 1 Gas liquido Bruciatore Diametro (mm) Potenza Potenza By-Pass termica termica 1/100 kW (p.c.s.*) kW (p.c.s.*) (mm) Ridot. Nomin. IT Gas naturale ugello 1/100 portata* g/h Potenza termica kW (p.c.s.*) ugello 1/100 (mm) *** ** Nomin.
Descrizione dellapparecchio IT Vista dinsieme PIASTRA ELETTRICA* BRUCIATORI GAS Griglie di appoggio per RECIPIENTI DI COTTURA Spia di funzionamento PIASTRA ELETTRICA* Manopole di comando dei BRUCIATORI GAS o della PIASTRA ELETTRICA* BISTECCHIERA * / PIANO COTTURA VETROCERAMICA * Griglie di appoggio per RECIPIENTI DI COTTURA BRUCIATORI GAS Manopole di comando dei BRUCIATORI GAS o della PIASTRA ELETTRICA* DISPOSITIVO DI SICUREZZA * Spia di funzionamento PIASTRA ELETTRICA* Candela di accensione dei
Avvio e utilizzo Su ciascuna manopola è indicata la posizione del bruciatore gas o della piastra elettrica* corrispondente. Bruciatori gas Il bruciatore prescelto può essere regolato dalla manopola corrispondente come segue: Spento Massimo Minimo Per accendere uno dei bruciatori, avvicinare allo stesso una fiamma o un accenditore, premere a fondo e ruotare la manopola corrispondente in senso antiorario fino alla posizione di massima potenza.
IT Consigli pratici per luso dei bruciatori Al fine di ottenere il massimo rendimento è utile ricordare quanto segue: utilizzare recipienti adeguati a ciascun bruciatore (vedere tabella) al fine di evitare che le fiamme fuoriescano dal fondo dei recipienti. utilizzare sempre recipienti a fondo piatto e con coperchio. al momento dellebollizione ruotare la manopola fino alla posizione di minimo.
Consigli pratici per l'uso del vetroceramica* Pos.
Precauzioni e consigli IT Lapparecchio è stato progettato e costruito in conformità alle norme internazionali di sicurezza. Queste avvertenze sono fornite per ragioni di sicurezza e devono essere lette attentamente. Sicurezza generale Questo apparecchio riguarda un apparecchio da incasso di classe 3. Gli apparecchi gas necessitano, per un corretto funzionamento, di un regolare ricambio daria.
Manutenzione e cura Escludere la corrente elettrica Prima di ogni operazione isolare lapparecchio dalla rete di alimentazione elettrica. Pulire lapparecchio Evitare luso di detergenti abrasivi o corrosivi, quali gli smacchiatori e prodotti antiruggine, i detersivi in polvere e le spugne con superficie abrasiva: possono graffiare irrimediabilmente la superficie. Non utilizzare mai pulitori a vapore o ad alta pressione per la pulizia dellapparecchio.
Anomalie e rimedi IT Può accadere che il piano non funzioni o non funzioni bene. Prima di chiamare l'assistenza, vediamo che cosa si può fare. Innanzi tutto verificare che non ci siano interruzioni nelle reti di alimentazione gas ed elettrica, ed in particolare i rubinetti gas a monte del piano siano aperti. Anomalie Possibili cause / Soluzione: Il bruciatore non si accende o la fiamma non è uniforme. Sono ostruiti i fori di uscita del gas del bruciatore.
Operating Instructions HOB Contents IT Italiano, 1 GB English,13 NL Nederlands, 39 FR Français, 25 Installation, 14-17 Positioning Electrical connection Gas connection Data plate Burner and nozzle specifications Description of the appliance, 18 Overall view Start-up and use, 19-21 Practical Practical Practical Practical Module TG 631 E TG 640 TG 640 GH TG 641 GH TG 642 GH TG 751 GH TG 752 GH TG 753 G GH TG 753 V GH advice on using the burners Advice on Using the Electric Hot Plates Advise on Using
Installation also be equipped with vents to allow gas to escape in the event of a leak. As a result LPG cylinders, whether partially or completely full, must not be installed or stored in rooms or storage areas that are below ground level (cellars, etc.). It is advisable to keep only the cylinder being used in the room, positioned so that it is not subject to heat produced by external sources (ovens, fireplaces, stoves, etc. ) which could raise the temperature of the cylinder above 50°C.
Back circuit-breaker). The supply cable must not come into contact with surfaces with temperatures higher than 50°C. The installer must ensure that the correct electrical connection has been made and that it is compliant with safety regulations. Before connecting to the power supply, make sure that: The appliance is earthed and the plug is compliant with the law. Hooking position for top H=40 mm The socket can withstand the maximum power of the appliance, which is indicated on the data plate.
GB Connecting a flexible jointless stainless steel pipe to a threaded attachment The gas supply pipe fitting is a threaded 1/2 gas cylindrical male attachment. These pipes must be installed so that they are never longer than 2000 mm when fully extended. Once connection has been carried out, make sure that the flexible metal pipe does not touch any moving parts and is not compressed. Only use pipes and seals that comply with current national regulations.
Burner and nozzle specifications Table 1 Liquid gas Burner Diameter Thermal Thermal By-pass Nozzle (mm) power power 1/100 1/100 (mm) kW kW (p.c.s.*) (p.c.s.*) Red. Nom. GB Natural gas Flow* g/h Thermal Nozzler power 1/100 kW (p.c.s.*) (mm) *** ** Nom.
Description of the appliance GB Overall view ELECTRIC HOTPLATE* GAS BURNERS Support Grid for COOKWARE Indicator Light for ELECTRIC HOTPLATE* Control Knobs for GAS BURNERS and ELECTRIC HOTPLATE* COOKTOP BROILER * / CERAMIC GLASS MODULE * Support Grid for COOKWARE GAS BURNERS Control Knobs for GAS BURNERS and ELECTRIC HOTPLATE* SAFETY DEVICES * The INDICATOR LIGHT FOR ELECTRIC HOTPLATES / COOKTOP BROILER / CERAMIC GLASS MODULE * switches on whenever the selector knob is moved from the off positio
Start-up and use The position of the corresponding gas burner or electric hotplate* is shown on every knob.
GB Practical advice on using the burners For best performance, follow these general guidelines: Use the appropriate cookware for each burner (see table) in order to prevent the flame from reaching the sides of the pot or pan; Practical Advice on Using the Electric Hot Plates * In order to avoid heat loss and damage to the hot plate, use cookware with a flat bottom the diameter of which is not less than that of the hot plate.
Practical Advise on Using the Ceramic Glass Module* Set. Radiant Burner 0 Off 1 To melt butter and chocolate. To obtain the best results from your hob: GB Use flat-bottomed pans to ensure that they adhere to the cooking zone perfectly. 2 To heat liquids. 3 4 For creams and sauces. 5 Always use pans with a diameter that is large enough to cover the hotplate fully, in order to use all the available heat. 6 For cooking at the boiling point. 7 8 For roasts.
Precautions and tips GB This appliance has been designed and manufactured in compliance with international safety standards. The following warnings are provided for safety reasons and must be read carefully. General safety This is a class 3 built-in appliance. Gas appliances require regular air exchange to maintain efficient operation. When installing the hob, follow the instructions provided in the paragraph on Positioning the appliance. Remove any liquid from the lid before opening it.
Maintenance and care Switching the appliance off Disconnect your appliance from the electricity supply before carrying out any work on it. Cleaning the appliance Do not use abrasive or corrosive detergents such as stain removers, anti-rust products, powder detergents or sponges with abrasive surfaces: these may scratch the surface beyond repair. Never use steam cleaners or pressure cleaners on the appliance.
Troubleshooting GB It may happen that the appliance does not function properly or at all. Before calling the service centre for assistance, check if anything can be done. First, check to see that there are no interruptions in the gas and electrical supplies, and, in particular, that the gas valves for the mains are open. Problem Possible causes/Solution The burner does not light or the flame is not even around the burner. The gas holes on the burner are clogged.
Mode demploi TABLE DE CUISSON Sommaire IT Italiano, 1 GB English,13 NL Nederlands, 39 FR Français, 25 Installation, 26-31 Positionnement Raccordement électrique Raccordement gaz Plaquette signalétique Caractéristiques des brûleurs et des injecteurs BE Description de lappareil, 32 NL Vue densemble Mise en marche et utilisation, 33-35 TG 631 E TG 640 TG 640 GH TG 641 GH TG 642 GH TG 751 GH TG 752 GH TG 753 G GH TG 753 V GH FR Conseils pratiques pour lutilisation des brûleurs Conseils pratique
Installation BE Conservez ce mode demploi pour pouvoir le consulter à tout moment. En cas de vente, de cession ou de déménagement, veillez à ce quil suive lappareil pour informer le nouveau propriétaire sur son fonctionnement et lui fournir les conseils correspondants.
540mm min. 700mm min. 600mm min. En cas dinstallation de la table de cuisson sous un élément haut, ce dernier devra être monté à au moins 700 mm de distance du plan (voir figure). un plan dappui continu qui ait une découpe dau moins 45 x 560 mm (voir figures). 560 mm . FR BE 45 m m. LU La découpe du meuble doit avoir les dimensions indiquées par la figure. Des crochets de fixation sont prévus pour fixer la table sur des plans de 20 à 40 mm dépaisseur.
FR BE LU NL Raccordement gaz Pour la France Raccorder lappareil à la bouteille ou à la canalisation du gaz conformément aux normes en vigueur, uniquement après avoir vérifié que lappareil est bien réglé pour le type de gaz dalimentation utilisé. Dans le cas contraire, effectuer les opérations décrites au paragraphe Adaptation aux différents types de gaz. Pour lalimentation en gaz liquide, utiliser des régulateurs de pression conformes aux Normes en vigueur.
les injecteurs par d'autres appropriés au nouveau type de gaz (voir tableau 1). remontez les différentes parties en effectuant les opérations dans le sens inverse. En cas de gaz liquides, il faut visser à fond la vis de réglage. FR En fin dopération remplacez la vieille étiquette par celle correspondant au nouveau gaz utilisé, disponible dans nos Services Après-vente.
FR Caractéristiques des brûleurs et des injecteurs Tableau 1 (Pour la France et la Belgique) BE LU NL Brûleur Diamètre (mm) Gaz liquides Puissance thermique kW (p.c.s.*) Puissance thermique kW (p.c.s.*) Red. Nom. By-pass 1/100 (mm) Injecteur 1/100 Gaz naturels Débit* g/h Injecteur 1/100 Puissance Débit* thermique l/h kW (p.c.s.*) Puissance thermique kW (p.c.s.*) Débit* l/h (mm) *** ** (mm) Nom. G20 Nom.
Tableau 1 (Pour le Luxembourg) Brûleur Diamètre (mm) Puissance thermique kW (p.c.s.*) Puissance thermique kW (p.c.s.*) Red. Nom. I3+ (1) I2E (1) Gaz liquides Gaz naturels By-pass 1/100 (mm) Injecteur 1/100 Débit* g/h Injecteur 1/100 FR Puissance Débit* thermique l/h kW (p.c.s.*) (mm) *** ** (mm) Nom.
Description de lappareil FR Vue densemble BE PLAQUE ÉLECTRIQUE* LU BRÛLEURS GAZ NL Grilles support de CASSEROLES Voyant de fonctionnement des PLAQUE ÉLECTRIQUE * Manettes de commande des BRÛLEURS GAZ ou des PLAQUE ÉLECTRIQUE* PLAQUE-GRILL* / TABLE DE CUISSON VITROCÉRAMIQUE* Grilles support de CASSEROLES BRÛLEURS GAZ Manettes de commande des BRÛLEURS GAZ ou des PLAQUE ÉLECTRIQUE* DISPOSITIF DE SÉCURITÉ * Voyant de fonctionnement des PLAQUE ÉLECTRIQUE * Bougie d’allumage des BRÛLEURS GAZ * V
Mise en marche et utilisation La position du brûleur gaz ou de la plaque électrique* correspondante est indiquée sur chaque manette. Brûleurs à gaz Chaque manette permet de régler le brûleur sélectionné comme suit : Eteint Maximum Minimum Pour allumer un brûleur, approchez une flamme ou un allume-gaz, appuyez à fond et tournez la manette correspondante dans le sens inverse des aiguilles dune montre pour sélectionner la position de puissance maximale.
FR Conseils pratiques pour lutilisation des brûleurs BE Pour obtenir un meilleur rendement, noubliez pas : LU dutiliser des récipients appropriés à chaque brûleur (voir tableau) pour éviter que les flammes ne dépassent de sous les casseroles. NL Conseils pratiques pour l'utilisation des plaques électriques * Afin d'éviter toute déperdition de chaleur et d'endommager la plaque, utilisez des casseroles à fond plat et d'un diamètre au moins égal à celui de la plaque.
Quelques conseils pratiques pour mieux utiliser votre table vitrocéramique * Pour obtenir de meilleures performances de votre table de cuisson : utilisez des casseroles à fond plat pour quelles adhèrent parfaitement à la zone de chauffe FR BE Pos Plaque autom atique 0 Éteint 1 Pour faire fondre le beurre, le chocolat LU 2 NL Pour réchauffer les liquides 3 4 Pour crèm es et sauces 5 utilisez toujours des casseroles dont le diamètre couvre complètement la zone de chauffe de façon à ce que tout
Précautions et conseils FR BE Cet appareil a été conçu et fabriqué conformément aux normes internationales de sécurité. Ces conseils sont fournis pour des raisons de sécurité et doivent être lus attentivement. Sécurité générale LU NL Ce mode demploi concerne un appareil à encastrer classe 3. Pour bien fonctionner, les appareils à gaz ont besoin dun apport dair régulier.
Nettoyage et entretien Mise hors tension Avant toute opération de nettoyage ou dentretien coupez lalimentation électrique de lappareil. Nettoyage de lappareil Nutilisez pas de détergents abrasifs ou corrosifs, tels que détacheurs et dérouilleurs, poudres à récurer et éponges à surface abrasive : ils risquent de rayer irrémédiablement la surface. Ne nettoyez jamais lappareil avec des nettoyeurs vapeur ou haute pression.
Anomalies et remèdes FR Il peut arriver que lappareil ne fonctionne pas ou ne fonctionne pas très bien. Avant dappeler le service aprèsvente, voyons ensemble que faire. Vérifiez avant tout sil ny a pas de coupure de gaz ou de courant, et si les robinets du gaz en amont de lappareil sont bien ouverts. BE LU NL Anomalies Causes / Solutions possibles Le brûleur ne sallume pas ou la flamme nest pas uniforme. les orifices de sortie du gaz ne sont pas par hasard bouchés.
Gebruiksaanwijzing KOOKPLAAT Samenvatting IT Italiano, 1 GB English,13 NL Nederlands, 39 FR Français, 25 Het installeren, 40-45 Plaatsing Elektrische aansluiting Gasaansluiting Typeplaatje Kenmerken van de branders en de straalpijpjes Beschrijving van het apparaat, 46 Algemeen aanzicht Starten en gebruik, 47-49 TG 631 E TG 640 TG 640 GH TG 641 GH TG 642 GH TG 751 GH TG 752 GH TG 753 G GH TG 753 V GH NL Praktisch advies voor het gebruik Practische raadgevingen voor het electrische kookplaten Practi
Het installeren NL BE Bewaar dit boekje zorgvuldig voor eventuele verdere raadpleging. Wanneer u het product weggeeft, verkoopt, of wanneer u verhuist, dient u dit boekje bij het apparaat te bewaren zodat alle nodige informatie voorhanden blijft. A Lees de gebruiksaanwijzingen zorgvuldig door: er staat belangrijke informatie in over installatie, gebruik en veiligheid.
540mm min. 700mm min. 600mm min. Als de kookplaat onder een keukenkastje wordt geplaatst, moet deze zich op een afstand van minstens 700 mm van het keukenblad bevinden (zie afbeelding). De opening van het meubel moet de afmetingen hebben die in de afbeelding zijn aangegeven. De bevestigingsklemmen maken een bevestiging mogelijk van de kookplaat aan een keukenblad van tussen de 20 en 40 mm dik. Voor een goede bevestiging raden wij u aan alle bijgeleverde haken te gebruiken.
NL BE het stopcontact geaard is en voldoet aan de geldende normen; het stopcontact in staat is het maximale vermogen van het apparaat te dragen, zoals aangegeven op het typeplaatje; de spanning zich bevindt tussen de waarden die staan aangegeven op het typeplaatje; het stopcontact en de stekker overeenkomen. Als dat niet zo is, dient u ofwel de stekker ofwel het stopcontact te vervangen; gebruik geen verlengsnoeren of dubbelstekkers.
2. schroef de straalpijpjes los met een steeksleutel van 7mm en vervang ze met de straalpijpjes geschikt voor het nieuwe type gas (zie tabel 1 Kenmerken van de branders en de straalpijpen). In het geval van een brander Mini WOK moet men een steeksleutel van 7 mm gebruiken om de branderkop los te draaien (zie afbeelding). 3. zet de onderdelen weer op hun plaats door de handelingen in omgekeerde volgorde uit te voeren. 4.
NL Kenmerken van de branders en de straalpijpjes Tabel 1 (Voor Belgie) BE Brûleur Doorsenee (mm) Vloeibaar gas Thermisch vermogen kW (p.c.s.*) Thermisch vermogen kW (p.c.s.*) Gered. Nomin. By-pass 1/100 (mm) Straal. 1/100 Natuurlijk gas Bereik* g/h Straal. 1/100 Thermisch Bereik* Thermisch Bereik* vermogen l/h vermogen l/h kW (p.c.s.*) kW (p.c.s.*) (mm) *** ** (mm) Nomin. G20 Nomin.
Tabel 1 (Voor Nederland) Natuurlijk gas Thermisch vermogen kW (p.c.s.*) Straal. 1/100 Bereik* l/h (mm) Nom. Gered.
Beschrijving van het apparaat NL Algemeen aanzicht BE ELECTRISCHE KOOKPLATEN* GASBRANDERS Roosters voor de PANNEN Controlelampje KOOKPLATEN * Bedieningsknoppen van de GASBRANDERS of ELECTRISCHE KOOKPLATEN * BIEFSTUKGRILL * / KERAMISCH KOKKVLAK * Roosters voor de PANNEN GASBRANDERS Bedieningsknoppen van de GASBRANDERS of ELECTRISCHE KOOKPLATEN * Controlelampje KOOKPLATEN * VEILIGHEIDSMECHANISME * Bougie voor ontsteking van de GASBRANDERS * Controlelampje ELECTRISCHE KOOKPLATEN *: gaat aan als de
Starten en gebruik Op iedere knop staat aangegeven waar de gasbrander of de elektrische plaat* zich precies bevindt. Gasbranders De gekozen brander kan met de betreffende knop als volgt worden geregeld: Uit Maximum Minimum Om een van de branders aan te steken dient u er een vlam of aansteker bij te houden, de knop stevig in te drukken en tegen de klok in te draaien tot u het maximum vermogen heeft bereikt.
NL Praktisch advies voor het gebruik van de branders BE Voor een optimaal rendement dient u het volgende te onthouden: gebruik voor iedere brander de pan die erop past (zie tabel) om te vermijden dat de vlammen er onderuit vandaan komen. gebruik alleen pannen met een platte bodem en met een deksel erop. draai de knop op het minimum zodra het kookpunt is bereikt.
Practische raadgevingen voor het gebruik van de keramische* Pos Stralingsplaat 0 Uit 1 Boter, chocolade smelten Onthoud het volgende voor het beste rendement: NL Op het keramische kookvlak kunt u alle soorten pannen gebruiken. Het belangrijkste is dat de bodem perfect plat is: pannen met een dikke bodem verdelen de warmte het beste. BE 2 Opwarmen vloeistoffen 3 4 Vla en sausen 5 6 Aan de kook brengen Gebruik pannen die de kookzone geheel bedekken, zodat u alle beschikbare hitte gebruikt.
Voorzorgsmaatregelen en advies NL BE Dit apparaat is ontworpen en vervaardigd volgens de geldende internationale veiligheidsvoorschriften. Deze aanwijzingen zijn geschreven voor uw veiligheid en u dient ze derhalve goed door te nemen. Algemene veiligheidsmaatregelen Dit is een inbouwapparaat van klasse 3. Gasfornuizen hebben voor een goede werking behoefte aan een regelmatige luchtverversing. Controleer dat bij het installeren aan de vereisten wordt voldaan beschreven in de paragraaf Plaatsing.
Onderhoud en verzorging De elektrische stroom afsluiten Sluit altijd eerst de stroom af voordat u tot enige handeling overgaat. Schoonmaken van het apparaat Vermijd het gebruik van schuurmiddelen of bijtende middelen, zoals vlekkenmiddelen en roestverwijderende producten, schoonmaakmiddelen in poedervorm of schuursponzen: deze kunnen het oppervlak onherstelbaar krassen. Gebruik nooit stoom- of hogedrukreinigers voor het reinigen van het apparaat.
Storingen en oplossingen NL 04/2009 - 195074189.00 XEROX FABRIANO Het kan gebeuren dat het kookvlak niet (afdoende) functioneert. Voordat u de servicedienst belt dient u te controleren of u het euvel zelf kunt oplossen. Verifieer om te beginnen of er een correcte stroom- en gastoevoer is, en in het bijzonder of de hoofdgasleiding open staat. BE Storingen Mogelijke oorzaken / Oplossing De brander gaat niet aan of de vlam is niet gelijkmatig. De openingen van de vlamverspreiders niet verstopt zijn.