
Installation Guide


Apron Front Stainless Steel Sink
Installation Instructions
PAGE 3
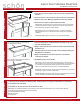
4: INSTALL THE SINK
1. Lower the sink onto the supports and verify the sink is supported by
the frame.
2. Push the sink in to ensure the apron is ush to the front of the cabinet.
3. Verify the sink is level. Make any adjustments and shim as needed.
4. Secure the sink in place using the hardware provided.
IMPORTANT: The front sink apron must be secured to the front of the cabinet
by attaching fasteners through the cabinet front and into the support framing.
Failure of this step can lead to product damage.
IMPORTANT: Schön is not responsible for sink or countertop if damaged
during installation. Be sure to inspect the sink for damage prior to beginning
installation.
IMPORTANT: Metal edges may be sharp - use caution when handling.
Apron Front Stainless Steel Sink
Installation Instructions
PAGE 3
4: INSTALL THE SINK
1. Lower the sink onto the supports and verify the sink is supported by
the frame.
2. Push the sink in to ensure the apron is flush to the front of the cabinet.
3. Verify the sink is level. Make any adjustments and shim as needed.
4. Secure the sink in place using the hardware provided.
IMPORTANT: The front sink apron must be secured to the front of the cabinet
by attaching fasteners through the cabinet front and into the support framing.
Failure of this step can lead to product damage.
IMPORTANT: IPT Sink Company is not responsible for sink or countertop if
damaged during installation. Be sure to inspect the sink for damage prior to
beginning installation.
IMPORTANT: Metal edges may be sharp - use caution when handling.
Apron Front Stainless Steel Sink
Installation Instructions
PAGE 3
4: INSTALL THE SINK
1. Lower the sink onto the supports and verify the sink is supported by
the frame.
2. Push the sink in to ensure the apron is flush to the front of the cabinet.
3. Verify the sink is level. Make any adjustments and shim as needed.
4. Secure the sink in place using the hardware provided.
IMPORTANT: The front sink apron must be secured to the front of the cabinet
by attaching fasteners through the cabinet front and into the support framing.
Failure of this step can lead to product damage.
IMPORTANT: Soleil is not responsible for sink or countertop if damaged
during installation. Be sure to inspect the sink for damage prior to beginning
installation.
IMPORTANT: Metal edges may be sharp - use caution when handling.
Apron Front Stainless Steel Sink
Installation Instructions
PAGE 3
4: INSTALL THE SINK
1. Lower the sink onto the supports and verify the sink is supported by
the frame.
2. Push the sink in to ensure the apron is flush to the front of the cabinet.
3. Verify the sink is level. Make any adjustments and shim as needed.
4. Secure the sink in place using the hardware provided.
IMPORTANT: The front sink apron must be secured to the front of the cabinet
by attaching fasteners through the cabinet front and into the support framing.
Failure of this step can lead to product damage.
IMPORTANT: Soleil is not responsible for sink or countertop if damaged
during installation. Be sure to inspect the sink for damage prior to beginning
installation.
IMPORTANT: Metal edges may be sharp - use caution when handling.
4: INSTALL THE SINK
1. Lower the sink onto the supports and verify the sink is supported by the
frame.
2.
3. Verify the sink is level. Make any adjustments and shim as needed.
4. Secure the sink in place using the hardware provided
IMPORTANT: The front sink apron must be secured to the front of the cabinet
by attaching fasteners through the cabinet front and into the support framing.
Failure of this step can lead to product damage.
IMPORTANT: Soleil is not responsible for sink or countertop if damaged
during installation. Be sure to inspect the sink for damage prior to beginning
installation.
IMPORTANT: Metal edges may be sharp – use caution when handling.
1.
sink with denatured alcohol.
2. Apply a narrow bead of silicone adhesive sealant around the side and
back of the sink.
3. Carefully position and secure the sink to the countertop following the
manufacturer’s instructions.
4. Apply a thin bead of silicone sealant where the sink meets the
countertop and cabinet.
5. Immediately remove excess sealant.
IMPORTANT: The enclosed cutout template will create a countertop opening
with a minimal (1/8” or less) reveal. It is recommended that you discuss this
Soleil is not responsible for improper sink or countertop installations.
IMPORTANT: Soleil apron front sinks should only be fastened to a solid surface
countertop (i.e. granite, Corian® or Silestone®).
IMPORTANT: Make sure the top of the sink does not extend above the top of the
cabinet; otherwise it will interfere with countertop installation.
5: INSTALL COUNTERTOP
APPLY SILICONE SEALANT AFTER CLEANING THE
SINK EDGE AND COUNTERTOP
APPLY SILICONE SEALANT WHERE THE SINK MEETS
THE COUNTERTOP AND CABINET.
6: FINAL STEPS
1. Following all local plumbing and building codes, install the faucet according to the manufacturer’s instructions.
2. Connect the drain and piping.
3. Run water into the sink and check all connections for leaks.
IMPORTANT: For additional information or warranty issues visit www.soleilsinks.com or contact Soleil directly at:
Apron Front Stainless Steel Sink
Installation Instructions
Contact Soleil at (687) 445-4638 or visit www.soleilsinks.com. Copyright ©2015, Soleil Sink Company Inc. All rights reserved.
PAGE 3
Soleil Sink Company Inc.
820 Shallowford Rd
Kennesaw, GA 30144
(678) 445-4638
with your installer and agree that this nished appearance is the desired eect.
5: INSTALL COUNTERTOP
1. Clean the bottom of the countertop and the top flange (or lip) of the
sink with denatured alcohol.
2. Apply a narrow bead of silicone adhesive sealant around the side and
back of the sink.
3. Carefully position and secure the sink to the countertop following the
manufacturer’s instructions.
4. Apply a thin bead of silicone sealant where the sink meets the
countertop and cabinet.
5. Immediately remove excess sealant.
IMPORTANT: The enclosed cutout template will create a countertop opening
with a minimal (1/8” or less) reveal. It is recommended that you discuss this with
your installer and agree that this finished appearance is the desired effect.
Soleil is not responsible for improper sink or countertop installations.
IMPORTANT: Soleil apron front sinks should only be fastened to a solid surface
countertop (i.e. granite, Corian® or Silestone®).
IMPORTANT: Make sure the top of the sink does not extend above the top of the
cabinet; otherwise it will interfere with countertop installation.
4: INSTALL THE SINK
1. Lower the sink onto the supports and verify the sink is supported by the
frame.
2.
3. Verify the sink is level. Make any adjustments and shim as needed.
4. Secure the sink in place using the hardware provided
IMPORTANT: The front sink apron must be secured to the front of the cabinet
by attaching fasteners through the cabinet front and into the support framing.
Failure of this step can lead to product damage.
IMPORTANT: Soleil is not responsible for sink or countertop if damaged
during installation. Be sure to inspect the sink for damage prior to beginning
installation.
IMPORTANT: Metal edges may be sharp – use caution when handling.
1.
sink with denatured alcohol.
2. Apply a narrow bead of silicone adhesive sealant around the side and
back of the sink.
3. Carefully position and secure the sink to the countertop following the
manufacturer’s instructions.
4. Apply a thin bead of silicone sealant where the sink meets the
countertop and cabinet.
5. Immediately remove excess sealant.
IMPORTANT: The enclosed cutout template will create a countertop opening
with a minimal (1/8” or less) reveal. It is recommended that you discuss this
Soleil is not responsible for improper sink or countertop installations.
IMPORTANT: Soleil apron front sinks should only be fastened to a solid surface
countertop (i.e. granite, Corian® or Silestone®).
IMPORTANT: Make sure the top of the sink does not extend above the top of the
cabinet; otherwise it will interfere with countertop installation.
5: INSTALL COUNTERTOP
APPLY SILICONE SEALANT AFTER CLEANING THE
SINK EDGE AND COUNTERTOP
APPLY SILICONE SEALANT WHERE THE SINK MEETS
THE COUNTERTOP AND CABINET.
6: FINAL STEPS
1. Following all local plumbing and building codes, install the faucet according to the manufacturer’s instructions.
2. Connect the drain and piping.
3. Run water into the sink and check all connections for leaks.
IMPORTANT: For additional information or warranty issues visit www.soleilsinks.com or contact Soleil directly at:
Apron Front Stainless Steel Sink
Installation Instructions
Contact Soleil at (687) 445-4638 or visit www.soleilsinks.com. Copyright ©2015, Soleil Sink Company Inc. All rights reserved.
PAGE 3
Soleil Sink Company Inc.
820 Shallowford Rd
Kennesaw, GA 30144
(678) 445-4638
with your installer and agree that this nished appearance is the desired eect.
6: FINAL STEPS
1. Following all local plumbing and building codes, install the faucet according to the manufacturer’s instructions.
2. Connect the drain and piping.
3. Run water into the sink and check all connections for leaks.
IMPORTANT: For additional information or warranty issues visit www.soleilsinks.com or contact Soleil directly at:
Soleil Sink Company Inc.
820 Shallowford Rd
Kennesaw, GA 30144
(678) 445-4638
Contact Soleil Sinks at (687) 445-4638 or visit www.soleilsinks.com. Copyright ©2015, Soleil Sink Company Inc. All rights reserved.
5: INSTALL COUNTERTOP
1. Clean the bottom of the countertop and the top flange (or lip) of the
sink with denatured alcohol.
2. Apply a narrow bead of silicone adhesive sealant around the side and
back of the sink.
3. Carefully position and secure the sink to the countertop following the
manufacturer’s instructions.
4. Apply a thin bead of silicone sealant where the sink meets the
countertop and cabinet.
5. Immediately remove excess sealant.
IMPORTANT: The enclosed cutout template will create a countertop opening
with a minimal (1/8” or less) reveal. It is recommended that you discuss this with
your installer and agree that this finished appearance is the desired effect.
Soleil is not responsible for improper sink or countertop installations.
IMPORTANT: Soleil apron front sinks should only be fastened to a solid surface
countertop (i.e. granite, Corian® or Silestone®).
IMPORTANT: Make sure the top of the sink does not extend above the top of the
cabinet; otherwise it will interfere with countertop installation.
Apron Front Stainless Steel Sink
Installation Instructions
PAGE 3
4: INSTALL THE SINK
1. Lower the sink onto the supports and verify the sink is supported by
the frame.
2. Push the sink in to ensure the apron is flush to the front of the cabinet.
3. Verify the sink is level. Make any adjustments and shim as needed.
4. Secure the sink in place using the hardware provided.
IMPORTANT: The front sink apron must be secured to the front of the cabinet
by attaching fasteners through the cabinet front and into the support framing.
Failure of this step can lead to product damage.
IMPORTANT: Soleil is not responsible for sink or countertop if damaged
during installation. Be sure to inspect the sink for damage prior to beginning
installation.
IMPORTANT: Metal edges may be sharp - use caution when handling.
4: INSTALL THE SINK
1. Lower the sink onto the supports and verify the sink is supported by the
frame.
2.
3. Verify the sink is level. Make any adjustments and shim as needed.
4. Secure the sink in place using the hardware provided
IMPORTANT: The front sink apron must be secured to the front of the cabinet
by attaching fasteners through the cabinet front and into the support framing.
Failure of this step can lead to product damage.
IMPORTANT: Soleil is not responsible for sink or countertop if damaged
during installation. Be sure to inspect the sink for damage prior to beginning
installation.
IMPORTANT: Metal edges may be sharp – use caution when handling.
1.
sink with denatured alcohol.
2. Apply a narrow bead of silicone adhesive sealant around the side and
back of the sink.
3. Carefully position and secure the sink to the countertop following the
manufacturer’s instructions.
4. Apply a thin bead of silicone sealant where the sink meets the
countertop and cabinet.
5. Immediately remove excess sealant.
IMPORTANT: The enclosed cutout template will create a countertop opening
with a minimal (1/8” or less) reveal. It is recommended that you discuss this
Soleil is not responsible for improper sink or countertop installations.
IMPORTANT: Soleil apron front sinks should only be fastened to a solid surface
countertop (i.e. granite, Corian® or Silestone®).
IMPORTANT: Make sure the top of the sink does not extend above the top of the
cabinet; otherwise it will interfere with countertop installation.
5: INSTALL COUNTERTOP
APPLY SILICONE SEALANT AFTER CLEANING THE
SINK EDGE AND COUNTERTOP
APPLY SILICONE SEALANT WHERE THE SINK MEETS
THE COUNTERTOP AND CABINET.
6: FINAL STEPS
1. Following all local plumbing and building codes, install the faucet according to the manufacturer’s instructions.
2. Connect the drain and piping.
3. Run water into the sink and check all connections for leaks.
IMPORTANT: For additional information or warranty issues visit www.soleilsinks.com or contact Soleil directly at:
Apron Front Stainless Steel Sink
Installation Instructions
Contact Soleil at (687) 445-4638 or visit www.soleilsinks.com. Copyright ©2015, Soleil Sink Company Inc. All rights reserved.
PAGE 3
Soleil Sink Company Inc.
820 Shallowford Rd
Kennesaw, GA 30144
(678) 445-4638
with your installer and agree that this nished appearance is the desired eect.
5: INSTALL COUNTERTOP
1. Clean the bottom of the countertop and the top flange (or lip) of the
sink with denatured alcohol.
2. Apply a narrow bead of silicone adhesive sealant around the side and
back of the sink.
3. Carefully position and secure the sink to the countertop following the
manufacturer’s instructions.
4. Apply a thin bead of silicone sealant where the sink meets the
countertop and cabinet.
5. Immediately remove excess sealant.
IMPORTANT: The enclosed cutout template will create a countertop opening
with a minimal (1/8” or less) reveal. It is recommended that you discuss this with
your installer and agree that this finished appearance is the desired effect.
Soleil is not responsible for improper sink or countertop installations.
IMPORTANT: Soleil apron front sinks should only be fastened to a solid surface
countertop (i.e. granite, Corian® or Silestone®).
IMPORTANT: Make sure the top of the sink does not extend above the top of the
cabinet; otherwise it will interfere with countertop installation.
4: INSTALL THE SINK
1. Lower the sink onto the supports and verify the sink is supported by the
frame.
2.
3. Verify the sink is level. Make any adjustments and shim as needed.
4. Secure the sink in place using the hardware provided
IMPORTANT: The front sink apron must be secured to the front of the cabinet
by attaching fasteners through the cabinet front and into the support framing.
Failure of this step can lead to product damage.
IMPORTANT: Soleil is not responsible for sink or countertop if damaged
during installation. Be sure to inspect the sink for damage prior to beginning
installation.
IMPORTANT: Metal edges may be sharp – use caution when handling.
1.
sink with denatured alcohol.
2. Apply a narrow bead of silicone adhesive sealant around the side and
back of the sink.
3. Carefully position and secure the sink to the countertop following the
manufacturer’s instructions.
4. Apply a thin bead of silicone sealant where the sink meets the
countertop and cabinet.
5. Immediately remove excess sealant.
IMPORTANT: The enclosed cutout template will create a countertop opening
with a minimal (1/8” or less) reveal. It is recommended that you discuss this
Soleil is not responsible for improper sink or countertop installations.
IMPORTANT: Soleil apron front sinks should only be fastened to a solid surface
countertop (i.e. granite, Corian® or Silestone®).
IMPORTANT: Make sure the top of the sink does not extend above the top of the
cabinet; otherwise it will interfere with countertop installation.
5: INSTALL COUNTERTOP
APPLY SILICONE SEALANT AFTER CLEANING THE
SINK EDGE AND COUNTERTOP
APPLY SILICONE SEALANT WHERE THE SINK MEETS
THE COUNTERTOP AND CABINET.
6: FINAL STEPS
1. Following all local plumbing and building codes, install the faucet according to the manufacturer’s instructions.
2. Connect the drain and piping.
3. Run water into the sink and check all connections for leaks.
IMPORTANT: For additional information or warranty issues visit www.soleilsinks.com or contact Soleil directly at:
Apron Front Stainless Steel Sink
Installation Instructions
Contact Soleil at (687) 445-4638 or visit www.soleilsinks.com. Copyright ©2015, Soleil Sink Company Inc. All rights reserved.
PAGE 3
Soleil Sink Company Inc.
820 Shallowford Rd
Kennesaw, GA 30144
(678) 445-4638
with your installer and agree that this nished appearance is the desired eect.
6: FINAL STEPS
1. Following all local plumbing and building codes, install the faucet according to the manufacturer’s instructions.
2. Connect the drain and piping.
3. Run water into the sink and check all connections for leaks.
IMPORTANT: For additional information or warranty issues visit www.soleilsinks.com or contact Soleil directly at:
Soleil Sink Company Inc.
820 Shallowford Rd
Kennesaw, GA 30144
(678) 445-4638
Contact Soleil Sinks at (687) 445-4638 or visit www.soleilsinks.com. Copyright ©2015, Soleil Sink Company Inc. All rights reserved.
6: FINAL STEPS
1. Following all local plumbing and building codes, install the faucet according to the manufacturer’s instructions.
2. Connect the drain and piping.
3. Run water into the sink and check all connections for leaks.
IMPORTANT: For additional information or warranty issues visit www.soleilsinks.com or contact Soleil directly at:
Soleil Sink Company Inc.
4170 JVL Industrial Park Drive
Marietta, GA 30066
(678) 445-4638
Contact Soleil Sinks at (678) 445-4638 or visit www.soleilsinks.com. Copyright ©2016, Soleil Sink Company Inc. All rights reserved.
5: INSTALL COUNTERTOP
1. Clean the bottom of the countertop and the top flange (or lip) of the
sink with denatured alcohol.
2. Apply a narrow bead of silicone adhesive sealant around the side and
back of the sink.
3. Carefully position and secure the sink to the countertop following the
manufacturer’s instructions.
4. Apply a thin bead of silicone sealant where the sink meets the
countertop and cabinet.
5. Immediately remove excess sealant.
IMPORTANT: The enclosed cutout template will create a countertop opening
with a minimal (1/8” or less) reveal. It is recommended that you discuss this with
your installer and agree that this finished appearance is the desired effect.
IPT Sink Company is not responsible for improper sink or countertop installations.
IMPORTANT: IPT Sink Company apron front sinks should only be fastened to a
solid surface countertop (i.e. granite, Corian® or Silestone®).
IMPORTANT: Make sure the top of the sink does not extend above the top of the
cabinet; otherwise it will interfere with countertop installation.
Apron Front Stainless Steel Sink
Installation Instructions
PAGE 3
4: INSTALL THE SINK
1. Lower the sink onto the supports and verify the sink is supported by
the frame.
2. Push the sink in to ensure the apron is flush to the front of the cabinet.
3. Verify the sink is level. Make any adjustments and shim as needed.
4. Secure the sink in place using the hardware provided.
IMPORTANT: The front sink apron must be secured to the front of the cabinet
by attaching fasteners through the cabinet front and into the support framing.
Failure of this step can lead to product damage.
IMPORTANT: Soleil is not responsible for sink or countertop if damaged
during installation. Be sure to inspect the sink for damage prior to beginning
installation.
IMPORTANT: Metal edges may be sharp - use caution when handling.
4: INSTALL THE SINK
1. Lower the sink onto the supports and verify the sink is supported by the
frame.
2.
3. Verify the sink is level. Make any adjustments and shim as needed.
4. Secure the sink in place using the hardware provided
IMPORTANT: The front sink apron must be secured to the front of the cabinet
by attaching fasteners through the cabinet front and into the support framing.
Failure of this step can lead to product damage.
IMPORTANT: Soleil is not responsible for sink or countertop if damaged
during installation. Be sure to inspect the sink for damage prior to beginning
installation.
IMPORTANT: Metal edges may be sharp – use caution when handling.
1.
sink with denatured alcohol.
2. Apply a narrow bead of silicone adhesive sealant around the side and
back of the sink.
3. Carefully position and secure the sink to the countertop following the
manufacturer’s instructions.
4. Apply a thin bead of silicone sealant where the sink meets the
countertop and cabinet.
5. Immediately remove excess sealant.
IMPORTANT: The enclosed cutout template will create a countertop opening
with a minimal (1/8” or less) reveal. It is recommended that you discuss this
Soleil is not responsible for improper sink or countertop installations.
IMPORTANT: Soleil apron front sinks should only be fastened to a solid surface
countertop (i.e. granite, Corian® or Silestone®).
IMPORTANT: Make sure the top of the sink does not extend above the top of the
cabinet; otherwise it will interfere with countertop installation.
5: INSTALL COUNTERTOP
APPLY SILICONE SEALANT AFTER CLEANING THE
SINK EDGE AND COUNTERTOP
APPLY SILICONE SEALANT WHERE THE SINK MEETS
THE COUNTERTOP AND CABINET.
6: FINAL STEPS
1. Following all local plumbing and building codes, install the faucet according to the manufacturer’s instructions.
2. Connect the drain and piping.
3. Run water into the sink and check all connections for leaks.
IMPORTANT: For additional information or warranty issues visit www.soleilsinks.com or contact Soleil directly at:
Apron Front Stainless Steel Sink
Installation Instructions
Contact Soleil at (687) 445-4638 or visit www.soleilsinks.com. Copyright ©2015, Soleil Sink Company Inc. All rights reserved.
PAGE 3
Soleil Sink Company Inc.
820 Shallowford Rd
Kennesaw, GA 30144
(678) 445-4638
with your installer and agree that this nished appearance is the desired eect.
5: INSTALL COUNTERTOP
1. Clean the bottom of the countertop and the top flange (or lip) of the
sink with denatured alcohol.
2. Apply a narrow bead of silicone adhesive sealant around the side and
back of the sink.
3. Carefully position and secure the sink to the countertop following the
manufacturer’s instructions.
4. Apply a thin bead of silicone sealant where the sink meets the
countertop and cabinet.
5. Immediately remove excess sealant.
IMPORTANT: The enclosed cutout template will create a countertop opening
with a minimal (1/8” or less) reveal. It is recommended that you discuss this with
your installer and agree that this finished appearance is the desired effect.
Soleil is not responsible for improper sink or countertop installations.
IMPORTANT: Soleil apron front sinks should only be fastened to a solid surface
countertop (i.e. granite, Corian® or Silestone®).
IMPORTANT: Make sure the top of the sink does not extend above the top of the
cabinet; otherwise it will interfere with countertop installation.
4: INSTALL THE SINK
1. Lower the sink onto the supports and verify the sink is supported by the
frame.
2.
3. Verify the sink is level. Make any adjustments and shim as needed.
4. Secure the sink in place using the hardware provided
IMPORTANT: The front sink apron must be secured to the front of the cabinet
by attaching fasteners through the cabinet front and into the support framing.
Failure of this step can lead to product damage.
IMPORTANT: Soleil is not responsible for sink or countertop if damaged
during installation. Be sure to inspect the sink for damage prior to beginning
installation.
IMPORTANT: Metal edges may be sharp – use caution when handling.
1.
sink with denatured alcohol.
2. Apply a narrow bead of silicone adhesive sealant around the side and
back of the sink.
3. Carefully position and secure the sink to the countertop following the
manufacturer’s instructions.
4. Apply a thin bead of silicone sealant where the sink meets the
countertop and cabinet.
5. Immediately remove excess sealant.
IMPORTANT: The enclosed cutout template will create a countertop opening
with a minimal (1/8” or less) reveal. It is recommended that you discuss this
Soleil is not responsible for improper sink or countertop installations.
IMPORTANT: Soleil apron front sinks should only be fastened to a solid surface
countertop (i.e. granite, Corian® or Silestone®).
IMPORTANT: Make sure the top of the sink does not extend above the top of the
cabinet; otherwise it will interfere with countertop installation.
5: INSTALL COUNTERTOP
APPLY SILICONE SEALANT AFTER CLEANING THE
SINK EDGE AND COUNTERTOP
APPLY SILICONE SEALANT WHERE THE SINK MEETS
THE COUNTERTOP AND CABINET.
6: FINAL STEPS
1. Following all local plumbing and building codes, install the faucet according to the manufacturer’s instructions.
2. Connect the drain and piping.
3. Run water into the sink and check all connections for leaks.
IMPORTANT: For additional information or warranty issues visit www.soleilsinks.com or contact Soleil directly at:
Apron Front Stainless Steel Sink
Installation Instructions
Contact Soleil at (687) 445-4638 or visit www.soleilsinks.com. Copyright ©2015, Soleil Sink Company Inc. All rights reserved.
PAGE 3
Soleil Sink Company Inc.
820 Shallowford Rd
Kennesaw, GA 30144
(678) 445-4638
with your installer and agree that this nished appearance is the desired eect.
6: FINAL STEPS
1. Following all local plumbing and building codes, install the faucet according to the manufacturer’s instructions.
2. Connect the drain and piping.
3. Run water into the sink and check all connections for leaks.
IMPORTANT: For additional information or warranty issues visit www.soleilsinks.com or contact Soleil directly at:
Soleil Sink Company Inc.
820 Shallowford Rd
Kennesaw, GA 30144
(678) 445-4638
Contact Soleil Sinks at (687) 445-4638 or visit www.soleilsinks.com. Copyright ©2015, Soleil Sink Company Inc. All rights reserved.
5: INSTALL COUNTERTOP
1. Clean the bottom of the countertop and the top flange (or lip) of the
sink with denatured alcohol.
2. Apply a narrow bead of silicone adhesive sealant around the side and
back of the sink.
3. Carefully position and secure the sink to the countertop following the
manufacturer’s instructions.
4. Apply a thin bead of silicone sealant where the sink meets the
countertop and cabinet.
5. Immediately remove excess sealant.
IMPORTANT: The enclosed cutout template will create a countertop opening
with a minimal (1/8” or less) reveal. It is recommended that you discuss this with
your installer and agree that this finished appearance is the desired effect.
Soleil is not responsible for improper sink or countertop installations.
IMPORTANT: Soleil apron front sinks should only be fastened to a solid surface
countertop (i.e. granite, Corian® or Silestone®).
IMPORTANT: Make sure the top of the sink does not extend above the top of the
cabinet; otherwise it will interfere with countertop installation.
Apron Front Stainless Steel Sink
Installation Instructions
PAGE 3
4: INSTALL THE SINK
1. Lower the sink onto the supports and verify the sink is supported by
the frame.
2. Push the sink in to ensure the apron is flush to the front of the cabinet.
3. Verify the sink is level. Make any adjustments and shim as needed.
4. Secure the sink in place using the hardware provided.
IMPORTANT: The front sink apron must be secured to the front of the cabinet
by attaching fasteners through the cabinet front and into the support framing.
Failure of this step can lead to product damage.
IMPORTANT: Soleil is not responsible for sink or countertop if damaged
during installation. Be sure to inspect the sink for damage prior to beginning
installation.
IMPORTANT: Metal edges may be sharp - use caution when handling.
4: INSTALL THE SINK
1. Lower the sink onto the supports and verify the sink is supported by the
frame.
2.
3. Verify the sink is level. Make any adjustments and shim as needed.
4. Secure the sink in place using the hardware provided
IMPORTANT: The front sink apron must be secured to the front of the cabinet
by attaching fasteners through the cabinet front and into the support framing.
Failure of this step can lead to product damage.
IMPORTANT: Soleil is not responsible for sink or countertop if damaged
during installation. Be sure to inspect the sink for damage prior to beginning
installation.
IMPORTANT: Metal edges may be sharp – use caution when handling.
1.
sink with denatured alcohol.
2. Apply a narrow bead of silicone adhesive sealant around the side and
back of the sink.
3. Carefully position and secure the sink to the countertop following the
manufacturer’s instructions.
4. Apply a thin bead of silicone sealant where the sink meets the
countertop and cabinet.
5. Immediately remove excess sealant.
IMPORTANT: The enclosed cutout template will create a countertop opening
with a minimal (1/8” or less) reveal. It is recommended that you discuss this
Soleil is not responsible for improper sink or countertop installations.
IMPORTANT: Soleil apron front sinks should only be fastened to a solid surface
countertop (i.e. granite, Corian® or Silestone®).
IMPORTANT: Make sure the top of the sink does not extend above the top of the
cabinet; otherwise it will interfere with countertop installation.
5: INSTALL COUNTERTOP
APPLY SILICONE SEALANT AFTER CLEANING THE
SINK EDGE AND COUNTERTOP
APPLY SILICONE SEALANT WHERE THE SINK MEETS
THE COUNTERTOP AND CABINET.
6: FINAL STEPS
1. Following all local plumbing and building codes, install the faucet according to the manufacturer’s instructions.
2. Connect the drain and piping.
3. Run water into the sink and check all connections for leaks.
IMPORTANT: For additional information or warranty issues visit www.soleilsinks.com or contact Soleil directly at:
Apron Front Stainless Steel Sink
Installation Instructions
Contact Soleil at (687) 445-4638 or visit www.soleilsinks.com. Copyright ©2015, Soleil Sink Company Inc. All rights reserved.
PAGE 3
Soleil Sink Company Inc.
820 Shallowford Rd
Kennesaw, GA 30144
(678) 445-4638
with your installer and agree that this nished appearance is the desired eect.
5: INSTALL COUNTERTOP
1. Clean the bottom of the countertop and the top flange (or lip) of the
sink with denatured alcohol.
2. Apply a narrow bead of silicone adhesive sealant around the side and
back of the sink.
3. Carefully position and secure the sink to the countertop following the
manufacturer’s instructions.
4. Apply a thin bead of silicone sealant where the sink meets the
countertop and cabinet.
5. Immediately remove excess sealant.
IMPORTANT: The enclosed cutout template will create a countertop opening
with a minimal (1/8” or less) reveal. It is recommended that you discuss this with
your installer and agree that this finished appearance is the desired effect.
Soleil is not responsible for improper sink or countertop installations.
IMPORTANT: Soleil apron front sinks should only be fastened to a solid surface
countertop (i.e. granite, Corian® or Silestone®).
IMPORTANT: Make sure the top of the sink does not extend above the top of the
cabinet; otherwise it will interfere with countertop installation.
4: INSTALL THE SINK
1. Lower the sink onto the supports and verify the sink is supported by the
frame.
2.
3. Verify the sink is level. Make any adjustments and shim as needed.
4. Secure the sink in place using the hardware provided
IMPORTANT: The front sink apron must be secured to the front of the cabinet
by attaching fasteners through the cabinet front and into the support framing.
Failure of this step can lead to product damage.
IMPORTANT: Soleil is not responsible for sink or countertop if damaged
during installation. Be sure to inspect the sink for damage prior to beginning
installation.
IMPORTANT: Metal edges may be sharp – use caution when handling.
1.
sink with denatured alcohol.
2. Apply a narrow bead of silicone adhesive sealant around the side and
back of the sink.
3. Carefully position and secure the sink to the countertop following the
manufacturer’s instructions.
4. Apply a thin bead of silicone sealant where the sink meets the
countertop and cabinet.
5. Immediately remove excess sealant.
IMPORTANT: The enclosed cutout template will create a countertop opening
with a minimal (1/8” or less) reveal. It is recommended that you discuss this
Soleil is not responsible for improper sink or countertop installations.
IMPORTANT: Soleil apron front sinks should only be fastened to a solid surface
countertop (i.e. granite, Corian® or Silestone®).
IMPORTANT: Make sure the top of the sink does not extend above the top of the
cabinet; otherwise it will interfere with countertop installation.
5: INSTALL COUNTERTOP
APPLY SILICONE SEALANT AFTER CLEANING THE
SINK EDGE AND COUNTERTOP
APPLY SILICONE SEALANT WHERE THE SINK MEETS
THE COUNTERTOP AND CABINET.
6: FINAL STEPS
1. Following all local plumbing and building codes, install the faucet according to the manufacturer’s instructions.
2. Connect the drain and piping.
3. Run water into the sink and check all connections for leaks.
IMPORTANT: For additional information or warranty issues visit www.soleilsinks.com or contact Soleil directly at:
Apron Front Stainless Steel Sink
Installation Instructions
Contact Soleil at (687) 445-4638 or visit www.soleilsinks.com. Copyright ©2015, Soleil Sink Company Inc. All rights reserved.
PAGE 3
Soleil Sink Company Inc.
820 Shallowford Rd
Kennesaw, GA 30144
(678) 445-4638
with your installer and agree that this nished appearance is the desired eect.
6: FINAL STEPS
1. Following all local plumbing and building codes, install the faucet according to the manufacturer’s instructions.
2. Connect the drain and piping.
3. Run water into the sink and check all connections for leaks.
IMPORTANT: For additional information or warranty issues visit www.soleilsinks.com or contact Soleil directly at:
Soleil Sink Company Inc.
820 Shallowford Rd
Kennesaw, GA 30144
(678) 445-4638
Contact Soleil Sinks at (687) 445-4638 or visit www.soleilsinks.com. Copyright ©2015, Soleil Sink Company Inc. All rights reserved.
6: FINAL STEPS
1. Following all local plumbing and building codes, install the faucet according to the manufacturer’s instructions.
2. Connect the drain and piping.
3. Run water into the sink and check all connections for leaks.
IMPORTANT: For additional information or warranty issues visit www.soleilsinks.com or contact Soleil directly at:
Soleil Sink Company Inc.
4170 JVL Industrial Park Drive
Marietta, GA 30066
(678) 445-4638
Contact Soleil Sinks at (678) 445-4638 or visit www.soleilsinks.com. Copyright ©2016, Soleil Sink Company Inc. All rights reserved.
6: FINAL STEPS
1. Following all local plumbing and building codes, install the faucet according to the manufacturer’s instructions.
2. Connect the drain and piping.
3. Run water into the sink and check all connections for leaks.
IMPORTANT: For additional information or warranty issues visit www.iptsink.com or contact IPT Sink Company directly at:
IPT Sink Company Inc.
4170 JVL Industrial Park Drive
Marietta, GA 30066
(678) 445-4638
Contact IPT Sink Company at (678) 445-4638 or visit www.iptsink.com. Copyright ©2016, IPT Sink Company Inc. All rights reserved.
5: INSTALL COUNTERTOP
1. Clean the bottom of the countertop and the top ange (or lip) of the
sink with denatured alcohol.
2. Apply a narrow bead of silicone adhesive sealant around the side and
back of the sink.
3. Carefully position and secure the sink to the countertop following the
manufacturer’s instructions.
4. Apply a thin bead of silicone sealant where the sink meets the
countertop and cabinet.
5. Immediately remove excess sealant.
IMPORTANT: The enclosed cutout template will create a countertop opening
with a minimal (1/8” or less) reveal. It is recommended that you discuss this with
your installer and agree that this nished appearance is the desired effect.
Schön is not responsible for improper sink or countertop installations.
IMPORTANT: Schön apron front sinks should only be fastened to a solid surface
countertop (i.e. granite, Corian® or Silestone®).
IMPORTANT: Make sure the top of the sink does not extend above the top of the
cabinet; otherwise it will interfere with countertop installation.
Apron Front Stainless Steel Sink
Installation Instructions
PAGE 3
4: INSTALL THE SINK
1. Lower the sink onto the supports and verify the sink is supported by
the frame.
2. Push the sink in to ensure the apron is flush to the front of the cabinet.
3. Verify the sink is level. Make any adjustments and shim as needed.
4. Secure the sink in place using the hardware provided.
IMPORTANT: The front sink apron must be secured to the front of the cabinet
by attaching fasteners through the cabinet front and into the support framing.
Failure of this step can lead to product damage.
IMPORTANT: IPT Sink Company is not responsible for sink or countertop if
damaged during installation. Be sure to inspect the sink for damage prior to
beginning installation.
IMPORTANT: Metal edges may be sharp - use caution when handling.
Apron Front Stainless Steel Sink
Installation Instructions
PAGE 3
4: INSTALL THE SINK
1. Lower the sink onto the supports and verify the sink is supported by
the frame.
2. Push the sink in to ensure the apron is flush to the front of the cabinet.
3. Verify the sink is level. Make any adjustments and shim as needed.
4. Secure the sink in place using the hardware provided.
IMPORTANT: The front sink apron must be secured to the front of the cabinet
by attaching fasteners through the cabinet front and into the support framing.
Failure of this step can lead to product damage.
IMPORTANT: Soleil is not responsible for sink or countertop if damaged
during installation. Be sure to inspect the sink for damage prior to beginning
installation.
IMPORTANT: Metal edges may be sharp - use caution when handling.
Apron Front Stainless Steel Sink
Installation Instructions
PAGE 3
4: INSTALL THE SINK
1. Lower the sink onto the supports and verify the sink is supported by
the frame.
2. Push the sink in to ensure the apron is flush to the front of the cabinet.
3. Verify the sink is level. Make any adjustments and shim as needed.
4. Secure the sink in place using the hardware provided.
IMPORTANT: The front sink apron must be secured to the front of the cabinet
by attaching fasteners through the cabinet front and into the support framing.
Failure of this step can lead to product damage.
IMPORTANT: Soleil is not responsible for sink or countertop if damaged
during installation. Be sure to inspect the sink for damage prior to beginning
installation.
IMPORTANT: Metal edges may be sharp - use caution when handling.
4: INSTALL THE SINK
1. Lower the sink onto the supports and verify the sink is supported by the
frame.
2.
3. Verify the sink is level. Make any adjustments and shim as needed.
4. Secure the sink in place using the hardware provided
IMPORTANT: The front sink apron must be secured to the front of the cabinet
by attaching fasteners through the cabinet front and into the support framing.
Failure of this step can lead to product damage.
IMPORTANT: Soleil is not responsible for sink or countertop if damaged
during installation. Be sure to inspect the sink for damage prior to beginning
installation.
IMPORTANT: Metal edges may be sharp – use caution when handling.
1.
sink with denatured alcohol.
2. Apply a narrow bead of silicone adhesive sealant around the side and
back of the sink.
3. Carefully position and secure the sink to the countertop following the
manufacturer’s instructions.
4. Apply a thin bead of silicone sealant where the sink meets the
countertop and cabinet.
5. Immediately remove excess sealant.
IMPORTANT: The enclosed cutout template will create a countertop opening
with a minimal (1/8” or less) reveal. It is recommended that you discuss this
Soleil is not responsible for improper sink or countertop installations.
IMPORTANT: Soleil apron front sinks should only be fastened to a solid surface
countertop (i.e. granite, Corian® or Silestone®).
IMPORTANT: Make sure the top of the sink does not extend above the top of the
cabinet; otherwise it will interfere with countertop installation.
5: INSTALL COUNTERTOP
APPLY SILICONE SEALANT AFTER CLEANING THE
SINK EDGE AND COUNTERTOP
APPLY SILICONE SEALANT WHERE THE SINK MEETS
THE COUNTERTOP AND CABINET.
6: FINAL STEPS
1. Following all local plumbing and building codes, install the faucet according to the manufacturer’s instructions.
2. Connect the drain and piping.
3. Run water into the sink and check all connections for leaks.
IMPORTANT: For additional information or warranty issues visit www.soleilsinks.com or contact Soleil directly at:
Apron Front Stainless Steel Sink
Installation Instructions
Contact Soleil at (687) 445-4638 or visit www.soleilsinks.com. Copyright ©2015, Soleil Sink Company Inc. All rights reserved.
PAGE 3
Soleil Sink Company Inc.
820 Shallowford Rd
Kennesaw, GA 30144
(678) 445-4638
with your installer and agree that this nished appearance is the desired eect.
5: INSTALL COUNTERTOP
1. Clean the bottom of the countertop and the top flange (or lip) of the
sink with denatured alcohol.
2. Apply a narrow bead of silicone adhesive sealant around the side and
back of the sink.
3. Carefully position and secure the sink to the countertop following the
manufacturer’s instructions.
4. Apply a thin bead of silicone sealant where the sink meets the
countertop and cabinet.
5. Immediately remove excess sealant.
IMPORTANT: The enclosed cutout template will create a countertop opening
with a minimal (1/8” or less) reveal. It is recommended that you discuss this with
your installer and agree that this finished appearance is the desired effect.
Soleil is not responsible for improper sink or countertop installations.
IMPORTANT: Soleil apron front sinks should only be fastened to a solid surface
countertop (i.e. granite, Corian® or Silestone®).
IMPORTANT: Make sure the top of the sink does not extend above the top of the
cabinet; otherwise it will interfere with countertop installation.
4: INSTALL THE SINK
1. Lower the sink onto the supports and verify the sink is supported by the
frame.
2.
3. Verify the sink is level. Make any adjustments and shim as needed.
4. Secure the sink in place using the hardware provided
IMPORTANT: The front sink apron must be secured to the front of the cabinet
by attaching fasteners through the cabinet front and into the support framing.
Failure of this step can lead to product damage.
IMPORTANT: Soleil is not responsible for sink or countertop if damaged
during installation. Be sure to inspect the sink for damage prior to beginning
installation.
IMPORTANT: Metal edges may be sharp – use caution when handling.
1.
sink with denatured alcohol.
2. Apply a narrow bead of silicone adhesive sealant around the side and
back of the sink.
3. Carefully position and secure the sink to the countertop following the
manufacturer’s instructions.
4. Apply a thin bead of silicone sealant where the sink meets the
countertop and cabinet.
5. Immediately remove excess sealant.
IMPORTANT: The enclosed cutout template will create a countertop opening
with a minimal (1/8” or less) reveal. It is recommended that you discuss this
Soleil is not responsible for improper sink or countertop installations.
IMPORTANT: Soleil apron front sinks should only be fastened to a solid surface
countertop (i.e. granite, Corian® or Silestone®).
IMPORTANT: Make sure the top of the sink does not extend above the top of the
cabinet; otherwise it will interfere with countertop installation.
5: INSTALL COUNTERTOP
APPLY SILICONE SEALANT AFTER CLEANING THE
SINK EDGE AND COUNTERTOP
APPLY SILICONE SEALANT WHERE THE SINK MEETS
THE COUNTERTOP AND CABINET.
6: FINAL STEPS
1. Following all local plumbing and building codes, install the faucet according to the manufacturer’s instructions.
2. Connect the drain and piping.
3. Run water into the sink and check all connections for leaks.
IMPORTANT: For additional information or warranty issues visit www.soleilsinks.com or contact Soleil directly at:
Apron Front Stainless Steel Sink
Installation Instructions
Contact Soleil at (687) 445-4638 or visit www.soleilsinks.com. Copyright ©2015, Soleil Sink Company Inc. All rights reserved.
PAGE 3
Soleil Sink Company Inc.
820 Shallowford Rd
Kennesaw, GA 30144
(678) 445-4638
with your installer and agree that this nished appearance is the desired eect.
6: FINAL STEPS
1. Following all local plumbing and building codes, install the faucet according to the manufacturer’s instructions.
2. Connect the drain and piping.
3. Run water into the sink and check all connections for leaks.
IMPORTANT: For additional information or warranty issues visit www.soleilsinks.com or contact Soleil directly at:
Soleil Sink Company Inc.
820 Shallowford Rd
Kennesaw, GA 30144
(678) 445-4638
Contact Soleil Sinks at (687) 445-4638 or visit www.soleilsinks.com. Copyright ©2015, Soleil Sink Company Inc. All rights reserved.
5: INSTALL COUNTERTOP
1. Clean the bottom of the countertop and the top flange (or lip) of the
sink with denatured alcohol.
2. Apply a narrow bead of silicone adhesive sealant around the side and
back of the sink.
3. Carefully position and secure the sink to the countertop following the
manufacturer’s instructions.
4. Apply a thin bead of silicone sealant where the sink meets the
countertop and cabinet.
5. Immediately remove excess sealant.
IMPORTANT: The enclosed cutout template will create a countertop opening
with a minimal (1/8” or less) reveal. It is recommended that you discuss this with
your installer and agree that this finished appearance is the desired effect.
Soleil is not responsible for improper sink or countertop installations.
IMPORTANT: Soleil apron front sinks should only be fastened to a solid surface
countertop (i.e. granite, Corian® or Silestone®).
IMPORTANT: Make sure the top of the sink does not extend above the top of the
cabinet; otherwise it will interfere with countertop installation.
Apron Front Stainless Steel Sink
Installation Instructions
PAGE 3
4: INSTALL THE SINK
1. Lower the sink onto the supports and verify the sink is supported by
the frame.
2. Push the sink in to ensure the apron is flush to the front of the cabinet.
3. Verify the sink is level. Make any adjustments and shim as needed.
4. Secure the sink in place using the hardware provided.
IMPORTANT: The front sink apron must be secured to the front of the cabinet
by attaching fasteners through the cabinet front and into the support framing.
Failure of this step can lead to product damage.
IMPORTANT: Soleil is not responsible for sink or countertop if damaged
during installation. Be sure to inspect the sink for damage prior to beginning
installation.
IMPORTANT: Metal edges may be sharp - use caution when handling.
4: INSTALL THE SINK
1. Lower the sink onto the supports and verify the sink is supported by the
frame.
2.
3. Verify the sink is level. Make any adjustments and shim as needed.
4. Secure the sink in place using the hardware provided
IMPORTANT: The front sink apron must be secured to the front of the cabinet
by attaching fasteners through the cabinet front and into the support framing.
Failure of this step can lead to product damage.
IMPORTANT: Soleil is not responsible for sink or countertop if damaged
during installation. Be sure to inspect the sink for damage prior to beginning
installation.
IMPORTANT: Metal edges may be sharp – use caution when handling.
1.
sink with denatured alcohol.
2. Apply a narrow bead of silicone adhesive sealant around the side and
back of the sink.
3. Carefully position and secure the sink to the countertop following the
manufacturer’s instructions.
4. Apply a thin bead of silicone sealant where the sink meets the
countertop and cabinet.
5. Immediately remove excess sealant.
IMPORTANT: The enclosed cutout template will create a countertop opening
with a minimal (1/8” or less) reveal. It is recommended that you discuss this
Soleil is not responsible for improper sink or countertop installations.
IMPORTANT: Soleil apron front sinks should only be fastened to a solid surface
countertop (i.e. granite, Corian® or Silestone®).
IMPORTANT: Make sure the top of the sink does not extend above the top of the
cabinet; otherwise it will interfere with countertop installation.
5: INSTALL COUNTERTOP
APPLY SILICONE SEALANT AFTER CLEANING THE
SINK EDGE AND COUNTERTOP
APPLY SILICONE SEALANT WHERE THE SINK MEETS
THE COUNTERTOP AND CABINET.
6: FINAL STEPS
1. Following all local plumbing and building codes, install the faucet according to the manufacturer’s instructions.
2. Connect the drain and piping.
3. Run water into the sink and check all connections for leaks.
IMPORTANT: For additional information or warranty issues visit www.soleilsinks.com or contact Soleil directly at:
Apron Front Stainless Steel Sink
Installation Instructions
Contact Soleil at (687) 445-4638 or visit www.soleilsinks.com. Copyright ©2015, Soleil Sink Company Inc. All rights reserved.
PAGE 3
Soleil Sink Company Inc.
820 Shallowford Rd
Kennesaw, GA 30144
(678) 445-4638
with your installer and agree that this nished appearance is the desired eect.
5: INSTALL COUNTERTOP
1. Clean the bottom of the countertop and the top flange (or lip) of the
sink with denatured alcohol.
2. Apply a narrow bead of silicone adhesive sealant around the side and
back of the sink.
3. Carefully position and secure the sink to the countertop following the
manufacturer’s instructions.
4. Apply a thin bead of silicone sealant where the sink meets the
countertop and cabinet.
5. Immediately remove excess sealant.
IMPORTANT: The enclosed cutout template will create a countertop opening
with a minimal (1/8” or less) reveal. It is recommended that you discuss this with
your installer and agree that this finished appearance is the desired effect.
Soleil is not responsible for improper sink or countertop installations.
IMPORTANT: Soleil apron front sinks should only be fastened to a solid surface
countertop (i.e. granite, Corian® or Silestone®).
IMPORTANT: Make sure the top of the sink does not extend above the top of the
cabinet; otherwise it will interfere with countertop installation.
4: INSTALL THE SINK
1. Lower the sink onto the supports and verify the sink is supported by the
frame.
2.
3. Verify the sink is level. Make any adjustments and shim as needed.
4. Secure the sink in place using the hardware provided
IMPORTANT: The front sink apron must be secured to the front of the cabinet
by attaching fasteners through the cabinet front and into the support framing.
Failure of this step can lead to product damage.
IMPORTANT: Soleil is not responsible for sink or countertop if damaged
during installation. Be sure to inspect the sink for damage prior to beginning
installation.
IMPORTANT: Metal edges may be sharp – use caution when handling.
1.
sink with denatured alcohol.
2. Apply a narrow bead of silicone adhesive sealant around the side and
back of the sink.
3. Carefully position and secure the sink to the countertop following the
manufacturer’s instructions.
4. Apply a thin bead of silicone sealant where the sink meets the
countertop and cabinet.
5. Immediately remove excess sealant.
IMPORTANT: The enclosed cutout template will create a countertop opening
with a minimal (1/8” or less) reveal. It is recommended that you discuss this
Soleil is not responsible for improper sink or countertop installations.
IMPORTANT: Soleil apron front sinks should only be fastened to a solid surface
countertop (i.e. granite, Corian® or Silestone®).
IMPORTANT: Make sure the top of the sink does not extend above the top of the
cabinet; otherwise it will interfere with countertop installation.
5: INSTALL COUNTERTOP
APPLY SILICONE SEALANT AFTER CLEANING THE
SINK EDGE AND COUNTERTOP
APPLY SILICONE SEALANT WHERE THE SINK MEETS
THE COUNTERTOP AND CABINET.
6: FINAL STEPS
1. Following all local plumbing and building codes, install the faucet according to the manufacturer’s instructions.
2. Connect the drain and piping.
3. Run water into the sink and check all connections for leaks.
IMPORTANT: For additional information or warranty issues visit www.soleilsinks.com or contact Soleil directly at:
Apron Front Stainless Steel Sink
Installation Instructions
Contact Soleil at (687) 445-4638 or visit www.soleilsinks.com. Copyright ©2015, Soleil Sink Company Inc. All rights reserved.
PAGE 3
Soleil Sink Company Inc.
820 Shallowford Rd
Kennesaw, GA 30144
(678) 445-4638
with your installer and agree that this nished appearance is the desired eect.
6: FINAL STEPS
1. Following all local plumbing and building codes, install the faucet according to the manufacturer’s instructions.
2. Connect the drain and piping.
3. Run water into the sink and check all connections for leaks.
IMPORTANT: For additional information or warranty issues visit www.soleilsinks.com or contact Soleil directly at:
Soleil Sink Company Inc.
820 Shallowford Rd
Kennesaw, GA 30144
(678) 445-4638
Contact Soleil Sinks at (687) 445-4638 or visit www.soleilsinks.com. Copyright ©2015, Soleil Sink Company Inc. All rights reserved.
6: FINAL STEPS
1. Following all local plumbing and building codes, install the faucet according to the manufacturer’s instructions.
2. Connect the drain and piping.
3. Run water into the sink and check all connections for leaks.
IMPORTANT: For additional information or warranty issues visit www.soleilsinks.com or contact Soleil directly at:
Soleil Sink Company Inc.
4170 JVL Industrial Park Drive
Marietta, GA 30066
(678) 445-4638
Contact Soleil Sinks at (678) 445-4638 or visit www.soleilsinks.com. Copyright ©2016, Soleil Sink Company Inc. All rights reserved.
5: INSTALL COUNTERTOP
1. Clean the bottom of the countertop and the top flange (or lip) of the
sink with denatured alcohol.
2. Apply a narrow bead of silicone adhesive sealant around the side and
back of the sink.
3. Carefully position and secure the sink to the countertop following the
manufacturer’s instructions.
4. Apply a thin bead of silicone sealant where the sink meets the
countertop and cabinet.
5. Immediately remove excess sealant.
IMPORTANT: The enclosed cutout template will create a countertop opening
with a minimal (1/8” or less) reveal. It is recommended that you discuss this with
your installer and agree that this finished appearance is the desired effect.
IPT Sink Company is not responsible for improper sink or countertop installations.
IMPORTANT: IPT Sink Company apron front sinks should only be fastened to a
solid surface countertop (i.e. granite, Corian® or Silestone®).
IMPORTANT: Make sure the top of the sink does not extend above the top of the
cabinet; otherwise it will interfere with countertop installation.
Apron Front Stainless Steel Sink
Installation Instructions
PAGE 3
4: INSTALL THE SINK
1. Lower the sink onto the supports and verify the sink is supported by
the frame.
2. Push the sink in to ensure the apron is flush to the front of the cabinet.
3. Verify the sink is level. Make any adjustments and shim as needed.
4. Secure the sink in place using the hardware provided.
IMPORTANT: The front sink apron must be secured to the front of the cabinet
by attaching fasteners through the cabinet front and into the support framing.
Failure of this step can lead to product damage.
IMPORTANT: Soleil is not responsible for sink or countertop if damaged
during installation. Be sure to inspect the sink for damage prior to beginning
installation.
IMPORTANT: Metal edges may be sharp - use caution when handling.
Apron Front Stainless Steel Sink
Installation Instructions
PAGE 3
4: INSTALL THE SINK
1. Lower the sink onto the supports and verify the sink is supported by
the frame.
2. Push the sink in to ensure the apron is flush to the front of the cabinet.
3. Verify the sink is level. Make any adjustments and shim as needed.
4. Secure the sink in place using the hardware provided.
IMPORTANT: The front sink apron must be secured to the front of the cabinet
by attaching fasteners through the cabinet front and into the support framing.
Failure of this step can lead to product damage.
IMPORTANT: Soleil is not responsible for sink or countertop if damaged
during installation. Be sure to inspect the sink for damage prior to beginning
installation.
IMPORTANT: Metal edges may be sharp - use caution when handling.
4: INSTALL THE SINK
1. Lower the sink onto the supports and verify the sink is supported by the
frame.
2.
3. Verify the sink is level. Make any adjustments and shim as needed.
4. Secure the sink in place using the hardware provided
IMPORTANT: The front sink apron must be secured to the front of the cabinet
by attaching fasteners through the cabinet front and into the support framing.
Failure of this step can lead to product damage.
IMPORTANT: Soleil is not responsible for sink or countertop if damaged
during installation. Be sure to inspect the sink for damage prior to beginning
installation.
IMPORTANT: Metal edges may be sharp – use caution when handling.
1.
sink with denatured alcohol.
2. Apply a narrow bead of silicone adhesive sealant around the side and
back of the sink.
3. Carefully position and secure the sink to the countertop following the
manufacturer’s instructions.
4. Apply a thin bead of silicone sealant where the sink meets the
countertop and cabinet.
5. Immediately remove excess sealant.
IMPORTANT: The enclosed cutout template will create a countertop opening
with a minimal (1/8” or less) reveal. It is recommended that you discuss this
Soleil is not responsible for improper sink or countertop installations.
IMPORTANT: Soleil apron front sinks should only be fastened to a solid surface
countertop (i.e. granite, Corian® or Silestone®).
IMPORTANT: Make sure the top of the sink does not extend above the top of the
cabinet; otherwise it will interfere with countertop installation.
5: INSTALL COUNTERTOP
APPLY SILICONE SEALANT AFTER CLEANING THE
SINK EDGE AND COUNTERTOP
APPLY SILICONE SEALANT WHERE THE SINK MEETS
THE COUNTERTOP AND CABINET.
6: FINAL STEPS
1. Following all local plumbing and building codes, install the faucet according to the manufacturer’s instructions.
2. Connect the drain and piping.
3. Run water into the sink and check all connections for leaks.
IMPORTANT: For additional information or warranty issues visit www.soleilsinks.com or contact Soleil directly at:
Apron Front Stainless Steel Sink
Installation Instructions
Contact Soleil at (687) 445-4638 or visit www.soleilsinks.com. Copyright ©2015, Soleil Sink Company Inc. All rights reserved.
PAGE 3
Soleil Sink Company Inc.
820 Shallowford Rd
Kennesaw, GA 30144
(678) 445-4638
with your installer and agree that this nished appearance is the desired eect.
5: INSTALL COUNTERTOP
1. Clean the bottom of the countertop and the top flange (or lip) of the
sink with denatured alcohol.
2. Apply a narrow bead of silicone adhesive sealant around the side and
back of the sink.
3. Carefully position and secure the sink to the countertop following the
manufacturer’s instructions.
4. Apply a thin bead of silicone sealant where the sink meets the
countertop and cabinet.
5. Immediately remove excess sealant.
IMPORTANT: The enclosed cutout template will create a countertop opening
with a minimal (1/8” or less) reveal. It is recommended that you discuss this with
your installer and agree that this finished appearance is the desired effect.
Soleil is not responsible for improper sink or countertop installations.
IMPORTANT: Soleil apron front sinks should only be fastened to a solid surface
countertop (i.e. granite, Corian® or Silestone®).
IMPORTANT: Make sure the top of the sink does not extend above the top of the
cabinet; otherwise it will interfere with countertop installation.
4: INSTALL THE SINK
1. Lower the sink onto the supports and verify the sink is supported by the
frame.
2.
3. Verify the sink is level. Make any adjustments and shim as needed.
4. Secure the sink in place using the hardware provided
IMPORTANT: The front sink apron must be secured to the front of the cabinet
by attaching fasteners through the cabinet front and into the support framing.
Failure of this step can lead to product damage.
IMPORTANT: Soleil is not responsible for sink or countertop if damaged
during installation. Be sure to inspect the sink for damage prior to beginning
installation.
IMPORTANT: Metal edges may be sharp – use caution when handling.
1.
sink with denatured alcohol.
2. Apply a narrow bead of silicone adhesive sealant around the side and
back of the sink.
3. Carefully position and secure the sink to the countertop following the
manufacturer’s instructions.
4. Apply a thin bead of silicone sealant where the sink meets the
countertop and cabinet.
5. Immediately remove excess sealant.
IMPORTANT: The enclosed cutout template will create a countertop opening
with a minimal (1/8” or less) reveal. It is recommended that you discuss this
Soleil is not responsible for improper sink or countertop installations.
IMPORTANT: Soleil apron front sinks should only be fastened to a solid surface
countertop (i.e. granite, Corian® or Silestone®).
IMPORTANT: Make sure the top of the sink does not extend above the top of the
cabinet; otherwise it will interfere with countertop installation.
5: INSTALL COUNTERTOP
APPLY SILICONE SEALANT AFTER CLEANING THE
SINK EDGE AND COUNTERTOP
APPLY SILICONE SEALANT WHERE THE SINK MEETS
THE COUNTERTOP AND CABINET.
6: FINAL STEPS
1. Following all local plumbing and building codes, install the faucet according to the manufacturer’s instructions.
2. Connect the drain and piping.
3. Run water into the sink and check all connections for leaks.
IMPORTANT: For additional information or warranty issues visit www.soleilsinks.com or contact Soleil directly at:
Apron Front Stainless Steel Sink
Installation Instructions
Contact Soleil at (687) 445-4638 or visit www.soleilsinks.com. Copyright ©2015, Soleil Sink Company Inc. All rights reserved.
PAGE 3
Soleil Sink Company Inc.
820 Shallowford Rd
Kennesaw, GA 30144
(678) 445-4638
with your installer and agree that this nished appearance is the desired eect.
6: FINAL STEPS
1. Following all local plumbing and building codes, install the faucet according to the manufacturer’s instructions.
2. Connect the drain and piping.
3. Run water into the sink and check all connections for leaks.
IMPORTANT: For additional information or warranty issues visit www.soleilsinks.com or contact Soleil directly at:
Soleil Sink Company Inc.
820 Shallowford Rd
Kennesaw, GA 30144
(678) 445-4638
Contact Soleil Sinks at (687) 445-4638 or visit www.soleilsinks.com. Copyright ©2015, Soleil Sink Company Inc. All rights reserved.
5: INSTALL COUNTERTOP
1. Clean the bottom of the countertop and the top flange (or lip) of the
sink with denatured alcohol.
2. Apply a narrow bead of silicone adhesive sealant around the side and
back of the sink.
3. Carefully position and secure the sink to the countertop following the
manufacturer’s instructions.
4. Apply a thin bead of silicone sealant where the sink meets the
countertop and cabinet.
5. Immediately remove excess sealant.
IMPORTANT: The enclosed cutout template will create a countertop opening
with a minimal (1/8” or less) reveal. It is recommended that you discuss this with
your installer and agree that this finished appearance is the desired effect.
Soleil is not responsible for improper sink or countertop installations.
IMPORTANT: Soleil apron front sinks should only be fastened to a solid surface
countertop (i.e. granite, Corian® or Silestone®).
IMPORTANT: Make sure the top of the sink does not extend above the top of the
cabinet; otherwise it will interfere with countertop installation.
Apron Front Stainless Steel Sink
Installation Instructions
PAGE 3
4: INSTALL THE SINK
1. Lower the sink onto the supports and verify the sink is supported by
the frame.
2. Push the sink in to ensure the apron is flush to the front of the cabinet.
3. Verify the sink is level. Make any adjustments and shim as needed.
4. Secure the sink in place using the hardware provided.
IMPORTANT: The front sink apron must be secured to the front of the cabinet
by attaching fasteners through the cabinet front and into the support framing.
Failure of this step can lead to product damage.
IMPORTANT: Soleil is not responsible for sink or countertop if damaged
during installation. Be sure to inspect the sink for damage prior to beginning
installation.
IMPORTANT: Metal edges may be sharp - use caution when handling.
4: INSTALL THE SINK
1. Lower the sink onto the supports and verify the sink is supported by the
frame.
2.
3. Verify the sink is level. Make any adjustments and shim as needed.
4. Secure the sink in place using the hardware provided
IMPORTANT: The front sink apron must be secured to the front of the cabinet
by attaching fasteners through the cabinet front and into the support framing.
Failure of this step can lead to product damage.
IMPORTANT: Soleil is not responsible for sink or countertop if damaged
during installation. Be sure to inspect the sink for damage prior to beginning
installation.
IMPORTANT: Metal edges may be sharp – use caution when handling.
1.
sink with denatured alcohol.
2. Apply a narrow bead of silicone adhesive sealant around the side and
back of the sink.
3. Carefully position and secure the sink to the countertop following the
manufacturer’s instructions.
4. Apply a thin bead of silicone sealant where the sink meets the
countertop and cabinet.
5. Immediately remove excess sealant.
IMPORTANT: The enclosed cutout template will create a countertop opening
with a minimal (1/8” or less) reveal. It is recommended that you discuss this
Soleil is not responsible for improper sink or countertop installations.
IMPORTANT: Soleil apron front sinks should only be fastened to a solid surface
countertop (i.e. granite, Corian® or Silestone®).
IMPORTANT: Make sure the top of the sink does not extend above the top of the
cabinet; otherwise it will interfere with countertop installation.
5: INSTALL COUNTERTOP
APPLY SILICONE SEALANT AFTER CLEANING THE
SINK EDGE AND COUNTERTOP
APPLY SILICONE SEALANT WHERE THE SINK MEETS
THE COUNTERTOP AND CABINET.
6: FINAL STEPS
1. Following all local plumbing and building codes, install the faucet according to the manufacturer’s instructions.
2. Connect the drain and piping.
3. Run water into the sink and check all connections for leaks.
IMPORTANT: For additional information or warranty issues visit www.soleilsinks.com or contact Soleil directly at:
Apron Front Stainless Steel Sink
Installation Instructions
Contact Soleil at (687) 445-4638 or visit www.soleilsinks.com. Copyright ©2015, Soleil Sink Company Inc. All rights reserved.
PAGE 3
Soleil Sink Company Inc.
820 Shallowford Rd
Kennesaw, GA 30144
(678) 445-4638
with your installer and agree that this nished appearance is the desired eect.
5: INSTALL COUNTERTOP
1. Clean the bottom of the countertop and the top flange (or lip) of the
sink with denatured alcohol.
2. Apply a narrow bead of silicone adhesive sealant around the side and
back of the sink.
3. Carefully position and secure the sink to the countertop following the
manufacturer’s instructions.
4. Apply a thin bead of silicone sealant where the sink meets the
countertop and cabinet.
5. Immediately remove excess sealant.
IMPORTANT: The enclosed cutout template will create a countertop opening
with a minimal (1/8” or less) reveal. It is recommended that you discuss this with
your installer and agree that this finished appearance is the desired effect.
Soleil is not responsible for improper sink or countertop installations.
IMPORTANT: Soleil apron front sinks should only be fastened to a solid surface
countertop (i.e. granite, Corian® or Silestone®).
IMPORTANT: Make sure the top of the sink does not extend above the top of the
cabinet; otherwise it will interfere with countertop installation.
4: INSTALL THE SINK
1. Lower the sink onto the supports and verify the sink is supported by the
frame.
2.
3. Verify the sink is level. Make any adjustments and shim as needed.
4. Secure the sink in place using the hardware provided
IMPORTANT: The front sink apron must be secured to the front of the cabinet
by attaching fasteners through the cabinet front and into the support framing.
Failure of this step can lead to product damage.
IMPORTANT: Soleil is not responsible for sink or countertop if damaged
during installation. Be sure to inspect the sink for damage prior to beginning
installation.
IMPORTANT: Metal edges may be sharp – use caution when handling.
1.
sink with denatured alcohol.
2. Apply a narrow bead of silicone adhesive sealant around the side and
back of the sink.
3. Carefully position and secure the sink to the countertop following the
manufacturer’s instructions.
4. Apply a thin bead of silicone sealant where the sink meets the
countertop and cabinet.
5. Immediately remove excess sealant.
IMPORTANT: The enclosed cutout template will create a countertop opening
with a minimal (1/8” or less) reveal. It is recommended that you discuss this
Soleil is not responsible for improper sink or countertop installations.
IMPORTANT: Soleil apron front sinks should only be fastened to a solid surface
countertop (i.e. granite, Corian® or Silestone®).
IMPORTANT: Make sure the top of the sink does not extend above the top of the
cabinet; otherwise it will interfere with countertop installation.
5: INSTALL COUNTERTOP
APPLY SILICONE SEALANT AFTER CLEANING THE
SINK EDGE AND COUNTERTOP
APPLY SILICONE SEALANT WHERE THE SINK MEETS
THE COUNTERTOP AND CABINET.
6: FINAL STEPS
1. Following all local plumbing and building codes, install the faucet according to the manufacturer’s instructions.
2. Connect the drain and piping.
3. Run water into the sink and check all connections for leaks.
IMPORTANT: For additional information or warranty issues visit www.soleilsinks.com or contact Soleil directly at:
Apron Front Stainless Steel Sink
Installation Instructions
Contact Soleil at (687) 445-4638 or visit www.soleilsinks.com. Copyright ©2015, Soleil Sink Company Inc. All rights reserved.
PAGE 3
Soleil Sink Company Inc.
820 Shallowford Rd
Kennesaw, GA 30144
(678) 445-4638
with your installer and agree that this nished appearance is the desired eect.
6: FINAL STEPS
1. Following all local plumbing and building codes, install the faucet according to the manufacturer’s instructions.
2. Connect the drain and piping.
3. Run water into the sink and check all connections for leaks.
IMPORTANT: For additional information or warranty issues visit www.soleilsinks.com or contact Soleil directly at:
Soleil Sink Company Inc.
820 Shallowford Rd
Kennesaw, GA 30144
(678) 445-4638
Contact Soleil Sinks at (687) 445-4638 or visit www.soleilsinks.com. Copyright ©2015, Soleil Sink Company Inc. All rights reserved.
6: FINAL STEPS
1. Following all local plumbing and building codes, install the faucet according to the manufacturer’s instructions.
2. Connect the drain and piping.
3. Run water into the sink and check all connections for leaks.
IMPORTANT: For additional information or warranty issues visit www.soleilsinks.com or contact Soleil directly at:
Soleil Sink Company Inc.
4170 JVL Industrial Park Drive
Marietta, GA 30066
(678) 445-4638
Contact Soleil Sinks at (678) 445-4638 or visit www.soleilsinks.com. Copyright ©2016, Soleil Sink Company Inc. All rights reserved.
6: FINAL STEPS
1. Following all local plumbing and building codes, install the faucet according to the manufacturer’s instructions.
2. Connect the drain and piping.
3. Run water into the sink and check all connections for leaks.
IMPORTANT: For additional information or warranty issues visit www.iptsink.com or contact IPT Sink Company directly at:
IPT Sink Company Inc.
4170 JVL Industrial Park Drive
Marietta, GA 30066
(678) 445-4638
Contact IPT Sink Company at (678) 445-4638 or visit www.iptsink.com. Copyright ©2016, IPT Sink Company Inc. All rights reserved.
6: FINAL STEPS
1. Following all local plumbing and building codes, install the faucet according to the manufacturer’s instructions.
2. Connect the drain and piping.
3. Run water into the sink and check all connections for leaks.
IMPORTANT: For additional information or warranty issues visit www.schonsimplymodern.com or contact Schön directly at:
Schön Warranty Dept, World Imports Decorative Plumbing
3074 Chastain Meadows Parkway
Marietta, GA 30066
(800) 880-8164
Contact Schön at (800) 880-8164 or visit www.schonsimplymodern.com. Copyright ©2017, World Imports Decorative Plumbing. All rights reserved.