OWNERS MANUAL MANUAL DEL USUARIO Models / Modelos: SC-7500A, SC-8020A, SC-10030A Automatic Battery Charger Cargador de baterías automático SC-7500A SC-8020A SC-10030A PLEASE SAVE THIS OWNERS MANUAL AND READ BEFORE EACH USE. This manual will explain how to use the battery charger safely and effectively. Please read and follow these instructions and precautions carefully. POR FAVOR CONSERVE ESTE MANUAL DEL USUARIO Y LEALO ANTES DE CADA USO.
CONTENTS IMPORTANT SAFETY INSTRUCTIONS .....................................................................................3 PERSONAL SAFETY PRECAUTIONS........................................................................................3 PREPARING TO CHARGE..........................................................................................................4 CHARGER LOCATION.................................................................................................................
1. IMPORTANT SAFETY INSTRUCTIONS SAVE THESE INSTRUCTIONS. 1.1 SAVE THESE INSTRUCTIONS – This manual contains important safety and operating instructions. 1.2 Do not expose the charger to rain or snow. 1.3 Use of an attachment not recommended or sold by the battery charger manufacturer may result in a risk of fire, electric shock or injury to persons. 1.4 To reduce the risk of damage to electric plug and cord, pull by the plug rather than the cord when disconnecting charger. 1.
3. PREPARING TO CHARGE 3.1 If necessary to remove battery from battery without removable cell caps, such vehicle to charge, always remove as valve regulated lead acid batteries, grounded terminal from battery first. Make carefully follow manufacturer’s recharging sure all accessories in the vehicle are off, instructions. so as not to cause an arc. 3.5 Study all battery manufacturer’s 3.2 Be sure area around battery is well specific precautions while charging and ventilated while battery is being charged.
7. FOLLOW THESE STEPS WHEN BATTERY IS OUTSIDE VEHICLE 7.1 7.2 7.3 7.4 A SPARK NEAR THE BATTERY MAY connect NEGATIVE (BLACK) charger clip CAUSE A BATTERY EXPLOSION. TO to free end of cable. REDUCE THE RISK OF A SPARK NEAR 7.5 Do not face battery when making final THE BATTERY: connection. Check polarity of battery posts. POSITIVE 7.6 When disconnecting charger, always do (POS, P, +) battery post usually has a larger so in reverse sequence of connecting diameter than NEGATIVE (NEG, N, –) post.
DIGITAL DISPLAY The Digital Display gives a digital indication of battery %, voltage or alternator %, depending on the Display Mode chosen. DISPLAY MODE BUTTON Use this button to set the function of the digital display to one of the following: • Battery % – The digital display shows an estimated charge percentage of the battery connected to the charger’s battery clamps. • Voltage – The digital display shows the voltage at the charger battery clamps, in DC volts.
6. When charging is complete, disconnect the charger from the AC power, disconnect the negative clamp, and finally the positive clamp. 7. A marine (boat) battery must be removed and charged on shore. BATTERY CONNECTION INDICATOR If the charger does not detect a properly connected battery, the CONNECTED (red) LED will not light. Charging will not begin if the CONNECTED LED is not on. When charging begins, the CHARGING (yellow/orange) LED will be lit.
1. With the charger unplugged from the AC outlet, connect the charger to the battery, following the instructions given in the CHARGING A BATTERY IN THE VEHICLE section. 2. With the charger plugged in and connected to the battery of the vehicle, press the BATTERY SIZE button until the ENGINE START LED is lit. The display mode will be automatically set to VOLTAGE. 3. Crank the engine until it starts or 3 seconds pass. If the engine does not start, wait 3 minutes before cranking again.
TESTER WITHOUT TIME LIMIT If either the DISPLAY MODE or BATTERY TYPE button is pressed within the first 10 minutes after the battery charger is powered up, the unit will remain a tester (not a charger) indefinitely, unless a charge rate is selected. TESTING AFTER CHARGING After the unit has been changed from tester to charger (by selecting a charge rate), it remains a charger. To change the battery charger back to a tester, press the BATTERY SIZE button until all BATTERY SIZE LEDs are off.
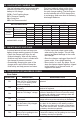
12. CALCULATING CHARGE TIME Use the following table to more accurately determine the time it will take to bring a battery to full charge. CCA = Cold Cranking Amps RC = Reserve Capacity Ah = Amp Hour NR = Not Recommended Find your battery’s rating on the chart below, and note the charge time given for each charger setting. The times given are for batteries with a 50% charge prior to recharging. Add more time for severely discharged batteries.
Troubleshooting PROBLEM The battery is connected and the charger is on, but isn’t charging. Indicator lights are lit in an erratic manner, not explained in this manual. The Digital Display always flashes before the battery is completely charged. The green CHARGED LED lights a few minutes after connecting to the battery. POSSIBLE CAUSE The charger is in tester mode, not charger mode. SOLUTION Press the BATTERY SIZE button to activate charging and select a charge rate.
PROBLEM Short or no start cycle when cranking engine. POSSIBLE CAUSE No power at receptacle. SOLUTION Check for an open fuse or circuit breaker supplying the AC outlet. AC cord and/or extension cord is loose. Check power cord and extension cord for loose fitting plug. The clamps are not making a good connection. Check for poor connection at battery and frame. Failure to wait 3 minutes (180 seconds) between cranks. Wait 3 minutes of rest time before the next crank.
16. BEFORE RETURNING FOR REPAIRS If these solutions do not eliminate the problem, or for more information about troubleshooting, contact customer service for assistance: services@schumacherelectric.com www.batterychargers.com or call 1-800-621-5485 Monday-Friday 7:00am to 5:00pm CST For REPAIR OR RETURN, contact Customer Service at 1-800-621-5485. DO NOT SHIP UNIT until you receive a RETURN MERCHANDISE AUTHORIZATION (RMA) number from Customer Service at Schumacher Electric Corporation. 17.
1. INSTRUCCIONES IMPORTANTES DE SEGURIDAD GUARDE ESTAS INSTRUCCIONES. 1.1 GUARDE ESTAS INSTRUCCIONES – Este manual contiene instrucciones operativas y de seguridad de importancia. 1.2 No exponga el cargador a la lluvia o a la nieve. 1.3 El uso de un accesorio no recomendado o suministrado por por el fabricante del cargador de baterías puede provocar riesgo de incendio, descarga eléctrica o lesiones a personas. 1.
provocar chispas o un cortocircuito en la batería o en cualquier otra pieza eléctrica que podría provocar una explosión. 2.7 No utilice elementos personales de metal tales como anillos, pulseras, collares y relojes al trabajar con una batería de plomo-ácido. Una batería de plomoácido puede producir una corriente de cortocircuito lo suficientemente elevada como para soldar un anillo o provocar efectos similares sobre el metal, causando una quemadura de gravedad. 2.
6. SIGA ESTOS PASOS CUANDO LA BATERÍA ESTÉ COLOCADA EN EL VEHÍCULO 6.1 6.2 6.3 6.4 6.5 7. UNA CHISPA PROVOCADA CERCA DE LA BATERÍA PUEDE CAUSAR LA EXPLOSIÓN DE LA BATERÍA. PARA REDUCIR EL RIESGO DE PROVOCAR CHISPAS CERCA DE LA BATERÍA: Ubique los cables de C.A. y C.C. para reducir el riesgo de daños a la cubierta, a la puerta y a las piezas móviles o calientes del motor. Manténgase alejado de las paletas del ventilador, correas, poleas y otras piezas que podrían provocar lesiones.
8. CONEXIONES A TIERRA Y ENERGÍA DE CA Este cargador de batería está destinado a un uso en un circuito con tensión nominal de 120 V. El cargador debe poseer una descarga a tierra para reducir el riesgo de descargas eléctricas. El enchufe se debe conectar a un tomacorriente adecuadamente instalado y que cuente con descarga a tierra de acuerdo con todas las ordenanzas y códigos. Los pasadores del enchufe deben adaptarse al receptáculo (tomacorriente). No utilizar con un sistema que no posea descarga a tierra.
BOTÓN DE TIPO DE BATERÍA Utilice este botón para seleccionar el tipo de batería. • STANDARD (estándar) – Utilizados en automóviles, camiones y motocicletas, este tipo de baterías cuentan con tapas de ventilación y a menudo se las clasifica como de “Bajo mantenimiento” o “Libre de mantenimiento”. Este tipo de baterías está diseñado para suministrar rápidas ráfagas de energía (tales como los arranques de motores) y poseen un mayor recuento en placa.
CARGA DE LA BATERÍA FUERA DEL VEHÍCULO 1. Coloque la batería un área bien ventilada. 2. Limpie las terminales de la batería. 3. Conectar la batería según las instrucciones que indicadas en las secciones 6 y 7. 4. Conecte el cargador a la toma de corriente. 5. Seleccione el tipo de batería y velocidad de carga. 6. Cuando la carga está completa, desconecte el cargador de la corriente CA, desconecte la pinza negativa, y por último la pinza positiva. 7.
Reinicio Si se cambia el modo de carga después de que la carga ha comenzado (presionando el botón BATTERY TYPE (tipo de batería) o SIZE (tamaño), el proceso de carga volverá a comenzar. Tensión La tensión que se muestra durante la carga es la tensión de carga y es por lo general más elevada que la tensión del resto de la batería. UTILIZAR LA FUNCIÓN DE ENCENDIDO DE MOTOR El cargador de batería se puede utilizar para impulsar el auto si la batería está baja.
UTILIZAR EL PROBADOR DE TENSIÓN DE BATERÍA 1. Con el cargador desenchufado del tomacorriente de CA, conecte el cargador a la batería siguiendo las instrucciones que figuran en las secciones anteriores. 2. Enchufe el cable de alimentación de CA del cargador en el tomacorriente de CA 3. Si fuera necesario, presione el botón BATTERY TYPE hasta que el tipo correcto se indique. 4.
Muestra de 12 Volts del Alternador Condición del Alternador 14,6 o más Pida que sea revisada 13,5 a 14,5 Trabajando Menos de 13,4 Pida que sea revisada LOS LED DE ESTADO DEL PROBADOR DE ALTERNADOR Cuando la unidad opera como probador de batería, los LED de estado se iluminan bajo las siguientes condiciones. • El LED CHARGED (verde) se encenderá si la salida del sistema de carga se encuentra en el nivel normalmente deseado. • El LED CHARGING no se enciende en el modo de prueba de alternador.
14. LOCALIZACIÓN Y RESOLUCIÓN DE PROBLEMAS Y CODIGOS DE ERROR Codigos de Error CÓDIGO DE ERROR DESCRIPCIÓN RAZÓN/SOLUCIÓN F01 El voltaje de la batería todavía está debajo de 10V (para una batería 12V) o de 5V (para una batería 6V) después de 2 horas de carga. La batería podría estar en malas condiciones. Verifíquela o reemplácela. F02 El cargador no puede desulfatar la batería. La batera no puede desulfatada.Verifíquela o reemplácela. La batería no alcanzó “su carga completa”, voltaje.
PROBLEMA La luz verde de CHARGED se enciende minutos después de conectar la batería. El cargador hace un ruido leve pero audible. El cargador hace un fuerte zumbido o murmullo. CAUSA POSIBLE La batería puede estar completamente cargada o pudo haber sido cargada recientemente, de esta forma mostrará el voltaje alto para dar indicio de que está cargada.
PROBLEMA Ciclo corto o sin comenzar al arrancar el motor. CAUSA POSIBLE No hay potencia en el receptáculo. SOLUCIÓN Vea si esta abierto el fusible o disyuntor que provee al tomacorriente CA. El cordón CA y/o el cordón de extensión están flojos. Vea si en el cordón de potencia y el de extensión hay enchufe con ajuste flojo. Las pinzas no hacen buena conexión. Vea si hay mala conexión en la batería y el bastidor. Falta de esperar 3 minutos (180 segundos) entre arranques.
16. ANTES DE DEVOLVER A REPARACIONES Si estas soluciones no eliminan el problema, o si desea obtener más información sobre la solución de problemas, póngase en contacto con el departamento de servicio al cliente para recibir asistencia: services@schumacherelectric.com www.batterychargers.com o llame 1-800-621-5485 Lunes-viernes 7:00am to 5:00pm CST Para REPARACIÓN O DEVOLUCIÓN, comuníquese con Servicios al Cliente al 1-800-621-5485.
WARRANTY CARD / TARJETA DE GARANTÍA SAVE ON POSTAGE! ACTIVATE YOUR WARRANTY ONLINE – THE QUICK AND EASY WAY! Go to www.batterychargers.com to register your product online. (No internet access? Send in the completed warranty card.) 2 YEAR LIMITED WARRANTY PROGRAM REGISTRATION MODEL:______________________ DESCRIPTION:_________________________ This is the only express limited warranty, and the manufacturer neither assumes nor authorizes anyone to assume or make any other obligation.