OWNER’S MANUAL Model 1200A For 12-Volt Batteries SpeedCharge ™ computer smart amp amp 2 12 amp 8 S L O W CHARGE ™ F A S T CHARGE MEDIUM CHARGE Fully Automatic Microprocessor Controlled Battery Charger with Battery Tester CAUTION: Read all Safety Rules and Operating Instructions, and follow them with each use of this product. Schumacher Electric Corporation Mount Prospect, IL 60056 U.S.A. Send Warranty Product Repairs to: Customer Service Returns P.O. Box 280,1025 E.
TABLE OF CONTENTS IMPORTANT SAFETY INSTRUCTIONS .................................................................... 3 PERSONAL SAFETY PRECAUTIONS ...................................................................... 4 BEFORE USING YOUR BATTERY CHARGER ......................................................... 5 PLUGGING IT IN .................................................................................................. 5 USING AN EXTENSION CORD ..........................................................
IMPORTANT SAFETY INSTRUCTIONS WARNING – RISK OF EXPLOSIVE GASES WORKING IN VICINITY OF A LEAD-ACID BATTERY IS DANGEROUS. BATTERIES GENERATE EXPLOSIVE GASES DURING NORMAL BATTERY OPERATION. FOR THIS REASON, IT IS OF UTMOST IMPORTANCE THAT EACH TIME BEFORE USING YOUR CHARGER, YOU READ THIS MANUAL AND FOLLOW THE INSTRUCTIONS EXACTLY.
Never place charger directly above battery being charged. The gases from the battery will corrode and damage the charger. Be sure to position the charger power cord to prevent it from being stepped on, tripped over, or damaged. Never pull out the plug by the cord when unplugging the charger. Pulling on the cord may cause damage to the cord or the plug. Never touch the battery clamps together when the charger is on. You could cause a spark.
BEFORE USING YOUR BATTERY CHARGER It is important to understand the charger’s requirements. This section explains the charger’s electrical requirements and how to prepare a battery for charging. extension cord, please make sure that you follow these guidelines: PLUGGING IT IN Your charger requires a 120V AC receptacle installed according to all local codes and ordinances. • Make sure that pins on plug of extension cord are the same number, size, and shape as those of plug on charger.
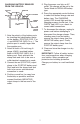
OPERATING INSTRUCTIONS IMPORTANT: Follow all safety instructions and precautions when charging your battery. Wear complete eye protection and clothing protection. Charge your battery in a well-ventilated area. CHARGING BATTERY IN THE VEHICLE: heavy, unpainted metal part of the chassis or engine block, away from the battery (see figure above). DO NOT connect clamp to negative battery post, carburetor, and fuel line or sheet metal part. 1.
5. Plug the power cord into an AC outlet. The charger will be set to the Tester Mode for REGULAR battery type. CHARGING BATTERY REMOVED FROM THE VEHICLE: POSITIVE NEGATIVE 6. Press the appropriate control buttons to select the desired charge rate and battery type. The CHARGING (yellow) LED should light and the charging process should start. If the CHECK (red) LED is on, check for correct cable connections. BATTERY CHARGER BATTERY 24", 6 GAUGE CABLE POWER CORD TO GROUNDED POWER OUTLET 7.
SPEEDCHARGE CONTROL SpeedCharge ™ Display Mode LEDs Charge Rate LEDs Battery Type LEDs Digital LED Status LEDs Switch Buttons 1200A CONTROL PANEL DISPLAY MODE SWITCH Use this switch to set the function of the digital meter to one of the following: • BATTERY %: The digital meter displays an estimate of the percent of charge of the battery connected to the charger battery clamps. • VOLTAGE: The digital meter displays the voltage at the charger battery clamps in DC volts.
Initial power-up, battery not detected No battery or reversed battery detected Battery tester activated Battery tester with charged battery Battery tester with no battery Voltage meter activated 2 Amp charge with battery detected 8 Amp charge with battery detected 12 Amp charge with battery detected Charge complete - Maintain Mode started Desulfation mode activated Charge aborted O indicates an LED that is on continuously. B indicates an LED that blinks on and off.
USING THE BUILT-IN BATTERY TESTER OVERVIEW The charger has a built-in battery tester that displays either an accurate battery voltage or an estimate of the battery’s relative charge based on the battery voltage and a scale set by the Battery Council International. TESTING AFTER CHARGING After the unit has been changed from tester to charger (by selecting a charge rate), it remains a charger as long as it has power. Disconnect and reconnect the power to change the unit back to a tester.
USING YOUR BATTERY CHARGER OVERVIEW Using the battery charger is very simple. First, connect the battery and AC power following the precautions listed under “OPERATING INSTRUCTIONS”. Then select the appropriate BATTERY TYPE and CHARGE RATE for your battery. The charger will then do everything automatically. This section explains a few details. special desulfation mode is indicated by blinking the CHARGING LED. If successful, normal charging will resume after the battery is desulfated.
KNOW YOUR CHARGER Read this entire manual before using your charger. The items below are additional features of your charger. Relay: Your charger is equipped with a relay. This device turns the charge current on and off to the battery. It is normal to occasionally hear a clicking sound when the relay is turned on or off. Overtemperature Protection: Your charger is equipped with an internal thermocouple. This device monitors the temperature and allows the charger to turn the fan on and off as needed.
BATTERY PERCENT AND CHARGE TIME This charger adjusts the charging time in order to charge the battery completely, efficiently and safely. The microprocessor automatically makes the necessary decisions. However, this section includes guidelines that can be used to estimate charging times. There are some important facts to keep in mind when charging a battery.
TROUBLESHOOTING Performance problems often can be corrected by the user. Please completely read this chart for possible solutions to common problems. PROBLEM POSSIBLE CAUSE SOLUTION The battery is connected and the charger is on, but it isn't charging. The charger is not in charging mode. Press DISPLAY MODE button until Battery % or Voltage light comes on. Indicator lights are lit in an erratic manner not explained in the “Using Your Battery Charger” section.
NOTES 15
LIMITED WARRANTY SCHUMACHER ELECTRIC CORPORATION, 801 BUSINESS CENTER DRIVE, MOUNT PROSPECT, ILLINOIS 60056-2179 MAKES THIS LIMITED WARRANTY TO THE ORIGINAL PURCHASER AT RETAIL OF THIS PRODUCT. THIS LIMITED WARRANTY IS NOT TRANSFERABLE. Schumacher Electric Corporation warrants this battery charger for five years from date of purchase at retail against defective material or workmanship. If such should occur, the unit will be repaired or replaced at the option of the manufacturer.