OPERATOR’S MANUAL ® BATTERY CHARGER 40/20 Amp Manual 200 Amp ENGINE STARTER Model No. 200.71230 CAUTION: Read and follow all Safety Rules and Operating Instructions Before Every Use of this Product. Save these instructions. Sears, Roebuck and Co., Hoffman Estates, IL 60179 U.S.A.
Table of Contents SECTION Page 1. IMPORTANT SAFETY INSTRUCTIONS 1 2. personal precautions 2 3. preparing to charge 3 4. charger location 3 5. dc connection precautions 3 6. when battery is installed in vehicle 4 7. when battery is outside vehicle 5 8. battery charging - ac connections 6 9. parts 5 10. features 9 11. assembly instructions 9 12. operating instructions 12 13. calculating charge time 13 14. using the engine start feature 15 15.
IMPORTANT: read and save this safety and instruction manual. 1. IMPORTANT SAFETY INSTRUCTIONS 1.1 SAVE THESE INSTRUCTIONS - The DieHard model 71230 Manual Battery Charger, offers a wide range of features to accommodate the needs for home or light commercial use. This manual will show you how to use your charger safely and effectively. Please read and follow these instructions and precautions carefully as this manual contains important safety and operating instructions. 1.
WARNING – RISK OF EXPLOSIVE GASES. WORKING IN THE VICINITY OF A LEAD-ACID BATTERY IS DANGEROUS. BATTERIES GENERATE EXPLOSIVE GASES DURING NORMAL BATTERY OPERATION. FOR THIS REASON, IT IS OF UTMOST IMPORTANCE THAT YOU FOLLOW THE INSTRUCTIONS EACH TIME YOU USE THE CHARGER. TO REDUCE THE RISK OF BATTERY EXPLOSION, FOLLOW THESE INSTRUCTIONS AND THOSE PUBLISHED BY THE BATTERY MANUFACTURER AND THE MANUFACTURER OF ANY EQUIPMENT YOU INTEND TO USE IN THE VICINITY OF THE BATTERY.
3. PREPARING TO CHARGE 3.1 If it is necessary to remove the battery from the vehicle to charge it, always remove the grounded terminal from the battery first. Make sure all of the accessories in the vehicle are off, so as not to cause an arc. 3.2 Be sure the area around the battery is well ventilated while the battery is being charged. 3.3 Clean the battery terminals. Be careful to keep corrosion from coming into contact with your eyes. 3.
. FOLLOW THESE STEPS WHEN BATTERY IS INSTALLED IN VEHICLE. A SPARK NEAR THE BATTERY MAY CAUSE A BATTERY EXPLOSION. TO REDUCE THE RISK OF A SPARK NEAR THE BATTERY: NEGATIVE GROUNDED SYSTEM 6.1 Position the AC and DC cables to reduce the risk of damage by the hood, door, or moving engine parts. 6.2 Stay clear of fan blades, belts, pulleys and other parts that can cause injury. 6.3 Check the polarity of the battery posts.
. FOLLOW THESE STEPS WHEN BATTERY IS OUTSIDE VEHICLE. A SPARK NEAR THE BATTERY MAY CAUSE A BATTERY EXPLOSION. TO REDUCE THE RISK OF A SPARK NEAR THE BATTERY: 7.1 Check the polarity of the battery posts. The POSITIVE (POS, P, +) battery post usually has a larger diameter than the NEGATIVE (NEG, N, -) post. 7.2 Attach at least a 24-inch-long 6-gauge (AWG) insulated battery cable to the NEGATIVE (NEG, N, -) battery post. 7.
. 8.1 battery charging - ac connections For all grounded cord-connected battery chargers: • GROUNDING AND AC POWER CORD CONNECTION INSTRUCTIONS – The charger should be grounded to reduce the risk of electric shock. The charger is equipped with an electric cord having an equipmentgrounding conductor and a grounding plug. The plug must be plugged into an outlet that is properly installed and grounded in accordance with all local codes and ordinances.
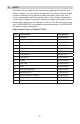
8.3 Recommended minimum AWG size for extension cords for battery chargers: AC input rating, a amperes But less At least than 0 2 2 3 3 4 4 5 5 6 6 8 8 10 10 12 12 14 14 16 16 18 18 20 25 (7.6) 18 18 18 18 18 18 18 16 16 16 14 14 AWG size of cord Length of cord, feet (m) 50 100 150 (15.2) (30.5) (45.
9. parts The Sears service centers offer the following replacement parts for your battery charger. If you are having trouble with your battery charger, please contact a qualified service person to diagnose and/or repair your unit. It is not recommended that the consumer service the internal components of the battery charger, as improper handling or repair could lead to shock, electrocution, damage to the charger, or result in fire.
10. features 1 2 3 1. Output Selector Switches 2. Ameter 3. Clamps 4. Wheels 4 11. Assembly instructions It is important to fully assemble your charger before use.
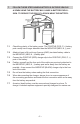
11.1 To attach the axle assembly: Remove charger from packing materials and place upside down on a flat surface. Attach mounting foot and secure with the four, 1/4-20 thread cutting screws. 11.2 Hold axle upright on floor or work surface. Then, using a hammer, tap one of the plastic axle caps onto the top end of the axle. Be sure to tap the axle cap on straight. Slide both wheels onto the axle with the recessed hubs facing out as shown. Install the second axle cap.
11.3 Place the charger on its side. Place one end of each bracket into slot, then place the axle assembly under each bracket. Fasten the other side of the brackets using the two, 10-32 screws provided. 11.4 To Attach Handle: Turn the charger right side up onto its foot and wheels. Remove the two top screws from each side of the charger. Align the handle so the screw holes are aligned with the screw holes on each side of the wheel charger. Attach the handle using the same screws.
12. operating instructions 200A 12V ENGINE START 2A 12V CHARGE OFF 40A 12V CHARGE SELECT VOLT/AMP SELECTOR 12.1 SETTING THE CONTROLS All controls for your charger are located on the front of the unit. Follow these instructions to obtain the accurate charge level for your battery. 12.2 Output Selector Switches: Two switches are used to select the rate of charge or function; a 3-position switch on the right, and a 2-position switch to the left of it.
The 2 amp charge rate may not indicate activity on the meter. The meter does not have the resolution to display this low rate. 13. 13.1 calculating charge time The Chart Method Use the following table to more accurately determine the time it will take to bring a battery to full charge. First, identify where your battery fits into the chart. • Small batteries — motorcycles, garden tractors, etc. — are usually rated in Ampere Hours (AH). For example: 6 to 12 AH, or 12 to 32 AH.
13.2 The Hydrometer or Electronic Method To find the time needed to fully charge your battery, determine the battery’s charge level with a hydrometer or electronic Percent-of-Charge Tester. The following table will help you convert hydrometer readings to percent of charge values. SPECIFIC GRAVITY OF CHARGE PERCENT OF CHARGE PERCENT NEEDED 1.265 100% 0% 1.225 75% 25% 1.155 25% 75% 1.
14. using the engine start feature Your battery charger can be used to jump-start your car if the battery is low. Follow these instructions on how to use the engine start feature. 14.1 Set the right-hand OUTPUT SELECTOR switch to the OFF position. Then follow the instructions for connecting the charger to the battery in the Operating Instructions section. 14.2 Once the charger is connected, set the right-hand selector switch to SELECT and set the left selector switch to the 200 AMP START position. 14.
17. troubleshooting PROBLEM POSSIBLE CAUSE SOLUTION/REASONS No reading on the ammeter. Clamps are not making a good connection. Check for poor connections to battery and frame. Make sure connecting points are clean. Rock clips back and forth for a better connection. 2-amp charge rate is being used. Ammeter may show no activity at the 2-amp charge rate. No reading on ammeter. Fan inside wheel charger appears to not be working. No power at receptacle.
PROBLEM POSSIBLE CAUSE Ammeter reads less than Extension cord too long or selected charge rate when wire gauge too small. charging a discharged battery. Weak cell or sulfated plate in battery. Charger makes a loud buzz or hum. Ammeter reading stays high. SOLUTION/REASONS Use shorter or heavier gauge extension cord. Sulfated battery will eventually take a normal charge if left connected. If the battery will not take a charge, have it tested by a Sears technician. Battery is only partially discharged.
• 18 •