
CAT L1 Evo Manual
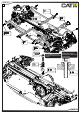

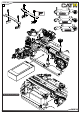
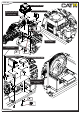


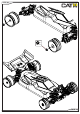
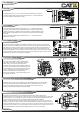

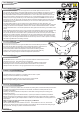
Table Of Contents
- L1 Evo front cover
- L1 Evo PAGE 1
- L1 Evo PAGE 2
- L1 Evo PAGE 3
- L1 Evo PAGE 4
- L1 Evo PAGE 5
- L1 Evo PAGE 6
- L1 Evo PAGE 7
- L1 Evo PAGE 8
- L1 Evo PAGE 9
- L1 Evo PAGE 10
- L1 Evo PAGE 11
- L1 Evo PAGE 12
- L1 Evo PAGE 13
- L1 Evo PAGE 14
- L1 Evo PAGE 15
- L1 Evo PAGE 16
- L1 Evo PAGE 17
- L1 Evo PAGE 18
- L1 Evo PAGE 19
- L1 Evo PAGE 20
- L1 Evo PAGE 21
- L1 Evo PAGE 22
- L1 Evo PAGE 23
- L1 Evo PAGE 24
- L1 Evo PAGE 25
- L1 Evo PAGE 26
- L1 Evo PAGE 27 Spares List 1
- L1 Evo PAGE 28 Spares List 2
- L1 Evo PAGE 29 Spares List 3
- L1 Evo PAGE 30 Spares List 4
- L1 Evo PAGE 31 Spares List 5
- L1 Evo PAGE 32 Spares List 6
- L1 Evo PAGE 33
- L1 Evo PAGE 34
- L1 Evo PAGE 35
- L1 Evo PAGE 36
- L1 Evo PAGE 37
- L1 Evo PAGE 38
- L1 Evo PAGE 39
- L1 Evo PAGE 40
- L1 Evo PAGE 41
- L1 Evo PAGE 42
- L1 Evo PAGE 43
- L1 Evo PAGE 44
- L1 Evo PAGE 45
- L1 Evo PAGE 46
- L1 Evo PAGE 47
- L1 Evo PAGE 48
- L1 Evo PAGE 49
- L1 Evo PAGE 50
- L1 Evo PAGE 51
- L1 Evo PAGE 52
- L1 Evo PAGE 53
- L1 Evo PAGE 54
- L1 Evo PAGE 55
- L1 Evo PAGE 56
- L1 Evo PAGE 57

Moving the front wishbones backwards offers more load transfer when loading up the front
going into the corner. This will promote more steering in general as there is more pressure
over the front wheels. This change also means the drive shaft angle has increased, so
naturally gives the car more drive. But all of that comes at the price of bump handling.
A softer damper setup would be used in this case.
The middle hole on the front shock mount is the most widely used position.
Moving the shock to the outer position will make the car react faster and increase
the initial steering response, it may however stiffen the suspension which may
require an oil and spring change so that the cars suspension feels the same.
Moving the shock to the inner hole will soften the suspension, slow down steering
reaction and make the car smoother on bumpy tracks. Again you may
need to alter the oil and spring combination to get the suspension to feel the same.
The middle hole in the wishbone is the standard setting for the lower shock absorber mounting.
Moving the shock absorber to the outer hole increases the reaction of the steering as well as
increasing the suspension stiffness, this position may cause the car to have a little too much initial
steering. Using the inside hole will soften the suspension and will probably need spring and
damping changes to make the best use of it. Anti roll bars are a good tuning aid when using
different shock absorber positions on the wishbone.
The middle hole works best for most track conditions giving good traction and drive through the
turns whilst maintaining good stability over the bumps. Moving to the outer hole on the wishbone will
decrease traction but will allow the rear to free up more in the turns. This setting would usually only
get used on high grip tracks and when moving the shock out you may have to change the oil and
spring settings to get the same suspension feel.
If the grip level is low and the track is bumpy, try the inside hole with a harder spring and a thicker oil.
The usual team setting for static rear camber is 1°- 2° negative at ride height
(the top of the wheel is leaning inwards towards the car). Decreasing the static
camber will generally increase the mid corner steering, whereas increasing the
static camber usually makes the car smoother to drive by reducing the steering
response.
For dirt tyres with a flatter profile use between 0.8°- 1.5° to keep the contact
patch more consistent.
Angling the top of the rear shock forwards 3mm will help jump landings with the sacrifice
of bump handling, it also increases initial steering.
You will need to fit a longer ball stud and add washers to do this.
U4700 - Pro Ball Stud - Ultra Long
U7712 - M3 Black Alloy Washers 3.00mm (pk10)
3mm
Negative CamberPositive Camber
PAGE 48
Track Settings
Front Wheelbase Options
Front Shock Mount
Rear Wishbone Shock Mounting Hole
Front Wishbone Shock Mounting Hole
Rear Shock Spacing Top
Rear Camber