OWNER’S MANUAL • Manual del usuario Model / Modelo: XP2260 INSTANT POWER™ Jump Starter and DC Power Source • Fuente de Poder de CD y Arrancador ADVERTENCIA • • READ THE ENTIRE MANUAL BEFORE USING THIS PRODUCT. FAILURE TO DO SO COULD RESULT IN SERIOUS INJURY OR DEATH. LEA EL MANUAL COMPLETO ANTES DE UTILIZAR ESTE PRODUCTO. CUALQUIER FALLA PODRÍA RESULTAR EN SERIAS LESIONES O PODRÍA SER MORTAL.
Table of Contents Section Page IMPORTANT SAFETY INSTRUCTIONS 2 PERSONAL PRECAUTIONS 2 FEATURES 4 Charging the internal battery of the Instant Power™ 4 OPERATING INSTRUCTIONS 5 Storage 11 TROUBLESHOOTING 11 SPECIFICATIONS 12 REPLACEMENT PARTS/accessories 12 LIMITED WARRANTY 12 ÍNDICE SECCIÓN PÀGINA INSTRUCCIONES IMPORTANTES DE SEGURIDAD 15 PRECAUCIONES PERSONALES 15 CARACTERÍSTICAS 17 PARA CARGAR LA BATERIA INTERNA DEL INSTANT POWER™ 17 INSTRUCCIONES DE OPERACIÓN 18 ALMA
IMPORTANT: READ AND SAVE THIS SAFETY AND INSTRUCTION MANUAL. SAVE THESE INSTRUCTIONS – Charge the Instant Power™ internal battery immediately after purchase, after every use and every 30 days. This manual will show you how to use your Instant Power™ safely and effectively. Please read, understand and follow these instructions and precautions carefully, as this manual contains important safety and operating instructions.
1. IMPORTANT SAFETY INSTRUCTIONS Risk of electric shock or fire. 1.1 1.2 1.3 1.4 1.5 To reduce the risk of a battery explosion, follow these instructions and those marked on the battery. Use only recommended attachments. Use of an attachment not recommended or sold by Schumacher® Electric Corporation may result in a risk of fire, electric shock or injury to persons or damage to property.
2.5 Be sure the area around the battery is well ventilated while the jump starter is being used. Do not operate the Instant Power™ in a closed-in area or restrict the ventilation in any way. Risk of contact with battery acid. Battery acid is a highly corrosive sulfuric acid. 2.6 2.7 2.8 2.9 2.10 2.11 2.12 2.13 2.14 Consider having someone close enough by to come to your aid when you work near a lead-acid battery.
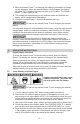
3. FEATURES 1 4 3 2 5 6 7 8 9 13 10 17 12 11 14 16 15 20 4. 4.1 4.2 1. Jump Start/USB On/Off Switch 2. USB Port 3. Built-In Work Light 4. Digital Display 5. Display Button 6. Work Light On/Off Switch 7. Inverter On/Off Switch 8. 12 Volt DC Outlets 9. 120 Volt AC Outlets 10.Compressor Hose 11. Compressor Gauge 12.Compressor/Inflator Switch 13.Inflator Port 14.Charger Plug 15.Wall Charger 16.Battery Clamps 17.Deflator Port 18.Adapters 19.Male to Male Adapter 20.
3. While the Instant Power™ is charging, the battery’s percentage of charge will be displayed. When the internal battery is fully charged, the display will show 100. Complete charging may take up to 72 hours. The Instant Power™ is then ready to use. 4. The charger will automatically go into maintain mode and maintain the battery at full charge without damaging it. 5. Charge the Instant Power™ as soon as possible after use. battery.
6. For a negative-grounded vehicle, connect the POSITIVE (RED) clip from the jump starter to the POSITIVE (POS, P, +) ungrounded post of the battery. Connect the NEGATIVE (BLACK) clip to the vehicle chassis or engine block away from the battery. Do not connect the clip to the carburetor, fuel lines or sheet-metal body parts. Connect to a heavy gauge metal part of the frame or engine block. 7.
Appliance Type Estimated Wattage Estimated Usage Time Cell Phone 4 watts 66 hours Fluorescent Light 4 watts 66 hours Radio, Fan 9 watts 29.3 hours Depth Finder 9 watts 29.3 hours Camcorder, VCR 15 watts 17.6 hours Electrical Tool 24 watts 11 hours Electrical Cooler 48 watts 5.5 hours Car Vacuum, Air Compressor 80 watts 3.3 hours 5.4 5.5 5.6 NOTE: Estimated run-times. Actual time may vary. Times are based on the internal battery being fully charged and in good condition.
NOTE: To prevent overheating, the compressor has built-in thermal protection that will turn the compressor off before it overheats. If the compressor shuts off, wait a few minutes and it will automatically restart when the compressor cools. NOTE: The air compressor is rated for 150 PSI. Estimated Time for Inflating 5.7 Vehicle Tires 13” to 16” 6 to 24 minutes Bike Tire 1 to 3 minutes Sports Balls 30 seconds These times are approximate.
5.9 6. When the product is deflated to the desired level, push the Compressor/ Inflator switch to the OFF position and remove the adapter. Before Using the Inverter 5.10 Important Safety Instructions: 1. Keep the Instant Power™ well ventilated in order to properly disperse heat generated while it is in use. Make sure there are several inches of clearance around the top and sides, and do not block the vents on the back of the Instant Power™. 2.
You can use an extension cord from the inverter to the device without significantly decreasing the power being generated by the inverter. For best operating results, the extension cord should be no longer than 50 feet. This inverter uses a nonsinusoidal waveform. Therefore, we do not recommend you use it to power the following devices: 1. Switch Mode Power Supplies; 2. Linear Power Supplies; 3. Class 2 Transformers; 4. Line Filter Capacitors; 5. Shaded Pole Motors; 6. Fan Motors; 7. Microwave Ovens; 8.
6. Storage IMPORTANT: • CHARGE IMMEDIATELY AFTER PURCHASE • KEEP FULLY CHARGED Charge the Instant Power™ internal battery immediately after purchase, after every use and every 30 days. All batteries are affected by temperature. The ideal storage temperature is at 70 degrees Fahrenheit. The internal battery will gradually self-discharge (lose power) over time, especially in warm environments. Leaving the battery in a discharged state may result in permanent battery damage.
PROBLEM The battery in the Instant Power™ won’t hold a charge. 8. POSSIBLE CAUSE The battery is bad (will not accept a charge). REASON/SOLUTION Have the battery checked. SPECIFICATIONS Internal Battery Type Maintenance-free AGM Lead-acid Nominal Voltage 12v DC Capacity 22 Ah DC Power Outlet (Max. Continuous Load) 15A (both outlets combined) Built-in Work Light (Non-replaceable) 3 white LEDs Jumper Cables 4-gauge awg, 24 Inches Dimensions (H x W x D) 12 H x 11.5 x 10.
Manufacturer does not provide any warranty for any accessories used with this product that are not manufactured by Schumacher Electric Corporation and approved for use with this product. This Limited Warranty is void if the product is misused, subjected to careless handling, repaired, or modified by anyone other than Manufacturer or if this unit is resold through an unauthorized retailer.
IMPORTANTE: LEA Y GUARDE ESTE MANUAL DE INSTRUCCIONES Y SEGURIDAD. GUARDE ESTAS INSTRUCCIONES - Cargue el Instant Power™ inmediatamente después de comprarla, después de cada uso y cada 30 días. Este manual le mostrará cómo utilizar su cargador en forma segura y efectiva. Por favor, lea, comprenda y siga estas instrucciones y precauciones cuidadosamente, ya que este manual contiene instrucciones operativas y de seguridad de importancia.
1. INSTRUCCIONES IMPORTANTES DE SEGURIDAD El riesgo de descarga eléctrica o incendio 1.1 1.2 1.3 1.4 1.5 1.6 1.7 1.8 1.9 2. Para reducir el riesgo de una explosión de la batería, siga estas instrucciones y aquellas especificadas en la batería. Utilice solamente accesorios recomendados. El uso de un accesorio no recomendado o suministrado por Schumacher® Electric Corporation puede provocar riesgo de incendio, descarga eléctrica o lesiones a personas o daño a la propiedad.
2.4 2.5 Para prevenir cortos, conecte y desconecte los ganchos de salida C.C. sólo después de haber establecido la fuente de poder interruptor a la posición de OFF (apagado). NUNCA permita que las pinzas se junten o hagan contacto por medio de un mismo metal. Asegúrese de que el área que rodea a la batería se encuentre bien ventilada mientras el aparato se utiliza. No utilice el Instant Power™ en un área cerrada o restrinja la ventilación en cualquier forma. Riesgo de contacto con el ácido de la batería.
3. CARACTERÍSTICAS 1 4 3 2 5 6 7 8 9 13 10 17 12 11 14 16 15 20 4. 4.1 4.2 19 1. Fuente de Poder USB, con interruptor de apagado/ encendido 2. Puerto USB 3. Luz integrada para laborar 4. Pantalla Digital 5. Botón de la pantalla 6. Interruptor de encendido/ apagado de la luz para laborar 7. Interruptor de encendido/ apagado del inversor 8. Salidas de Corriente Continua de 12 Volt 9. Salidas de Corriente Alterna de 120 Volt 10.Manguera del Compresor 11. Medidor del Compresor 12.
3. Mientras el Instant Power™ está cargando, el porcentaje de carga de la batería de se mostrará. Cuando la batería interna está completamente cargada, la carátulsa demostrará 100. Para completar la carga se requieren por lo menos 72 horas. El Instant Power™ está lista para ser utilizada 4. El cargador cambiará automáticamente a un la función de modo flotante y mantendrá la batería cargada totalmente sin dañar la batería. 5. Cargue el Instant Power™ tan pronto sea posible, después de usarse.
4. Verifique la polaridad de los bornes de la batería. El borne POSITIVO (POS, P, +) de la batería generalmente posee un diámetro mayor al borne NEGATIVO (NEG, N, -). 5. Determine qué borne de la batería hace descarga a tierra (se encuentra conectado) con el chasis. Si el borne negativo hace descarga a tierra con el chasis (como en la mayor parte de los vehículos), ver el paso 6. Si el borne positivo hace descarga a tierra con el chasis, ver el paso 7. 6.
4. Si el aparato de 12 V de CD absorbe más de 15 A o tiene un corto circuito, el interruptor de circuitos interno del Instant Power™ se reactivará e interrumpirá el paso de corriente al aparato. Desconecte el aparato de 12V de CD. El mismo interruptor se reactivará automáticamente después de que una sobrecarga ocurra. El enchufe está conectado directamente a la batería interna. Una operación en exceso del aparato de 12V de CD podría descargar la batería excesivamente.
1. Asegúrese que las pinzas estén fijas en el compartimiento. 2. Quite la manguera del compartimiento del compresor de aire situada en la parte de atrás el Instant Power™ instale adaptadores si es necesario. 3. Sujete la manguera del compresor al producto o aparato a ser inflado, tirando la palanca hacia abajo. 4. Coloque interruptor de compresor/inflador señalando la posición de compresor y comience a inflar el producto. 5.
Tiempo estimado para inflar Pelota de playa de “24 1 a 3 minutos Balsa marina 4 a 6 minutos Cama de aire tamaño matrimonial 4 a 8 minutos Balsa para 2 personast 8 a 10 minutos 5.9 Estos lapsos de tiempo son aproximados y depende de la medida y características del artículo. Uso del desinflador 1. Asegúrese que las pinzas estén fijas en el compartimiento. 2.
Aparatos como televisiones, ventiladores o motores eléctricos requieren energía adicional para encender (comúnmente conocido como arranque o máxima energía).El Instant Power™ podría suplementar u operar en vatios; de cualquier forma aún los aparatos clasificados por debajo de los 400 vatios pueden exceder de la capacidad del inversor y lo apaga automáticamente por sobrecarga.
6. Si el aparato no funciona adecuadamente al momento de conectarlo al inversor, presione el botón ON, OFF, y ON una y otra vez consecutivamente. Si este proceso no tiene éxito, quiere decir que el Inversor no tiene la capacidad requerida para operar el aparato deseado. 7. Cargue Fuente de Poder™ tan pronto sea posible después de cada uso. Riesgo de descarga eléctrica. Una operación incorrecta de su inversor podría resultar en daños y lesiones personales.
7. LOCALIZACIÓN Y SOLUCIÓN DE PROBLEMAS PROBLÈME La fuente de poder no arranca mi auto. La Fuente de poder no pone a funcionar mi aparato de 12V. La batería de La Fuente de poder no retiene la carga. CAUSE POSSIBLE RAISON/SOLUTION El Interruptor de la Fuente de Poder/USB no esta ENCENDIDO. Encienda el interruptor de la Fuente de Poder/USB. Las pinzas no hacen buena conexión a la batería Asegúrese de que existe buena conexión a la batería y la carrocería.
8. ESPECIFICACIONES De Tipo interno AGM Batería AGM de Acido-plomo, sin necesidad de mantenimiento El voltaje nominal De 12V de C.C. Capacidad 22 ampere/hora Salida de Corriente Contínua (Máxima Carga) 15A (ambos enchufes combinados) Luz incorporada (reemplazable) tres LEDs blanco Cables de arranque AWG, de Calibre 4 y 24 pulgadas Dimensiones (H x W x D) de 12 de alto X 11.5 Ancho X 10.5 profundo (pulgadas) Peso del Producto M 24.
El Fabricante no presta garantía por lo accesorios utilizados con este producto que no sean los fabricados por Schumacher Electric Corporation y que no estén aprobados para su uso con este producto. La presente Garantía Limitada será nula si el producto se utiliza en forma errónea, se trata de manera inadecuada, es reparado o modificado por personas que nos sean el Fabricante o si esta unidad es revendida a través de un vendedor minorista no autorizado.