©2007. Nautilus, Inc. All rights reserved. Nautilus, the Nautilus Logo, Universal, the Universal Logo, Bowflex, StairMaster, Pearl Izumi and Nautilus Institute are either registered trademarks or trademarks of Nautilus, Inc. Schwinn is a registered trademark. All other trademarks are owned by their respective companies. Nautilus, Inc., World Headquarters, 16400 SE Nautilus Drive, Vancouver, WA 98683 1-800-NAUTILUS www.nautilus.
Schwinn® IC Bikes IC Elite, IC Pro, IC Evolution, IC Evolution SR Service Manual Nautilus® Bowflex® Schwinn® Fitness Pearl Izumi® StairMaster® Universal® Nautilus Institute® PN001-7145 (08/2007)
Table of Contents Important Safety Warnings - - - - - - - - - - - - - - - - - - - - - - - - - - - - - - - - - - - - - - - - - - - - - - - 4 Recommended Tools and Lubes - - - - - - - - - - - - - - - - - - - - - - - - - - - - - - - - - - - - - - - - - - - 5 Reading the Serial Number - - - - - - - - - - - - - - - - - - - - - - - - - - - - - - - - - - - - - - - - - - - - - - 6 Bas
Important Safety Warnings This icon means a potentially hazardous situation which, if not avoided, could result in death or serious injury. Failure to follow these precautions can cause damage to the Schwinn® IC Bike series, serious injury to users and bystanders, and can also compromise the effectiveness of your exercise program. Before using this equipment, obey the following warnings: Read and understand the complete Owner’s Manual. Read and understand all Warnings on this machine. 1.
Recommended Tools and Lubes We recommend the following tools and lubes to properly assemble, maintain and repair all Schwinn® Indoor Cycling bikes. Lubes Tools 1. Schwinn® Fit-Tech Silicone Spray: recommended for the brake pads and all moving parts (e.g., handle bar post, seat post & slide, pop-pins, resistance knob etc.) 1. Torque wrench w/ 8mm Allen Key socket: used to tighten the crank bolts of crank arms to 480 lbf/in. 2. Pedal wrench: Has 15mm and 9/16” wrench to tighten and loosen pedals. 3.
Reading the Serial Number Find the serial number on the underside of the machine base. Decode the information in the serial number with the below instructions: AAABCCCCCC AAA= Day of the year manufactured (e.g., 35 = February 4th) B= Last digit of year manufactured (e.g., 6 = 2006) CCCCCC = Unique code for each individual unit. Serial number tags on newer models also read date of manufacture.
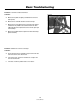
Basic Troubleshooting Problem: Loud Squealing Sound From the Brake Figure 1 Solution: A. Use a 4mm Allen wrench to remove the bolt and spring from the brake assembly. (See Figure 1.) B. Slide the brake pads out of the assembly. C. Rough up the surface with a wire brush if the pads look glossy. D. Saturate the brake pads with silicone lubricant after they have been roughed up. E. Replace the brake pads. F. Tighten the bolt and spring to the pads only finger-tight.
Basic Troubleshooting Problem: Brake Pads Off Center Figure 3 Solution: A. Use a 10mm wrench to loosen the nylon nut on the front of the bike. B. Adjust the brake assembly until the brake pads are evenly spaced from the flywheel. C. Tighten the nylon nut using moderate torque. Problem: Chain is too Loose Figure 4 Solution: A. Use a 15mm wrench or socket to loosen each axle nut of the flywheel. B. Use a 10mm wrench and turn each chain tensioner bolt 1/4 turn to the right. C.
Basic Troubleshooting Problem: Chain Makes a Grinding Sound Solution: Chain too tight and/or the flywheel out of alignment. A. Use a 15mm wrench to loosen each axle nut. B. Adjust the 10mm chain tensioner bolts to align the flywheel with the frame. Make sure that the chain tensionis adjusted properly without being too tight. C. Adjust the chain tension by locating the point where the chain is tightest during one revolution of the crank. D. Check the tension.
Basic Troubleshooting Problem: Crank Arms or Pedals Feel Loose Figure 6 Solution: A. Make sure the pedals are tightly screwed into the crank arms. (See Figure 6.) B. Make sure the crank bolts on both crank arms are tight. C. Make sure the square opening in the crank arms have not been rounded out. This problem is caused when the bike has been ridden with loose arms. Replace the crank arm if the sqare taper shows damage. D. Make sure the bottom bracket is tight in the frame and bearings operate smoothly.
Replacing Parts IC Pro and IC Elite Brake Rod and Knob Replacement Tools Required: Figure 7 Figure 8 Figure 9 Figure 10 • #2 Phillips or Flat Head Screwdriver • 10mm Box Wrench or Small Adjustable Wrench • 7mm Box Wrench or Small Adjustable Wrench Procedure: A. Replace the Tension Control Knob 1. Turn the tension control knob to least resistance. 2. Use a flat or phillips head screwdriver to remove the shrouds. (See Figure 7.) 3.
Preventative Maintenance Attention: Any Schwinn® bike that is allowed to operate with torque in excess of the specified values does not qualify for warranty replacement for the crank arms. Do NOT torque crank bolts in excess of 360 obf/in. on IC Pro and IC Elite or 420 lbf/in on Evolution models. Overtightening causees damage to the crank or the bottom bracket interface. Daily Maintenance At the end of each workout: • Release the brake resistance so that the brake pads do not contact the flywheel.
Preventative Maintenance Adjust the Smart Release™ Mechanism Tools: • Smart Release™ Adjusting tool • 45 to 50 lb. dumbell or weight Figure 11 Attention: Only a mechanic trained to work on Schwinn® IC bicycles should do this procedure. Make adjustments to the Smart Release™ mechanism only to restore the mechanism to factory specifications. Never overtighten. Smart Release™ Adjusting Plate Procedure: 1. Ride the bike. This forces the the Smart Release™ mechanism to break free.
Important Contact Numbers OFFICES IN THE UNITED STATES: INTERNATIONAL OFFICES: E-mail: customerservice@nautilus.com For technical assistance and a list of distributors in your area, please call or fax one of the following numbers. TECHNICAL/CUSTOMER SERVICE Phone: 800-NAUTILUS (800-628-8458) Fax: (877) 686-6466 E-mail: cstech@nautilus.com INTERNATIONAL CUSTOMER SERVICE Nautilus International S.A.