003–3802–042310A
Nautilus, Inc., World Headquarters, 16400 SE Nautilus Dr. Vancouver, WA, USA 98683, (800) NAUTILUS / (800) 628-8458, www.NautilusInc.com - Customer Service: North America (800) 605-3369, customerservice@schwinnfitness.com | Europe, Middle East & Africa 49 02203 2020 0, technics-EMEA@nautilus.com | Germany & Austria + 49 02203 2020 0, Switzerland + 41 26 460 77 66, United Kingdom + 44 1908 267 345, Asia Pacific & Latin America (360) 859-5180, technics-APLA@nautilus.
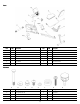
Parts Item Qty 1 1 2 Description Item Qty Main Unit 8 1 Side Handlebars 1 Front Stabilizer 9 1 Console Mast 3 1 Rear Stabilizer 10 1 Console 4 1 Seat Rail 11 1 Pedal, Left (L) 5 1 Seat Bracket Assembly 12 1 Pedal, Right (R) 6 1 Seat Bottom 13 1 Water Bottle Holder 7 1 Seat Back Item Qty Description Description Hardware Item Qty A 4 Carriage Bolt M8 x 65 E 12 Flat Washer B 5 Arc Washer F 2 Rubber Limit Pad C 4 Acorn Nut G 8 Phillips Head Sc
Assembly 1. Attach Front Stabilizer to Main Unit 2. Install Handlebar to Seat Bracket NOTICE: Do not crimp cable from Handlebar.
3. Attach Seat Bottom and Seat Back to Seat Bracket NOTICE: Do not crimp cable. 4. Slide Seat Assembly onto Seat Rail NOTICE: Do not crimp cables. 5. Install Seat Rail Assembly to Main Assembly NOTICE: Connect Heart Rate (HR) cables from Seat Rail and Main Unit. Do not crimp cables.
. Attach Rear Stabilizer to Seat Rail NOTICE: Connect Heart Rate (HR) cables from Seat Rail and Handlebar. Do not crimp cables. 7. Install Console Mast to Main Assembly Note: NOTICE: You can attach a wire (or string) to the Console Cable and HR Cable to help pull the cables through the Console Mast. Do not crimp cables.
8. Install the Console to the Console Mast Note: NOTICE: Hardware is pre-installed on Console and not on Hardware Card. Do not crimp cables. Make sure that the switch on the back of the Console is set to B. 9.
10. Install Water Bottle Holder Note: Hardware is pre-installed on Console Mast and not on Hardware Card. 11. Install Batteries in Console Note: The console uses D size batteries (LR20). Make sure the batteries point in the direction of the +/– indicators in the battery bay. If you use rechargeable batteries, the optional power adapter will not recharge the batteries. Optional Power Adapter The console for your machine can operate on battery power or AC power.
NOTICE: If you use a power adapter for your bike, make sure that the cord stays clear of the path of the pedals. Attach the cord to the machine as shown: NOTICE: It is recommended to remove batteries when they are not used, to avoid damage from battery corrosion. To order the optional Power Adapter, go to: www.schwinnfitness.com/powersupply Or call 1 (800) 605–3369. Final Inspection Inspect your machine to ensure that all fasteners are tight and components are properly assembled.
Printed in China