Manual en Español Latino Americano: http://www.schwinnfitness.
Table of Contents Important Safety Instructions - Assembly 3 Safety Warning Labels / Serial Number 4 Specifications 4 Before Assembly 5 Parts 6 Hardware 7 Tools 7 Assembly 8 Leveling the Bike 14 Moving the Bike 14 Important Safety Instructions - Owner’s Features Console Features Contact Heart Rate (CHR) Operations Adjustments Quick Start / Manual Program Profile Programs Pausing or Stopping Results Changing Unit Measures (English Imperial/Metric) Maintenance Troubleshooting Warranty 15 16 17 18 20 20 20 2
Important Safety Instructions — ASSEMBLY ! This icon means a potentially hazardous situation which, if not avoided, could result in death or serious injury. Obey the following warnings: ! Read and understand all warnings on this machine. Carefully read and understand the Assembly instructions. • Keep bystanders and children away from the product you are assembling at all times. • Do not connect power supply to the machine until instructed to do so.
Safety Warning Labels and Serial Number • • • • • • • • • • • Serial number • FCC Compliance ! Changes or modifications to this unit not expressly approved by the party responsible for compliance could void the user’s authority to operate the equipment. The power supply complies with part 15 of the FCC rules.
Specifications Maximum User Weight: 275 lbs. (125 kg) Power Requirements: 4 D Batteries (LR20) – not included Operational Voltage: 6VDC Regulatory Approvals: Optional AC Power Adapter: UL listed, CSA certified (or equivalent), Rated 120V 60Hz Input, 9VDC, 500mA Output. Class 2 or LPS. ! his product, its packaging, and components contain T chemicals known to the State of California to cause cancer, birth defects, or reproductive harm.
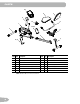
PARTS 10 7 6 9 13 8 1 12 (R) 2 5 4 3 11 (L) Item Qty Description Item Qty 1 1 Main Frame 8 1 Side Handlebars 2 1 Front Stabilizer 9 1 Console Mast 3 1 Rear Stabilizer 10 1 Console 4 1 Seat Rail 11 1 Left Pedal (L) 5 1 Seat Bracket Assembly 12 1 Right Pedal (R) 6 1 Seat Bottom 13 1 Water Bottle Holder 7 1 Seat Back Note: Media Cable is in the Console box.
HARDWARE / TOOLs A B Item Qty A 4 B C D Description E F G H Item Qty Description Carriage Bolt M8 x 65 E 12 Flat Washer M8 5 Arc Washer M8 F 2 Rubber Limit Pad C 4 Acorn Nut M8 G 8 Phillips Head Screw M6 x 35 D 12 Hex Screw M8 x 15 H 1 Adjustment Knob Tools Included Not Included 6 mm/#2 (recommended) 13mm/17mm 15mm 7
ASSEMBLY 1. Attach Front Stabilizer to Main Unit X2 A 1 2 B C X2 2. Install Handlebar to Seat Bracket NOTICE: D o not crimp cable from Handlebar.
3. Attach Seat Bottom and Seat Back to Seat Bracket NOTICE: D o not crimp cable. 7 6 G X8 4. Slide Seat Assembly onto Seat Rail NOTICE: Do not crimp cables.
5. Install Seat Rail Assembly to Main Assembly NOTICE: Connect Heart Rate (HR) cables from Seat Rail and Main Unit. Do not crimp cables. 6. Attach Rear Stabilizer to Seat Rail NOTICE: Connect Heart Rate (HR) cables from Seat Rail and Handlebar. Do not crimp cables.
7. Install Console Mast to Main Assembly Note: Y ou can attach a wire (or string) to the Console Cable and HR Cable to help pull the cables through the Console Mast. NOTICE: Do not crimp cables. X3 B D 6mm 8. Install the Console to the Console Mast Note: H ardware is pre-installed on Console and not on Hardware Card. Remove hardware from Console before you connect the cables. NOTICE: D o not crimp cables. Make sure that the switch on the back of the Console is set to B (bike).
9. Install Pedals Note: T he Left Pedal is reverse-threaded. Be sure to attach Pedals on the proper side of the Bike. Orientation is based from a seated position on the bike. The Left Pedal has an “L”, the Right Pedal an “R”. 12 (R) 11 (L) 10. Install Water Bottle Holder Note: Hardware is pre-installed on Console Mast and not on Hardware Card.
11. Install Batteries in Console Note: The console uses D size batteries (LR20). Make sure that the batteries point in the direction of the +/– indicators in the battery bay. If you use rechargeable batteries, the optional power adapter will not recharge the batteries. ! X4 Do not mix old and new batteries. + Do not mix alkaline, standard (carbon-zinc), or rechargeable (Ni-Cd, Ni-MH, etc) batteries. – Optional Power Adapter The console for your machine can operate on battery power or AC power.
BEFORE YOU START Leveling Your Bike The levelers are the polygonal end caps on the Rear Stabilizer. Turn the end cap to adjust the level. Make sure the bike is level and stable before you exercise. Moving Your Bike To move the recumbent bike, carefully lift the rear end of the bike and slowly push the bike to the desired location. NOTICE: B e careful when you move the bike. Abrupt motions can affect the computer operation.
Important Safety Instructions ! This icon means a potentially hazardous situation which, if not avoided, could result in death or serious injury. Before using this equipment, obey the following warnings: ! Read and understand the complete Manual. Keep the Manual for future reference. ead and understand all warnings on this machine. If at any time the Warning stickers become loose, unreadable R or dislodged, contact Nautilus® Customer Service for replacement stickers.
FEATURES A S E I J C Q Q B H P O D K F B M G N L R 16 A Console K Contact Heart Rate (CHR) Sensors B Side Handlebars L Power Connector C Adjustable Seat M Battery Bay D Adjustment Knob N Machine Type Switch E Fully Shrouded Flywheel O Media Tray F Levelers P MP3 Input G Stabilizers Q Speakers H Transport Rollers R Headphones Output I Pedals S Media Cable J Water Bottle Holder
Console Features The Console provides important information about your workout and lets you control the resistance levels while you exercise. The Console has a grid display with touch control buttons to navigate you through the exercise programs.
Speed / Distance The SPEED/DISTANCE display field shows the machine speed in kilometers per hour (km/h) or miles per hour (mph) for 6 seconds, then the Distance for 6 seconds. The Distance display shows the distance count (miles or km) in the workout. Note: T o change the measurement units to English Imperial or metric, refer to the “Changing Unit Measures” section in this manual.
The most efficient procedure to burn fat during exercise is to start at a slow pace and gradually increase your intensity until your heart rate reaches between 60 – 85% of your maximum heart rate. Continue at that pace, keeping your heart rate in that target zone for over 20 minutes. The longer you maintain your target heart rate, the more fat your body will burn. The graph is a brief guideline, describing the generally suggested target heart rates based on age.
Operations What to Wear Wear rubber-soled athletic shoes. You will need the appropriate clothes for exercise that allow you to move freely. How Often Should You Exercise Consult a physician before you start an exercise program. Stop exercising if you feel pain or tightness in your chest, become short of breath, or feel faint. Contact your doctor before you use the machine again. Use the values calculated or measured by the machine’s computer for reference purposes only.
Changing Resistance Levels Push the Increase() or Decrease() buttons to change the resistance level at any time in a workout program. Profile Programs These programs automate different resistances and workout levels. Fun Rides Rolling Hills Ride in the Park Mountains Pike’s Peak Pyramids Challenges Uphill Finish Cross-Training To start a Profile Program: 1. Step on the machine. 2. Push the button for the desired Profile Program type: Fun Rides, Mountains or Challenges.
MAINTENANCE Read all maintenance instructions fully before you start any repair work. In some conditions, an assistant is necessary to do the necessary tasks. ! Equipment must be regularly examined for damage and repairs. The owner is responsible to make sure that regular maintenance is done. Worn, damaged or loose components must be repaired or replaced immediately. Only WA RNING manufacturer supplied components can be used to maintain and repair the equipment.
MAINTENANCE A G H W E F I J T L J B X K U M N S R C Q P J O D O D P C A Console I Side Handlebars Q Levelers B Console Mast J HR Cables R Flywheel C Pedals K CHR Sensors S Brake Assembly D Crank Arms L Seat T RPM Sensor E Battery Bay M Seat Slider U Speed Sensor Magnet F AC Power Connector N Adjustment Knob V Servo Motor G Machine Type Switch O Shrouds W Drive Belt H Data Cable Center Plates X Drive Pulley P 23
Replacing the Console Batteries If the Battery Indicator comes on, replace the batteries in the back of the console with fresh batteries. Make sure the batteries point in the +/– direction shown in the battery bay. Note: The console uses D size batteries (LR20). If you use rechargeable batteries, the optional power adapter will not recharge the batteries. ! Do not mix old and new batteries. Do not mix alkaline, standard (carbon-zinc), or rechargeable (Ni-Cd, Ni-MH, etc) batteries.
Troubleshooting Condition/Problem No display/partial display/ unit will not turn on Things to Check Solution If bike has AC adapter, check Make sure unit is plugged into a functioning wall outlet. electrical (wall) outlet If bike has AC adapter, check Connection should be secure and undamaged. Replace connection at unit adapter or connection at unit if either are damaged. If bike has batteries, check Battery Indicator on console or check batteries. Replace the batteries.
Console shuts off (enters sleep mode) while in use Check RPM Sensor (requires shroud removal) RPM sensor should be aligned with magnet and connected to data cable. Realign sensor if necessary. Replace if there is any damage to the sensor or the connecting wire. Check data cable integrity All wires in the cable should be intact. If any are cut or crimped, replace cable. Check data cable connections/orientation Be sure cable is connected securely and oriented properly.
WARRANTY Who Is Covered This warranty is valid only to the original purchaser and is not transferable or applicable to any other person(s). What Is Covered Nautilus, Inc. warrants that this product is free from defects in materials and workmanship, when used for the purpose intended, under normal conditions, and provided it receives proper care and maintenance as described in the Product’s Assembly and Owner’s manual.
EN Nautilus® 8000173.072312.