230 / 430 470 Manual en Español Latino Americano: http://www.schwinnfitness.
TABLE OF CONTENTS Important Safety Instructions 3 Safety Warning Labels / Serial Number 5 Specifications 6 Before Assembly 6 Parts 7 Hardware 8 Tools 8 Assembly 9 Moving the Machine 21 Leveling the Machine 21 Features 22 Console Features 23 Operations 28 Adjustments 28 Power Up / Idle Mode 29 Quick Start Program 30 User Profiles 30 Pausing or Stopping 34 Results / Cool Down Mode 35 GOAL TRACK Statistics 35 Console Service Mode 37 Maintenance 38 Maintenance Parts 39 Troub
IMPORTANT SAFETY INSTRUCTIONS This icon means a potentially hazardous situation which, if not avoided, could result in death or serious injury. Obey the following warnings: Read and understand all warnings on this machine. Carefully read and understand the Assembly instructions. Read and understand the complete Manual. Keep the Manual for future reference.
This icon means a potentially hazardous situation which, if not avoided, could result in death or serious injury. Before using this equipment, obey the following warnings: Read and understand the complete Manual. Keep the Manual for future reference. • • • • • • • • • • • • • • • • • • 4 ead and understand all warnings on this machine. If at any time the Warning labels become loose, R unreadable or dislodged, contact Nautilus Customer Service for replacement labels.
SAFETY WARNING LABELS AND SERIAL NUMBER WARNING! • Injury or death is possible if caution is not used while using this machine. • Keep children and pets away. • Read and follow all warnings on this machine. • Refer to the Owner’s Manual for additional warnings and safety information. • The heart rate displayed is an approximation and should be used for reference only. • Not intended for use by anyone under 14 years of age. • The maximum user weight for this machine is 300 lbs (136 kg).
SPECIFICATIONS 63.2” (160.5 cm) 28.2” (71.5 cm) ! 70.1” (178.1 cm) Maximum User Weight: 300 lbs. (136 kg) Max pedal height at full incline: Machine weight : 26.0” (66.1 cm) 168.7 lbs (76.5 kg) Power Requirements: Operational Voltage: Operating Current: 9VDC 1500 mA Regulatory Approvals: AC Power Adapter: L listed, CSA certified (or equivalent), U Rated 120V 60Hz Input, 9VDC, 1500mA Output. Class 2.
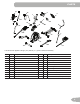
PARTS 21 2 19 5 1 18 20 3 4 16 6 12 17 15 9 7 14 11 10 13 8 A decal has been applied to all right (“ R ”) and left (“ L ”) parts to assist with assembly.
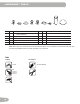
HARDWARE / TOOLS A Item Qty A 6 B C D Description E F G Item Qty Button Head Hex Screw, M8x16 (with Loctite® adhesive) F 6 H I Description Wave Washer B 4 Flat Washer, M8 G 12 Lock Washer, M8 C 8 Wide Washer, M8 H 2 Pivot Sleeve D 4 Button Head Hex Screw, M8x16 I 2 Cap E 2 Hex Head Screw, M8x20 Note: Select pieces of Hardware have been provided as spares on the Hardware Card. Be aware that there may be remaining Hardware after the proper assembly of your machine.
ASSEMBLY 1. Attach Front Stabilizer to Frame Note: Hardware is pre-installed and not on the Hardware Card.
2. Attach Rail Assembly to Frame Assembly Note: Be sure Levelers are fully raised on Rail Assembly. Hardware is pre-installed and not on the Hardware Card.
3. Attach the Manual Lift Assembly using the Arm Pivot Rod Note: Hardware is pre-installed and not on the Hardware Card. * NOTICE: With the Arm Pivot Rod under the plate junction, push the Manual Lift Assembly toward the Frame Assem- bly and fully tighten hardware. Remove the Arm Pivot Rod after tightening. Keep fingers away from any pinch opportunities when placing or removing the Arm Pivot Rod.
4. Connect the Cable and Attach the Console Mast to Frame Assembly NOTICE: Do not crimp Console Cable.
5.
6.
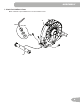
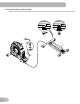
7. Attach Left Pedal to Frame Assembly NOTICE: Attach the Pedal to the Leg first. Make sure the Pivot Sleeve (H) engages the Handlebar knuckle cover. Repeat step on opposite side with the Right Pedal (Item 15).
8. Attach the Upper Handlebar Arms to Frame Assembly Note: Hardware is pre-installed and not on the Hardware Card. * Make sure the Upper Handlebar Arms are secure before you exercise.
9. Route Cables and Attach the Static Handlebar to Frame Assembly Note: Hardware is pre-installed and not on the Hardware Card. * NOTICE: Do not crimp the Console Cables.
10. Attach Water Bottle Holder to Frame Assembly Note: Hardware is pre-installed and not on the Hardware Card.
11. Remove Hardware from Console NOTICE: Do not crimp the cable. Note: Hardware is pre-installed and not on the Hardware Card. * 5 X4 * #2 12. Connect Cables and Attach Console to Frame Assembly NOTICE: Align the clips on the cable connectors and make sure the connectors lock. Do not crimp cables.
13. Connect AC Power Adapter to Frame Assembly 19 14. Final Inspection Inspect your machine to ensure that all hardware is tight and components are properly assembled. Note: I f necessary, apply silicone lubricant to a cloth and wipe the rails to eliminate roller noise. Silicone lubricant is not intended for human consumption. Keep out of reach of children. Store in a safe place. 22 Be sure to record the serial number in the field provided at the front of this manual.
BEFORE YOU START Moving the Machine The machine may be moved by one or more persons depending on their physical abilities and capacities. Make sure that you and others are all physically fit and able to move the machine safely. 1. Remove the power cord. 2. Use the Transport Handle to carefully lift the machine onto the transport rollers. 3. Push the machine into position. 4. Carefully lower the machine into position. NOTICE: B e careful when you move the elliptical.
FEATURES U V E D C F B G A H I J T L K S R Q P O A Speakers L Foot Pedal N B Console M Transport Handle C Media Tray N Rail D Fan O Incline Arm E Handlebar Arm P Leveler F Contact Heart Rate (CHR) Sensors Q Stabilizer G Handlebar, Static R Transport Roller H Water Bottle Holder S Power Connector I Storage Bin T Fully Shrouded Flywheel J Incline Release Button U USB Port K Incline Adjustment Handle V MP3 Input M Use the values calculated or measu
Console Features The Console provides important information about your workout and lets you control the resistance levels while you exercise. The Console features the Schwinn Dual Track™ display with touch control buttons to navigate you through the exercise programs.
Resistance Level Quick Buttons- Shifts the resistance levels to the setting quickly during a workout Achievement Indicator Lights- when a workout result is reviewed, the achievement indicator light will activate. Schwinn Dual Track™ Display Upper Display Data 10 9 8 7 6 5 4 3 2 1 10% 40% 70% User Display Achievement Display Program Display The Program Display shows information to the User and the grid display area shows the course profile for the program.
10% 40% 70% Lower Display Data Hr The Lower Display shows the Workout Values and can be customized for each User (Consult the “Edit User Profile” section of this manual). Use the Right() button to move through all the workout statistics. Speed The Speed display field shows the machine speed in miles per hour (mph) or kilometers per hour (km/h). Time The TIME display field shows the total time count of the workout, the average Time for the User Profile, or the total operational time of the machine.
Export Workout Results to USB Flash Drive This fitness machine is equipped with a USB Port and can export your Workout Results to a USB Flash Drive. With the Workouts exported from the fitness machine, connect the USB Flash Drive to a computer and upload the file to your Schwinn Connect™ account. Note: USB Flash Drives must be formatted in FAT32 for proper functionality. 1. From the Power-Up screen, push the User button to select the desired User Profile. 2.
Once the Console has your initial heart rate, do not move or shift your hands for 10 to 15 seconds. The Console will now validate the heart rate. Many factors influence the ability of the sensors to detect your heart rate signal: • Movement of the upper body muscles (including arms) produces an electrical signal (muscle artifact) that can interfere with pulse detection. Slight hand movement while in contact with the sensors can also produce interference.
OPERATIONS What to Wear Wear rubber-soled athletic shoes. You will need the appropriate clothes for exercise that allow you to move freely. How Often Should You Exercise Consult a physician before you start an exercise program. Stop exercising if you feel pain or tightness in your chest, become short of breath, or feel faint. Contact your doctor before you use the machine again. Use the values calculated or measured by the machine’s computer for reference purposes only.
To release the Incline Assembly: Do not adjust the workout angle when on the machine. 1. Grasp the Incline Adjustment Handle and push the Incline Release Button with the palm of your hand. Be prepared to support the weight of the raised parts of the machine. When released, the Incline Assembly may fully disengage. Make sure that you are able to support the weight of the raised parts of the machine safely. Note: The Incline Handle may need to be slightly lifted to disengage the Incline Assembly. 2.
Quick Start ( Manual ) Program The Quick Start ( Manual ) program lets you start a workout without entering any information. During a Manual Workout, each column represents a 2 minute time period. The active column will advance across the screen every 2 minutes. If the workout lasts for more than 30 minutes, the active column is fixed on the farthest column on the right and pushes the previous columns off the display. 1. Stand on the machine. 2.
4. The Console display shows the NAME prompt and the current User Profile name. Note: The User name will be blank if this is the first edit. The name of a User Profile is limited to 10 characters. The currently active segment will flash. Use the Increase/Decrease buttons to move through the alphabet and blank space (found between A and Z). To set each segment, use the Left() or Right() buttons to shift between segments. Push the OK button to accept the displayed User name. 5.
Changing Resistance Levels Push the Resistance Level Increase() or Decrease() buttons to change the resistance level at any time in a workout program. To rapidly change the resistance level, push the desired Resistance Level Quick Button. The Console will adjust to the selected resistance level of the quick button. Profile Programs These programs automate different resistance and workout levels. The Profile Programs are organized into Categories (Fun Rides, Mountains, and Challenges).
Workout Profile and Goal Program The Console lets you select the Profile Program and type of Goal for your workout (Distance, Time or Calories), and set the Goal value. 1. Stand on the machine. 2. Push the Increase() or Decrease() buttons to select the correct User profile. 3. Push the Programs button. 4. Push the Left() or Right() buttons to select a Category of Workout. 5. Push the Increase() or Decrease() buttons to select a Profile Workout, and push OK. 6.
Heart Rate Control (HRC) Workout Programs The Heart Rate Control (HRC) programs let you set a heart rate goal for your workout. The program monitors your heart rate in beats per minute (BPM) from the Contact Heart Rate (CHR) sensors on the machine, and adjusts the workout to keep your heart rate in the selected zone. ote: The console must be able to read the heart rate information from the CHR sensors for the HRC program to work N correctly.
Results / Cool Down Mode After a workout the GOAL display shows 03:00 and then starts to count down. During this Cool Down period, the Console shows the Workout Results. All workouts except Quick Start have a 3-minute Cool Down period. After a workout the GOAL display shows 03:00 and then starts to count down. During this Cool Down period, the Console shows the Workout Results. All workouts except Quick Start have a 3-minute Cool Down period.
The BMI Measurement is a useful tool that shows the relationship between weight and height that is associated with body fat and health risk. The table below gives a general rating for the BMI score: Underweight Below 18.5 Normal 18.5 – 24.9 Overweight 25.0 – 29.9 Obesity 30.0 and above ote: The rating may overestimate body fat in athletes and others who have a muscular build. It may also underestiN mate body fat in older persons and others who have lost muscle mass.
CONSOLE SETUP MODE The Console Setup Mode lets you input the date and time, set the units of measurement to either English or Metric, change the machine type, control the sound settings ( on/ off), or see maintenance statistics (Error Log and Run Hours – for service technician use only). 1. old down the PAUSE/END button and Right button together for 3 seconds while in the Power-Up Mode to go into H the Console Setup Mode.
MAINTENANCE Read all maintenance instructions fully before you start any repair work. In some conditions, an assistant is required to do the necessary tasks. Equipment must be regularly examined for damage and repairs. The owner is responsible to make sure that regular maintenance is done. Worn or damaged components must be repaired or replaced immediately. Only manufacturer supplied components can be used to maintain and repair the equipment.
Maintenance Parts A B I C D H G II E F GG HH FF P EE CC M R S V Z X L DD BB Y K M Q CC J N O U T AA W A Console M Roller Y Fly Wheel B Heart Rate Cable, Upper N Leg, Right Z Speed Sensor Magnet C Handlebar, Static O Shroud Cap AA Speed Sensor D Console Cable, Upper P Shroud, Upper BB Pedal Arm, Left E Arm Pivot Rod Q Console Cable, Lower CC Transport Wheel F Console Mast R Incline Assembly DD Front Stabilizer G Water Bottle Holder S Frame A
TROUBLESHOOTING Condition/Problem No display/partial display/ unit will not turn on Things to Check Solution Check electrical (wall) outlet Make sure unit is plugged into a functioning wall outlet. Check connection at front of unit Connection should be secure and undamaged. Replace adapter or connection at unit if either are damaged. Check data cable integrity All wires in cable should be intact. If any are visibly crimped or cut, replace cable.
Condition/Problem Console shuts off (enters sleep mode) while in use Things to Check Solution Check electrical (wall) outlet Make sure unit is plugged into a functioning wall outlet. Check connection at front of unit Connection should be secure and undamaged. Replace adapter or connection at unit if either are damaged. Check data cable integrity All wires in the cable should be intact. If any are cut or crimped, replace cable.
Condition/Problem Things to Check Solution Squeaking noise that appears a few minutes into a workout and normally will get progressively worse as the workout continues Bolt that connects the swing arms to the axle running through the console mast Loosen pivot rod bolt slightly until noise goes away. White lithium grease can also be applied for a temporary fix. Contact Customer Care for assistance.
WARRANTY Who Is Covered This warranty is valid only to the original purchaser and is not transferable or applicable to any other person(s). What Is Covered Nautilus, Inc. warrants that this product is free from defects in materials and workmanship, when used for the purpose intended, under normal conditions, and provided it receives proper care and maintenance as described in the Product’s Assembly and Owner’s manual.
EN Nautilus® 8011490.050116.