
User's Manual


Do not install where the detector faces a window, since
movement outside could cause unwanted alarms.
Make sure the detection area does not have obstructions (curtains,
screens, large pieces of furniture, plants, etc.) that could block the
pattern of coverage.
Avoid placing the sensor in areas containing objects likely to
produce a rapid change in temperature, such as central heating
radiators or ducts (or heaters of any kind), air conditioners, open
flame, etc.
INSTALLATION
1.
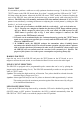
Refer to FIG. 2, and loosen the screw on the PIR bottom, and then remove the front cover.
2. Insert two AAA alkaline batteries. Select “Installer Mode” on the Base Unit and enter the
Installer Code to gain access authority. Then select \Set Device\Enroll Device\Burglar
Sensor\Enter Zone No. to enroll the ID of PIR-3SP by pressing its TEST button on the PIR
board. You may change its various attributes under \Set Device\Change Device Setting\Burglar
Sensor Change, to fulfill different requirements.
Important Notice: In order to reset the microprocessor properly, before replacing the
batteries in the PIR-3SP, press the TEST button for 5 seconds to discharge the energy that
remains in the capacitor on the PC board. Otherwise, it may not restart.
3.
After power on, wait one minute for sensor warm-up.
4.
Mount the base with two screws (refer to Fig. 4) or use Velcro tab provided at a selected
location, and 2 m above the floor. Make sure the distance between PIR and Base Unit is within
RF transmission range.
$
Fig. 2
Screw
Holes
Fig. 3
Open
Test Button
Simulation
ON
OFF
Fig. 4
Fig. 5
2