
Manual


12 of 27
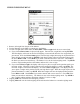
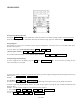
GLP & ISO MENU
Initially the GLP, ISO, AutoGLP & Main icons are visible. To use any of these programs, you must set
the balance clock to the current time and date. To do this, go to the Main Menu, tap the Timed Send %
Clock icon and then tap the Set Balance Clock box.
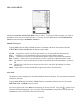
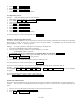
Manual GLP report
Tapping GLP clears the balance XBAR statistics accumulator and enters the manual GLP mode.
XAVG, RCL X AVG, Lot ID, New & Tare are made visible.
Lot ID - Tap this box to enter a lot ID for the statistics run via the graffiti pad with keyboard.
Tare - Tap this box to tare the balance before or between weight readings remotely.
XAVG - Tap this box each time to read and add the balance weight to the statistics accumulator.
RCL X AVG - Tap this box to end the statistics run and to show the completed statistics results.
Save - Tap this box to store the manual GLP results to the print buffer for downloading to a printer or
file.
New - Tap this box to clear the screen and return to the GLP, Auto GLP, ISO display for another
statistics run.
Main - Tap this box to exit the manual GLP program and return to the main menu.
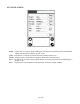
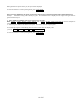
Auto GLP
The balance must be configured to Send When Stable from the front panel. See your balance instruction
manual for directions.
Tapping Auto GLP clears the balance XBAR statistics accumulator and enters the auto GLP mode.
Done, Run, New, and Main icons are visible
The cursor appears next to the Done box prompting you to enter a lot ID. Tap on the
graffiti icon to
make the PDA keyboard appear. Type in your lot ID, then tap Done in the graffiti screen and then tap
the Done box next to the lot ID in the Auto GLP screen.