Getting Started With The ® ™ Explorer 8000 and 8000HD DVR ™ Record your favorite programs when you’re busy Record one program and watch another Record two live programs while watching a third program you recorded earlier Record and store up to 90 hours of standard-definition programming or 20 hours of high-definition programming (with a 160 GB hard drive) Watch and record high-definition programs on the 8000HD DVR (the actual high-definition storage capacity depends on the model) Pause live TV for up to
Welcome! With the Explorer® 8000™ Digital Video Recorder (DVR), you can easily record your favorite programs and then play them back anytime. The built-in DVR and Picture-In-Picture (PIP) features give you complete control, convenience, and choice when watching TV. Use your DVR to control the following features...
Using Your Remote Control Use the keys on the AllTouch Remote Control to access the DVR and PIP features of your DVR. This guide describes the keys used to access the DVR and PIP features.
Preparing the Explorer 8000HD DVR to Work With Your High-Definition TV If you have an Explorer 8000HD DVR and an HDTV, and you are not using a Digital Visual Interface (DVI) connection, you may need to set up the DVR so that it provides video to your HDTV in picture formats that your HDTV supports. Otherwise, your picture quality may be less than optimal.
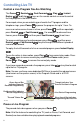
Selecting Picture Formats With the Setup Wizard Setting up the DVR to support a variety of picture formats allows you to toggle among the settings you have chosen while watching TV. You can also select the setting that provides the best picture quality for the format currently being broadcast. Note: If your HDTV displays a black screen when you turn on the HDTV and the DVR, you may need to select a compatible picture format for your HDTV. Go to Selecting Compatible Picture Formats on page 7.
4. Choose one of the following options: • If you have a standard-screen (4:3) HDTV, press A . • If you have a wide-screen (16:9) HDTV, press B . 5. Choose one of the following options: • To choose the Quick Setup option to begin watching press A . Press television. • To choose the Standard Setup option press screen instructions. When you finish, press press to begin watching television. B ; then follow the onto exit the setup.
Selecting Compatible Picture Formats If your HDTV displays a black screen when you turn it on, the DVR may not be sending your HDTV a picture format that your HDTV supports. Follow these steps to select picture format settings that your HDTV supports. Note: Rather than selecting a single picture format setting, you may want to select all settings that your HDTV supports.
Controlling Live TV Control a Live Program You Are Watching The Pause , Rewind , Fast-Forward , Play , Instant Replay , and Live keys on the remote control are used to control the live program in the Main screen. For example, when you are watching your favorite live TV program and the telephone rings, press Pause to pause the program for up to 1 hour. To and then repeatedly reverse or advance one frame at a time, press Pause press Rewind or Fast-Forward .
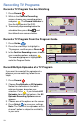
Using the Program Guide Find a Program to Watch 1. Press Guide . The Program Guide appears and lists the next 7 days of programs. ) to 2. Press the directional keys ( move through the program listings and highlight the program you want to watch. HDLN 36 Headline News 4:00-5:00pm Up-to-the-minute coverage of the latest events.
Recording TV Programs Record a TV Program You Are Watching 1. Press Record . 2. While in the Confirm Recording screen, choose your recording options and press A . The Record Indicator is lit on the front panel of the DVR. 3. To manually stop recording before the Confirm Recording "Design On A Dime" Tue: 11/13 Save: 14 days scheduled time, press Stop and then follow the on-screen choices.
Watching Your Recordings Access and Play Back Your Recorded Programs Anytime Recorded List "Design On A Dime" 1. Press List . 2. Use the arrow keys to choose the program you want to play back. 3. Press Select to display your options.
Copy Recordings to a VCR Tape The Copy to VCR feature lets you use your VCR as a back-up storage device for the hard drive in your DVR. In other words, you can archive your recordings to a VCR tape. Verify that the OUT 2 (VCR) outputs are connected to your VCR. When you want to archive a TV program to VCR tape, first record the program to your DVR. Then, copy the program from the DVR to your VCR.
Copy a Recording 1. Connect the VCR to the OUT 2 (VCR) connection on the back of the Explorer DVR. See Set Up Connections on page 12 for more information. 2. Make sure that a tape is in your VCR and that the VCR is set to record. Recorded List "Design On A Dime" 3. Press List . The Recorded List screen appears. Save: Until Erased Recorded Programs 4. Press Move Up or Move Down to highlight the recording you want to copy to the VCR. Make sure to select a program that is not currently being recorded. 5.
Using Picture-In-Picture Activate PIP on Your TV While watching a program, press PIP On/Off to activate the PIP screen. Notes: • To pause or record the video in the PIP screen, you must first swap it to the Main screen. • You can only use the dedicated DVR keys (Pause, Rewind, Fast-Forward) to control the program shown in the Main screen. • To change the channel in the PIP screen, use PIP CH+ and PIP CH- PIP Screen Main Screen PIP Screen Main Screen .
Use Power-Save Mode To maximize the life of your DVR, you should power-down the DVR when it is not in use. Simply press CBL and then press Power on your remote control, or press Power on the front panel of the DVR. The Power light turns off, but because the DVR still is plugged in, your scheduled recordings still occur. Between 1:00 a.m. and 6:00 a.m. every day, your DVR will automatically enter Power-Save mode. In Power-Save mode, the set-top is powereddown, but all scheduled recordings still occur.
Frequently Asked Questions How far back can I rewind live TV? The length of time you can rewind live TV depends on how long you have been tuned to a single channel. Each time you change channels, a new copy is automatically stored to the built-in recorder. This copy saves up to the last 1 hour of programming. For example, if you have been watching the same channel for 15 minutes, you can rewind that 15 minutes of the program.