
DVR User Manual


7
Selecting Compatible Picture Formats
If your HDTV displays a black screen when you turn it on, the DVR may not be
sending your HDTV a picture format that your HDTV supports. Follow these
steps to select picture format settings that your HDTV supports.
Note: Rather than selecting a single picture format setting, you may want to
select all settings that your HDTV supports. Setting up the DVR to support a
variety of picture formats allows you to toggle among the different settings while
viewing TV and select the setting that provides the best picture quality for the
format being broadcast.
1. Find the picture formats that your HDTV supports. (If necessary, refer to the
user’s manual that came with your HDTV.)
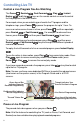
2. If the DVR is off, press Cable and then Power on the remote control
to turn it on.
3. On the front of the DVR, press and hold Select until the Message Light
blinks.
4. On the front of the DVR, press Vol – to indicate that you want to select a
picture format setting. The LED displays HdSr to indicate that you are in the
Picture Format mode for HDTV screens.
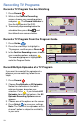
5. Use the following table to select settings that your HDTV supports.
Important: You have 20 seconds to begin selecting picture format settings.
After 20 seconds, HdSr disappears to indicate that the DVR is no longer in
the Picture Format mode. If this occurs, repeat this process by starting at
step 3.
On the
To Select This DVR The DVR And Then
Picture Format: Press: Briefly Displays: Briefly Displays:
480i CH+ 480i SEt
720p VOL- 720p SEt
480p CH- 480p SEt
1080i VOL+ 1080i SEt
Note: The default picture format setting is 1080i.
6. To start watching TV, make sure the remote control is in Cable mode and
press Power .