Connecting the ® TM Explorer 8240 Digital Video Recorder
Notice for CATV Installers CATV Installers Notice If you are a CATV installer, read the information in the box below. U.S. Patents U.S. Patents List A patent notice is affixed to this product.
Contents Important Safety Instructions ................................................................. 4 Change the Way You Watch TV ............................................................ 6 Safety First ............................................................................................ 6 The Explorer eClub ............................................................................... 6 Identify Your 8240 DVR..........................................................................
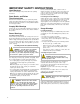
IMPORTANT SAFETY INSTRUCTIONS Heed Warnings Adhere to all warnings on the product and in the operating instructions. Read, Retain, and Follow These Instructions Read all of the instructions before you operate this product. Follow all operating instructions that accompany this product. Retain the instructions for future use. Give particular attention to all safety precautions. Comply With Warnings Avoid electric shock.
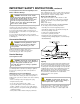
IMPORTANT SAFETY INSTRUCTIONS, continued Protecting This Product From Foreign Objects and Water or Moisture Damage WARNING: Avoid electric shock and fire hazard! Never push objects through the openings in this product. Foreign objects can cause electrical shorts that can result in electric shock or fire. Do not expose this product to rain or moisture. Do not place objects filled with liquid, such as vases, on this product.
Change the Way You Watch TV DVR makes it easy to watch TV on your terms. The Explorer® 8240™ Digital Video Recorder (DVR) is the simple way to take control over your TV – and your life. You take control because DVR lets you decide what’s on TV and when. So there’s no more putting off the things you need to do, just because there’s a show on TV you want to watch. Just think what DVR can do for you: • Never miss a minute of your favorite movie or the big game.
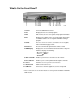
What’s On the Front Panel? 1 Power Turns the 8240 DVR on and off 2 List Displays the list of recorded programs 3 Exit Exits menus, the on-screen guide, and program information 4 Info Displays a description of the selected program.
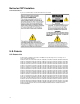
What’s On the Back Panel? CAUTION CABLE OUT RISK OF ELECTRIC SHOCK DO NOT OPEN OUT 1 CABLE IN THIS DEVICE IS INTENDED TO BE ATTACHED TO A RECEIVER THAT IS NOT USED TO RECEIVE OVER-THE-AIR BROADCAST SIGNALS. CONNECTION OF THIS DEVICE IN ANY OTHER FASHION MAY CAUSE HARMFUL INTERFERENCE TO RADIO COMMUNICATIONS AND IS IN VIOLATION OF THE FCC RULES, PART 15.
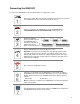
Connecting the 8240 DVR To connect your 8240 DVR to your entertainment devices, complete these steps. 1 2 3 Connect the coaxial cable that carries the signal from your cable service provider to the CABLE IN connector on the back panel of the set-top. Connect your SDTV to the 8240 DVR. Refer to the Connections for a Standard-Definition TV and Standard VCR section on page 13. Identify the additional devices you will connect to the 8240 DVR and TV.
Connections for a Standard-Definition TV and VCR When using the 8240 DVR with an SDTV, you must make one of the following connections to view content. Some SDTVs may not have all of these connections. In addition, you can make connections to a VCR to archive recordings to a VCR tape. Refer to your TV and VCR user’s guide and the cabling diagrams in this guide for more information. Note: The labeling on your 8240 DVR model may vary from the labels shown in the following table.
Watch TV Access Services and Programs Access cable services and programs by pressing the following keys on the remote control: • Guide–Access the on-screen guide. The on-screen guide displays schedules of TV programs and other services available from your cable service provider, such as video-on-demand and pay-per-view programs. • Arrows–Select a program in the schedule. • Info–Display a specific program description (either from the on-screen guide or while viewing a program).
Performance Tips If the 8240 DVR does not perform as expected, the following tips may help. If you need further assistance, contact your cable service provider. No Picture • Verify that the power to your TV is turned on. • If the 8240 DVR is plugged into a wall switch, verify the wall switch is in the ON position. • Note: You should avoid plugging the 8240 DVR into an outlet that is controlled by a wall switch. Verify that all cables are properly connected.
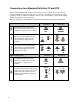
Connecting the 8240 DVR to a Standard TV WARNING: Electric shock hazard! Unplug all electronic devices before connecting or disconnecting any device cables for the 8240 DVR. Connecting the 8240 DVR to a Standard TV and Standard VCR WARNING: Electric shock hazard! Unplug all electronic devices before connecting or disconnecting any device cables for the 8240 DVR.
Connecting the 8240 DVR to a Stereo TV WARNING: Electric shock hazard! Unplug all electronic devices before connecting or disconnecting any device cables for the 8240 DVR. Connecting the 8240 DVR to a Stereo TV and Stereo VCR Note: This connection allows for archiving to the VCR and for watching VCR tapes on your TV. You may also choose to connect OUT 1 from the 8240 DVR directly to the TV, so that you may watch live channels on the TV during any archive-toVCR process.
Connecting the 8240 DVR to a Home Theater Receiver and Stereo TV WARNING: Electric shock hazard! Unplug all electronic devices before connecting or disconnecting any device cables for the 8240 DVR.
Connecting the 8240 DVR to an External SATA Hard Disk Drive (optional) Complete the following steps to install a SATA drive. 1. Make sure that both the 8240 DVR and the external SATA drive are unplugged from power. 2. Connect the data cable for the SATA drive to the 8240 DVR. 3. Plug in power to the external SATA drive. 4. Plug in the 8240 DVR power cord, and then turn on the 8240 DVR. 5. Follow the on-screen instructions.
Connecting the 8240 DVR to an External SATA Hard Disk Drive (optional), continued Disconnecting the External SATA Hard Disk Drive Complete the following steps to disconnect the SATA drive safely. 1. Make sure that the 8240 DVR is powered off. 2. Disconnect the power cord from the 8240 DVR and wait for at least 10 seconds. 3. Disconnect the power cord and data cable from the external SATA drive.
Compliance Information United States FCC Compliance Canada EMI Regulation This equipment has been tested and found to comply with the applicable limits of Part 15 of the FCC Rules. These limits are designed to provide reasonable protection against harmful interference in a residential installation.
© 2005 by Scientific-Atlanta, Inc. All rights reserved. Product and service availability subject to change without notice. Scientific-Atlanta, Inc., 5030 Sugarloaf Parkway, P.O. Box 465447, Lawrenceville, GA 30042 www.scientificatlanta.