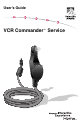
User’s Guide VCR Commander™ Service
IMPORTANT RULES FOR SAFE OPERATION CAUTION RISK OF ELECTRIC SHOCK DO NOT OPEN AVIS RISQUE DE CHOC ÉLECTRIQUE NE PAS OUVRIR CAUTION: To reduce the risk of electric shock, do not remove cover (or back).. No user-serviceable parts inside. Refer servicing to qualified service personnel. WARNING TO PREVENT FIRE OR ELECTRIC SHOCK, DO NOT EXPOSE THIS UNIT TO RAIN OR MOISTURE. This symbol is intended to alert you that uninsulated voltage within this product may have sufficient magnitude to cause electric shock.
IMPORTANT RULES FOR SAFE OPERATION, Continued 1. Carefully read all safety and operating instructions before operating this product, and retain them for future reference. 2. Follow all warnings and cautions in the operating instructions, as well as those that are affixed to this product. 3. Follow all operating instructions that accompany this product. 4. Do not use liquid or aerosol cleaners. Use a damp cloth for cleaning. 5. 8. a.
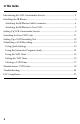
In This Guide Introducing the VCR Commander Service ..................................................... 5 Installing the IR Blaster ..................................................................................... 6 Attaching the IR Blaster Cable Connector ................................................... 6 Attaching the IR Blaster to Your VCR .......................................................... 7 Setting Up VCR Commander Service .............................................................
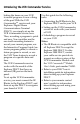
Introducing the VCR Commander Service Setting the timer on your VCR to record programs is now a thing of the past! With the VCR CommanderTM service and your Explorer® Digital Home Communications Terminal (DHCT), you simply set up the VCR Commander service once. Then, recording a program is quick and easy.
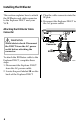
Installing the IR Blaster This section explains how to attach the IR Blaster and cable connector to the Explorer DHCT and your VCR. Attaching the IR Blaster Cable Connector 3. Plug the cable connector into the IR port. 4. Reconnect the Explorer DHCT to the AC power outlet. DIGITAL AUDIO OUT CATV CONVERTER MADE IN MEXICO CABLE OUT IR L R WARNING: Avoid electric shock. Disconnect the DHCT from the AC power outlet before attaching the connector.
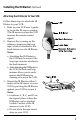
Installing the IR Blaster, Continued Attaching the IR Blaster to Your VCR Follow these steps to attach the IR Blaster to your VCR. 1. Refer to your VCR user’s guide to locate the IR sensor window. (The IR sensor is where the VCR receives the remote control signal.) 2. Remove the covering on the adhesive strip from the loop tape, which is attached to the hook fastener on the IR Blaster. Notes: • Attaching the IR Blaster to the VCR may be easier if the loop tape remains attached to the hook fasteners.
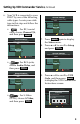
Setting Up VCR Commander Service Use your remote control to set up the VCR Commander service. After you connect the IR Blaster, you must program the code for your brand of VCR into the memory of the VCR Commander. Before you begin, verify the following status: • VCR is off • TV is on and tuned to your cable channel (3 or 4) Note: At any time during this procedure, you can press C or EXIT to manually record a program on your VCR. 1. Turn on the power to your Explorer DHCT. 2.
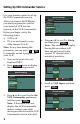
Setting Up VCR Commander Service, Continued 6. Your VCR is connected to your DHCT by one of the following cable types. Locate your cable type in this step and follow the instructions: • General Settings Highlight an INPUT, press SELECT to change. PREFERENCE Set: VCR Comnder Setup VCR Input For RF/coaxial cable, choose Channel 3/4, and then press SELECT . General Settings Highlight an INPUT, press SELECT to change.
Setting Up VCR Commander Service, Continued 10. Turn to the Manufacturers' VCR Codes section in this guide to find the code choice(s) for your brand of VCR. You will use these codes in step 11. Notes: • This is a four-digit code. • You will have 1 minute to enter the code. This screen will return to the General Settings screen after 1 minute of inactivity. 11. Enter the code for your brand of VCR, and then press SELECT .
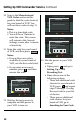
Searching for Your VCR Code If none of the codes lised for your brand of VCR turn on the power to the VCR and start the recording, then follow these steps to scan the entire VCR code library. The scan locates the code that will turn on the power to your VCR and start the recording: 1. Enter code 0000, and then press SELECT . Note: This process can take several minutes. 2. Wait for the test process to complete. General Settings Highlight a SETUP, press SELECT to advance to next setting.
Setting Up a VCR Recording Test Before setting your VCR to record a program, complete these steps to verify that the code you selected operates the recording function of your VCR. 1. Insert a blank tape into your VCR and turn the VCR off. 2. Press SELECT to begin a recording test. General Settings Highlight a SETUP, press SELECT to advance to next setting. VCR Commander PREFERENCE SETUP Instructions To test RECORD with VCR model 0062: • Insert a blank tape into your VCR. • Turn yourVCR VCRInput off.
Scheduling a VCR Recording This section explains how you can use Quick Settings and the Interactive Program Guide, to schedule a VCR recording. This section also explains how you can clear, or cancel, a scheduled VCR Timer program from the VCR Timer. Using Quick Settings You can instantly record the program you are currently watching using your remote control. 1. Verify that the power to your Explorer DHCT is turned on. 2. Press SETTINGS once while viewing a full-screen TV program. 3.
Scheduling a VCR Recording, Continued Using the Interactive Program Guide You can program your VCR to record future TV programs, directly from the Interactive Program Guide, using your remote control. You can select up to eight programs to record. 1. Verify that the power to your Explorer DHCT is turned on. 2. Press GUIDE . The Interactive Program Guide appears. 3. Press C for the current time and channel. 5. Press s or t to scroll to Set a VCR Timer for..., and then press SELECT to set the timer.
Scheduling a VCR Recording, Continued 8. Verify that the power to the VCR is off. Notes: • When you set a timer from the IPG, you are setting a one-time only timer for that program. See Using the VCR Timer next in this guide for information about setting 7-day, weekday only, weekend only, or single-day timers. • The power to the DHCT does not need to be on for recording to begin at the scheduled time. • The volume on the DHCT will automatically adjust to the maximum level when recording begins.
Scheduling a VCR Recording, Continued 3. Press s or t to scroll to the Timer: VCR New option, and then press SELECT . General Settings Highlight a Preference, press SELECT to change its setting(s). PREFERENCE CURRENT STATUS Timer: Remind New Timer: Sleep Timer: Turn Off Timer: VCR New Timer: VCR 1 Timer: VCR 2 Timer: Wake-Up 6 Available 4. Follow the on-screen instructions to set the recording time. 5. Press A to accept the timer settings. 6.
Scheduling a VCR Recording, Continued Clearing a VCR Timer You can clear, or cancel, a scheduled VCR Timer program from the VCR Timer. 1. Verify that the power to your Explorer DHCT is turned on. 2. Press SETTINGS twice while viewing a full-screen TV program. 4. Press C to clear, or cancel, the timer, and then press EXIT to return to the TV program. General Settings Highlight a CHANNEL, press SELECT to go to next setting.
Manufacturers' VCR Codes Find the code for your brand of VCR and use this code in Setting Up the VCR Commander Service procedure. Start with the first code in the list and continue through the choices. The most common codes are listed first.
Manufacturers' VCR Codes, Continued VCR Brand Name Code Daewoo Daytron Denon Dynatech Electrohome Electrophonic Emerex Emerson 0034, 0031, 0059, 0101, 0292, 0534, 0559, 0792 0034, 0534 0056, 0058, 0556, 0558 0014 0051, 0551, 0651, 0751, 0851 0051, 0551, 0651, 0751, 0851 0046, 0546 0014, 0016, 0050, 0051, 0057, 0075, 0082, 0102, 0135, 0198, 0222, 0223, 0225, 0226, 0292, 0308, 0309, 0375, 0493, 0516, 0524, 0551, 0557, 0635, 0651, 0657, 0698, 0723, 0751, 0792, 0824, 0851, 0893 0061, 0068, 0080, 0118, 0561,
Manufacturers' VCR Codes, Continued VCR Brand Name Code JVC 0081, 0083, 0022, 0055, 0220, 0221, 0398, 0522, 0555, 0581, 0583, 0655, 0720, 0721, 0755, 0898 0055, 0555, 0655, 0755 0051, 0292, 0551, 0651, 0751, 0792, 0851 0086, 0586 0081, 0083, 0052, 0055, 0398, 0555, 0581, 0583, 0655, 0755, 0898 0049, 0051, 0551, 0651, 0751, 0851 0051, 0551, 0651, 0751, 0851 0014, 0222 0086, 0586 0049 0057, 0075, 0254, 0557, 0657, 0754, 0854 0254, 0754, 0854 0014, 0254, 0754, 0854 0292, 0792 0014, 0049, 0053, 0095, 0117, 0
Manufacturers' VCR Codes, Continued VCR Brand Name Code Nikko Nikon Noblex Olympus Optimus 0051, 0551, 0651, 0751, 0851 0048, 0267, 0548 0254, 0754, 0854 0240, 0049 0072, 0062, 0051, 0118, 0176, 0446, 0551, 0562, 0618, 0651, 0718, 0751, 0851 0076 0016, 0198, 0309, 0493, 0516, 0698, 0893 0240, 0049, 0091, 0116, 0176, 0239, 0241, 0260, 0392 0049, 0051, 0052, 0054, 0056, 0058, 0068, 0254, 0551, 0556, 0558, 0651, 0751, 0754, 0851, 0854 0056, 0058, 0079, 0119, 0556, 0558 0049, 0223, 0493, 0723, 0893 0049, 00
Manufacturers' VCR Codes, Continued VCR Brand Name Code Realistic 0060, 0062, 0014, 0049, 0051, 0061, 0076, 0080, 0118, 0551, 0560, 0561, 0562, 0618, 0651, 0718, 0751, 0851 0048, 0267, 0548 0053, 0553 0056, 0058, 0556, 0558 0089 0067, 0059, 0065, 0254, 0559, 0754, 0854 0062, 0053, 0553, 0562 0081, 0083, 0014, 0055, 0096, 0285, 0493, 0555, 0581, 0583, 0596, 0655, 0755, 0893 0060, 0061, 0118, 0254, 0282, 0386, 0560, 0561, 0618, 0718, 0754, 0854 0057, 0059, 0135, 0198, 0224, 0225, 0226, 0559, 0635, 0698 006
Manufacturers' VCR Codes, Continued VCR Brand Name Code TMK Tatung Teac Technics Teknika Thomas Toshiba 0050, 0222, 0254, 0754, 0854 0055, 0555, 0655, 0755 0014, 0055, 0555, 0655, 0755 0049, 0176, 0260 0014, 0049, 0051, 0066, 0551, 0651, 0751, 0851 0014 0057, 0059, 0071, 0080, 0224, 0226, 0380, 0557, 0559, 0657 0051, 0254, 0551, 0651, 0751, 0754, 0851, 0854 0254, 0754, 0854 0059, 0559 0052, 0054 0054, 0059, 0075, 0235, 0559 0254, 0754, 0854 0062, 0014, 0049, 0056, 0058, 0061, 0069, 0074, 0076, 0086, 0095
Troubleshooting Check the following list for possible errors. If an error occurs, you may be able to easily resolve it before calling your cable service provider. Message or Error Possible Cause Check and Correct VCR Commander service did not turn on the power to the VCR for the scheduled recording and/or did not begin recording. A blank tape is not in the VCR. Insert a blank tape. The VCR is not off. Turn the power off to the VCR. The VCR Commander Menu option does not appear on the screen.
Notes 25
Notes 26
FCC Compliance This equipment has been tested and found to comply with the applicable limits of Part 15 of FCC Rules. These limits are designed to provide reasonable protection against harmful interference in a residential installation. This equipment generates, uses, and can radiate radio frequency energy and, if not installed and used in accordance with the instructions, may cause harmful interference to radio or television reception, which can be determined by turning this equipment off or on.
Scientific-Atlanta, Inc., Scientific Atlanta, the Scientific-Atlanta logo and Explorer are registered trademarks of Scientific-Atlanta, Inc. VCR Commander and “Bringing the Interactive Experience Home” are trademarks of Scientific-Atlanta, Inc. All other trademarks shown are trademarks of their respective owners. Product and service availability are subject to change without notice. United States Scientific-Atlanta, Inc.