WebSTAR™ DPX2203™ and EPX2203™ VoIP Cable Modem User’s Guide
WebSTAR DPX2203 or EPX2203 VoIP Cable Modem User’s Guide Overview Introduction Welcome to the world of high-speed Internet and high quality digital telephone service. Your new WebSTAR™ Model DPX2203™ or Model EPX2203™ Cable Modem with Embedded MTA is a modem that meets industry standards for highspeed data connectivity along with digital telephone service.
Section A IMPORTANT RULES FOR SAFE OPERATION Overview Introduction This section provides important safety instructions that you must read and follow. In this Section This section contains the following topic.
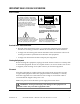
IMPORTANT RULES FOR SAFE OPERATION Note to Installer Note to CATV System Installer This reminder is provided to call the CATV system installer’s attention to Article 820-40 of the NEC (Section 54, Part I of the Canadian Electrical Code), that provides guidelines for proper grounding and, in particular, specifies that the CATV cable ground shall be connected to the grounding system of the building, as close to the point of cable entry as practical.
IMPORTANT RULES FOR SAFE OPERATION, Continued Accessories Do not use accessories with this equipment unless recommended by your cable service provider. Note: This unit may contain an optional battery pack. See the instructions for handling, replacing, and disposing of the battery in Section E Telephone Service Installation, later in this guide. Ventilation This equipment has openings for ventilation that protect it from overheating. To ensure the reliability of this equipment, do not obstruct the openings.
IMPORTANT RULES FOR SAFE OPERATION, Continued Lightning and Power Surges Plug your equipment into a surge protector in order to reduce the risk of damage from lightning strikes and power surges. If you are unsure of the type of surge protector to use, contact your cable service provider. Servicing Do not open the cover of this equipment. If you open the cover, your warranty will be void. Refer all servicing to qualified personnel only. Contact your cable service provider for instructions.
IMPORTANT RULES FOR SAFE OPERATION, Continued Damage that Requires Service For damage that requires service, unplug this equipment from the electrical outlet.
Section B Before You Begin Overview Introduction When you receive your WebSTAR Cable Modem, you should check the cable modem equipment and accessories to verify that each item is in the carton and that each item is undamaged. This section provides an equipment checklist. In this Section This section contains the following topics.
Check Your Equipment Equipment Checklist Before you install your cable modem, check the items in the carton. The carton contains the following items: • One WebSTAR Cable Modem • One Ethernet cable (CAT5/RJ-45) • One USB cable • One power adapter with power cord If any of the items listed is missing, please contact SciCare™ Broadband Services at 1-800-283-2636 for assistance.
Section C Front and Back Panel Components Overview Introduction This section provides descriptions of the DPX2203 or EPX2203 front and back panel components and the functions of the lights on the front panel and the optional battery pack. In this Section This section contains the following topics.
WebSTAR Cable Modem Front Panel Front Panel Components The following illustration shows the function of the front panel lights on the DPX2203 and EPX2203. 1 REPLACE BATTERY – Illuminates to indicate that the battery could not be fully charged. While the battery may be able to provide some backup power, it should be replaced to restore maximum capacity. Contact your cable service provider for instructions to replace and dispose of the old battery.
WebSTAR Cable Modem Front Panel, Continued 8 SEND – Blinks to indicate that the modem is sending data to the cable network 9 RECEIVE - Blinks to indicate that the modem is receiving data from the cable network 10 POWER – Illuminates solid green to indicate that power is being applied to the cable modem Notes: • After the cable modem is successfully registered on the network, the POWER (Light 10) and CABLE (Light 7) lights illuminate continuously to indicate that the cable modem is active and fully ope
WebSTAR Cable Modem Back Panel Back Panel Components The following illustration shows the description and function of the back panel components on the DPX2203 and EPX2203. CAUTION: Do not connect your PC to both the Ethernet and USB ports at the same time. Your modem will not function if both the Ethernet and USB ports are connected to your PC at the same time. Note: You can connect two separate PCs to the cable modem at the same time by connecting one to the Ethernet port and one to the USB port.
WebSTAR Cable Modem Back Panel, Continued 4 ETHERNET - RJ-45 Ethernet port connects to the Ethernet port on your PC 5 USB - 12 Mbps USB port connects to the USB port on your PC 6 CABLE IN - F-Connector connects to an active cable signal from your cable service provider 4004041 Rev B WebSTAR DPX2203 or EPX2203 VoIP Cable Modem User’s Guide 13
Functions of the Front Panel Lights Initial Power Up, Calibration, and Registration The following chart illustrates the sequence of steps and the corresponding appearance of the front panel lights on the cable modem during power up, calibration, and registration on the network. Use this chart to troubleshoot the power up, calibration, and registration process of your cable modem.
Functions of the Front Panel Lights, Continued Normal Operations The following chart illustrates the appearance of the front panel lights on the cable modem during normal operations.
Functions of the Front Panel Lights, Continued Special Conditions The following chart describes the appearance of the front panel lights on the cable modem during special conditions to show that you have been denied network access. If the front panel lights on the cable modem indicate that network access is denied, contact your cable service provider.
Section D Internet Service Installation Internet Service: Overview Introduction This section provides information and procedures to assist you in placing, installing, configuring, operating, and troubleshooting your DPX2203 or EPX2203 Cable Modem for high-speed Internet service. In this Section This section contains the following topics.
Internet Service: Before You Begin Contacting Your Local Cable Service Provider You need to set up an Internet access account with your local cable service provider in order to use your cable modem.
Internet Service: System Requirements Introduction This section provides hardware and software requirements for connecting your cable modem to a PC for high-speed Internet service. Minimum System Requirements for PCs • A PC with a Pentium MMX 133 processor or greater • 32 MB of RAM • Web browsing software (Netscape or Internet Explorer) • CD-ROM drive Minimum System Requirements for Macintosh • MAC OS 7.
Internet Service: Install the Cable Modem Installation Diagram The following diagram illustrates one of the various connection options that are available to you.
Internet Service: Install the Cable Modem, Continued Installing the Modem for High-Speed Data Service The following installation procedures explain how to set up and configure your cable modem if you plan to use high-speed data service. If you plan to use your modem for telephone service only, go to Telephone Service: Install the Cable Modem, later in this guide. WARNING: To avoid personal injury or damage to your equipment, follow these steps in the exact order shown.
Internet Service: Configure TCP/IP Introduction This section contains instructions for configuring the WebSTAR Cable Modem to run in Microsoft Windows or Macintosh environments. In addition, the TCP/IP protocol in a Microsoft Windows environment is different for each Microsoft Windows 95, 98, 98SE, ME, 2000, and XP version. Go to the appropriate section and follow the instructions to configure the TCP/IP protocol.
Internet Service: Configure TCP/IP, Continued 11. Click the DNS Configuration tab, and then select Disable DNS. 12. Click OK. Result: The Copying Files window opens. 13. When the system finishes copying the files, click OK. 14. Close all networking windows. 15. When the System Settings Change dialog box opens, click YES to restart your computer. Results: • The computer restarts. • The TCP/IP protocol is now configured on your PC and your cable modem and it is ready for use.
Internet Service: Configure TCP/IP, Continued Microsoft Windows 2000 Follow these steps to install and configure the TCP/IP protocol for Microsoft Windows 2000 environments. 1. Click Start, select Settings, and choose Network and Dial-up Connections. Result: The Network and Dial-up Connections window opens. 2. In the Network and Dial-up Connections window, double-click the Local Area Connection icon. Result: The Local Area Connection Status window opens. 3.
Internet Service: Configure TCP/IP, Continued Macintosh Follow these steps to verify that the TCP/IP communications protocol and an Ethernet device are installed on your Macintosh computer. 1. Click the Apple icon in the upper left corner of the Finder. Scroll down to Control Panels, and then click TCP/IP. 2. Click Edit on the Finder (gray bar) at the top of the screen. Scroll down to the bottom of the menu, and then click User Mode. 3. Click Advanced in the User Mode window, and then click OK. 4.
Internet Service: Install USB Drivers Introduction This section contains instructions for installing the WebSTAR cable modem USB drivers if your PC is equipped with a USB interface and a Microsoft Windows 98, 98SE, ME, 2000, or XP operating system. The USB driver installation procedures are different for each operating system. Follow the appropriate instructions in this section for your operating system. Note: If your PC does not have a USB interface, you may skip this section.
Internet Service: Install USB Drivers, Continued Microsoft Windows 2000 Follow these steps to install the WebSTAR cable modem USB drivers for Microsoft Windows 2000 environments. 1. Insert the USB Cable Modem Driver Installation Disk into the CD-ROM drive of your PC. 2. Wait until the POWER and CABLE lights on the cable modem appear solid green; then, plug the USB cable into the USB port on your PC. Result: The Found New Hardware Wizard window opens. 3.
Internet Service: Install USB Drivers, Continued Microsoft Windows XP Follow these steps to install the WebSTAR cable modem USB drivers for Microsoft Windows XP environments. 1. Insert the USB Cable Modem Driver Installation Disk into the CD-ROM drive of your PC. 2. Wait until the POWER and CABLE lights on the cable modem appear solid green; then, plug the USB cable into the USB port on your PC. Result: The Found New Hardware Wizard window opens. 3.
Internet Service: Frequently Asked Questions Introduction This section provides answer to frequently asked questions about cable modem Internet service. For questions about cable modem telephone service, see Telephone Service: Frequently Asked Questions, later in this guide. Frequently Asked Questions Q. What if I don’t subscribe to cable TV? A. If cable TV is available in your area, data service may be made available with or without subscribing to cable TV service.
Internet Service: Troubleshooting Common Troubleshooting Suggestions The modem does not register an Ethernet connection. Even new computers do not always have Ethernet capabilities. Be sure to verify that your computer has a 10/100BaseT Ethernet card and that the Ethernet driver software is properly installed. If you purchase and install an Ethernet card, follow the installation instructions very carefully. The modem does not register an Ethernet connection after connecting to a hub.
Internet Service: Troubleshooting, Continued Check and Correct If your cable modem does not operate as expected, the following tips may help. If you need further assistance, contact your cable service provider. • Verify that the plug to your cable modem AC adapter is properly inserted into an electrical outlet. • Verify that your cable modem AC adapter is not plugged into an electrical outlet that is controlled by a wall switch.
Section E Telephone Service Installation Telephone Service: Overview Introduction This section provides procedures to assist you in placing, installing, configuring, operating, and troubleshooting your DPX2203 or EPX2203 Cable Modem for telephone service. In this Section This section contains the following topics.
Telephone Service: Before You Begin Contacting Your Local Cable Service Provider You need to set up a telephone account with your local cable service provider in order to use your cable modem for telephone service.
Telephone Service: Before You Begin, Continued Selecting a Location for Your Modem You should work with your cable telephony service provider to choose the best location for your cable modem. Consider these recommendations: • Choose a location close to your computer if you will also use the cable modem for high-speed Internet service. • Choose a location that is near an existing RF coaxial connection to eliminate the need for an additional RF coaxial outlet.
Telephone Service: Telephone Requirements Introduction This section provides hardware and software requirements for utilizing your cable modem for telephone service. Number of Telephone Devices The RJ-11 telephone-style connectors on the cable modem can each provide telephone service to multiple telephones, fax machines, and analog modems. The maximum number of telephone devices connected to each RJ-11 port is limited by the total Ringing Load of the telephone devices that are connected.
Telephone Service: Using the Battery Pack (Optional) Introduction Your modem may include rechargeable Lithium-Ion battery back to provide stand-by operation in the event of an AC power failure. You can replace the battery pack without the use of any tools. WARNING: There is danger of explosion if the battery is mishandled or incorrectly replaced. Replace only with the same type of WebSTAR battery. Do not disassemble it or attempt to recharge it outside the system.
Telephone Service: Using the Battery Pack (Optional), Continued 3. On the right side of the modem is a slide switch marked Lock and Unlock. Slide the switch to the Lock position. 4. Continue installing the modem, using the other procedures in this guide. Charging the Battery Pack The battery begins to charge automatically as soon as you attach the modem to the battery pack and connect the 15VDC power supply to the back panel of the modem.
Telephone Service: Using the Battery Pack (Optional), Continued Using the Modem Without a Battery Pack If you want, you can choose to use the modem without a battery pack. To remove the battery pack, follow these steps. 1. Slide the Lock/Unlock switch to the Unlock position. 2. Carefully but firmly slide the modem away from the battery pack. 3. Attach the modem foot to the modem by aligning the prong on the foot with the hole on the bottom of the modem.
Telephone Service: Using the Battery Pack (Optional), Continued Adding a Battery Pack You may still be able to use a battery pack, even if one was not included with your modem. To determine if you can use a battery pack with your modem, look at the bottom of the modem. If your modem has a ten-pronged connector socket, you can add a battery pack to your modem. To add a battery pack to your modem, you must first remove the foot. 1. Rotate the foot on your modem counter-clockwise to the third click. 2.
Telephone Service: Mount the Battery Pack on a Wall Mounting Illustrations You can mount the optional battery pack for the DPX2203 on a wall using two wall anchors, two screws, and the mounting slots on the bottom of the unit. The modem can be mounted vertically or horizontally as shown in the following illustrations. WARNING: There is danger of explosion if the battery is mishandled or incorrectly replaced. Do not crush, puncture, or use excessive force in handling the battery.
Telephone Service: Mount the Battery Pack on a Wall, Continued Before You Begin Before you begin, choose an appropriate mounting place. The wall can be made of cement, wood, or drywall. The mounting location should be free of obstructions on all sides, and the cables should be able to easily reach the cable modem without strain. Leave sufficient clearance between the bottom of the cable modem, and any flooring or shelving underneath, to allow access to cabling.
Telephone Service: Mount the Battery Pack on a Wall, Continued Battery Backup Wall Mount Illustration 4" 101.6 mm 1.25" A 31.75 mm .25" A 6.35 mm Mounting Slot B .50" 12.7 mm .50" 12.7 mm Mounting Slot Mounting Slot 6" 152.4 mm Not Drawn To Scale Mounting Slot .25" 6.35 mm B .50" 12.7 mm .50" 12.
Telephone Service: Mount the Battery Pack on a Wall, Continued Wall Mounting Instructions Complete these steps to mount the battery pack to the wall. 1. Using a drill with a 3/16-in. bit, drill two holes in the wall as follows: • To mount the cable modem vertically, drill the holes at the same height and 4 inches apart. • To mount the cable modem horizontally, drill the holes at the same height and 6 inches apart.
Telephone Service: Install the Cable Modem Introduction The cable modem can be used to provide telephone service for one or two telephone lines. This section describes how to connect a single telephone, fax machine, analog telephone modem, or other telephone device to each telephone port on the cable modem. Important: Connecting the cable modem permanently to the installed home telephone wiring is not covered by this document.
Telephone Service: Install the Cable Modem, Continued Installation Diagram The following diagram illustrates one of the various connection options that are available to you.
Telephone Service: Install the Cable Modem, Continued Installing the Cable Modem Follow these steps to install the cable modem to provide telephone service. 1. Connect a telephone, fax machine, or analog modem to each of the appropriate RJ-11 ports on the cable modem. Notes: • The cable modem provides one line of telephone service on each of the RJ-11 connectors. • Service must be set up and enabled by the cable telephone service provider.
Telephone Service: Frequently Asked Questions Introduction This section provides answers to frequently asked questions regarding cable modem telephone service. For questions about cable modem internet service, see Internet Service: Frequently Asked Questions, earlier in this guide. Frequently Asked Questions Q. What if I don't subscribe to telephone service from my cable operator, can I still use the cable modem to make and receive phone calls? A. No.
Telephone Service: Troubleshooting Common Troubleshooting Suggestions The modem does not register a cable connection. • The modem works with a standard, 75-ohm, RF coaxial cable. If you are using a different cable, your cable modem will not function properly. Contact your cable service provider to determine whether you are using the correct cable. There is no dial tone when I lift the telephone handset. • Your telephone service may not be enabled from your cable telephone service provider.
Notices Trademarks Scientific-Atlanta and the Scientific-Atlanta ARCs logo are registered trademarks of Scientific-Atlanta, Inc. WebSTAR, DPX2203, EPX2203, and “Bringing the Interactive Experience Home” are trademarks of Scientific-Atlanta, Inc. Other trademarks listed herein are the property of their respective owners. Disclaimer Scientific-Atlanta, Inc. assumes no responsibility for errors or omissions that may appear in this guide.
FCC Compliance United States FCC Compliance Note: This device has been tested and found to comply with the limits for a Class B digital device, pursuant to part 15 of the FCC Rules. These limits are designed to provide reasonable protection against such interference in a residential installation. This equipment generates, uses and can radiate radio frequency energy. If not installed and used in accordance with the instructions, it may cause harmful interference to radio communications.
FCC Compliance, Continued Canada EMI Regulation This Class B digital apparatus complies with Canadian ICES-003. Cet appareil numérique de la class B est conforme à la norme NMB-003 du Canada. FCC Part 68 The Federal Communications Commission (FCC) of the United States restricts specific uses of modems, and places registration responsibilities on both the manufacturer and the individual user. 1. The modem may not be connected to a party line or to a coin-operated telephone. 2.
FCC Compliance, Continued IC (Industry Canada) Notice Notice: The Industry Canada (formerly Canadian Department of Communications) label identifies certified equipment. This certification means that the equipment meets certain telecommunications network protective, operational, and safety requirements. The department does not guarantee the equipment will operate to the user’s satisfaction.
For Information If You Need Technical Assistance If you need technical assistance, contact your cable service provider. © 2004 Scientific-Atlanta, Inc. All rights reserved.
Scientific-Atlanta, Inc. 5030 Sugarloaf Parkway, Box 465447 Lawrenceville, GA 30042 770.236.5000 www.scientificatlanta.com This document includes various trademarks of Scientific-Atlanta, Inc. Please see the Notices section of this document for a list of the Scientific-Atlanta trademarks used in this document. All other trademarks shown are trademarks of their respective owners. Product and service availability is subject to change without notice. © 2004 by Scientific-Atlanta, Inc. All rights reserved.