www.scigene.com Little Dipper® Processor for Agilent USER MANUAL CAT. #1080-40-1 (115V); 1080-40-2 (230V) FOR RESEARCH USE ONLY Not for Use in Diagnostic Procedures SciGene • 470 Lakeside Dr, Ste F, Sunnyvale, CA 94085 USA • 408-733-7337 • techserv@scigene.
Little Dipper® Processor for Agilent— USER MANUAL Serial Number The following serial number identifies the specific instrument you have purchased and must be referenced when requesting service. A copy is affixed to the instrument. Warranty 4B The Little Dipper® Processor described in this manual is warranted to be free of defects in materials and workmanship for a period of 12 months from date of delivery. This warranty does not cover removable parts or accessories, including removable baths.
Little Dipper® Processor for Agilent— USER MANUAL Table of Contents I. SAFETY NOTICES .................................................................................................................................. 3 A. Instrument Safety ...................................................................................................................................3 B. Conventions and Labels ...............................................................................................................
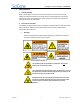
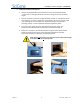
Little Dipper® Processor for Agilent— USER MANUAL I. SAFETY NOTICES A. Instrument Safety Before operating the instrument, read the information in this section concerning hazards and potential hazards. Ensure that everyone involved with the instrument’s operation is instructed in both general safety practices for laboratories and specific safety practices for the instrument. B.
Little Dipper® Processor for Agilent— USER MANUAL 2. Cautions Failure to comply with the following cautionary statement affixed to the product may lead to possible personal injury. Do not touch the bottom metal surface of the bath during operation. Insert the bath liner and fill with buffer before turning on power to each bath. The Little Dipper System weighs approximately 59 lbs (26.5 kg). Use caution when lifting the unit to avoid personal injury.
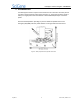
Little Dipper® Processor for Agilent— USER MANUAL II. SITE PREPARATION The Little Dipper Processor requires a level surface area of at least 30 x 22 inches (76 x 56 cm) with a vertical clearance of 30 inches (76 cm) (Fig. 1). Locate the unit within 3 feet (1 meter) of a single power outlet that delivers at least 1700 Watts/20 Amps of constant power. Clear the benchtop before unpacking any cartons. Allow unimpeded access to the Emergency Off (EMO) and main power switches on the right side of the instrument.
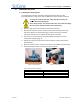
Little Dipper® Processor for Agilent— USER MANUAL III. UNPACKING AND SETUP A. Unpacking and Verifying Items The Little Dipper Processor instrument weighs about 59 lbs (26.5 kg) and is generally shipped in a large carton with an additional small carton for accessories. Do not lift the unit by the robot arm. Always grip the instrument from underneath the base when lifting!! Never attempt to lift or move the instrument alone.
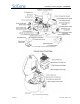
Little Dipper® Processor for Agilent— USER MANUAL Fig. 4. Little Dipper Processor System Components Fig. 5 Internal View of Centrifuge July 2013 7 manual 2.0; software 1.
Little Dipper® Processor for Agilent— USER MANUAL B. Identifying System Components (Figs. 4 and 5) 1. Main power switch – Turns on power to the unit 2. Bath power switch – Turns on power to each bath, for heating liquid 3. Temperature controller – Used to set and observe bath temperature 4. Temperature sensor – Transmits bath temperature to controller. 5. Standard bath – Removable insert, compatible with most liquids/solvents 6. Low volume bath - Removable stainless steel insert 7.
Little Dipper® Processor for Agilent— USER MANUAL C. Computer and Power Connections 1. Connect the braided cable to the touchscreen and to the receptacle labeled “TOUCHSCREEN” on the right side of the instrument, using the circular connectors (Fig. 6). 2. Connect the power cord to the receptacle labeled “POWER” on the right side of the instrument (Fig. 7) and to a power source that delivers 15 Amps or more for 115V units or 8 Amps or more for 230V units.
Little Dipper® Processor for Agilent— USER MANUAL IV. SYSTEM OPERATION A. Installing Baths and Centrifuge Buckets 1. Clean baths, racks and stir bars by rinsing in running tap water, followed by 100 ml of DI water and then 100 ml of ethanol (Fig. 10). Dry with a lint-free towel. 2. Clean sensors with DI water and a lint-free towel (Fig. 11). 3. Install standard or heatable low volume baths by rotating temperature sensors up, placing baths and then lowering sensors (Fig. 12).
Little Dipper® Processor for Agilent— USER MANUAL B. Using the Touch Screen Use the handheld touchscreen to navigate between screens, select and run protocols, create new protocols and control instrument movement (Fig. 17). If the touchscreen fails to respond, it may require calibration. See Section VI C. for details. Fig. 17. Use touchscreen controls. Fig. 18. Pause protocols as needed. C.
Little Dipper® Processor for Agilent— USER MANUAL E. Running a Test Protocol / Practicing Rack Loading This test verifies the mechanical operation of the instrument and provides the operator an opportunity to practice loading the slide rack onto the gripper. An empty slide rack is automatically moved from bath to bath with agitation, followed by a brief centrifugation. No liquid is required and temperature controllers should remain OFF. Fig. 21. Quik-tst protocol. Fig. 22. Load slide rack. 1.
Little Dipper® Processor for Agilent— USER MANUAL F. Running a Pre-Installed Protocol The instrument comes configured with validated protocols installed. Refer to the Little Dipper Processor Method corresponding to your protocol for details on how to set up the instrument. Method sheets can be found online at www.scigene.com. Do not under any circumstances run a protocol while a bath cover is in place.
Little Dipper® Processor for Agilent— USER MANUAL 12. Carefully place slide rack onto gripper (Fig. 28). The instrument will perform the steps as programmed. 13. At completion (varies by protocol), remove the rack from the centrifuge (Fig. 29) or from above the last bath (Fig. 30), if running a protocol without centrifugation, by pushing the thumbpad to open the gripper paddle. 14. Clean the instrument per section VI. B. Cleaning After Every Use. July 2013 Fig. 27. Press Start Now. Fig. 28.
Little Dipper® Processor for Agilent— USER MANUAL G. Using the Temperature Controllers Temperature controllers are used to regulate heating of the five bath positions. Each controller is calibrated at the factory to provide an accurate bath temperature when operated between 35 to 95°C. The following instructions are general guidelines for setting temperature(s). 1. Select a bath position (according to your protocol) and turn ON the switch above the bath to provide power to the temperature controller.
Little Dipper® Processor for Agilent— USER MANUAL V. CUSTOM PROTOCOLS A. Adding a Protocol Custom protocols can be created using the touchscreen. The touchscreen can store up to 14 protocols with 1 to 9 steps each. 1. From the touchscreen Home page, press New/Edit Protocol. On the Create/Edit Protocol screen (Fig. 33), use the up/down buttons to move the cursor “»” to “NEW”. Press Select to go to the Name Protocol screen (Fig. 34). 2.
Little Dipper® Processor for Agilent— USER MANUAL 6. To add a pause within the protocol, do one of the following: • Enter time for rack to remain submerged at end of step • Enter 9999 for User Control. Rack will stay submerged until the operator presses the touchscreen to resume the protocol. This is beneficial for protocols that require more than 5 baths. 7. When all values for Step 1 are entered, press Save and Exit to return to the Step Input screen. 8.
Little Dipper® Processor for Agilent— USER MANUAL VI. PERIODIC MAINTENANCE A. Cleaning Before Every Use Baths, racks and stir bars must be free of buffer residue and dust before processing slides. If they were not cleaned and stored properly after the last use, wash and dry them as follows: 1. 2. 3. 4. 5. 6. Fill baths containing the rack(s) and stir bars with tap water. Wipe racks, stir bars and baths with a lint-free towel. Rinse in running tap water. Rinse with approximately 100-200 ml of DI water.
Little Dipper® Processor for Agilent— USER MANUAL VII. SYSTEM CALIBRATION The instrument is calibrated and tested at the factory and should not require adjustment under most circumstances. A. Temperature Controller Calibration The EZ-Zone controllers are calibrated at the factory to provide accurate bath temperatures from ambient +5 to 95°C (Fig. 42).
Little Dipper® Processor for Agilent— USER MANUAL B. Slide Rack Position Calibration The instrument is calibrated and tested at the factory for proper rack positioning and should not require adjustment unless a new touchscreen is installed. The following tests check proper alignment. Baths should remain OFF with no liquid needed. 1. Bath #1 Loading a. Insert standard baths into Baths #1 and #2. b. Insert and activate stir bars. c.
Little Dipper® Processor for Agilent— USER MANUAL C. Centrifuge Loading Calibration This test ensures the rack is automatically inserted into the sample bucket of the centrifuge. 1. Hold a 12-position rack in Bath #1. In the Advanced Settings screen, press C’fuge Loading (Fig. 45). Load the rack onto the gripper. The gripper will close and then move the rack to the centrifuge (Fig. 46).
Little Dipper® Processor for Agilent— USER MANUAL VIII. SPECIFICATIONS Electrical Power supply 115V AC, 50/60 Hz; 1700W; 20 Amps (cat. #1080-40-1) 230V AC; 50/60 Hz; 1700W; 10 Amps (cat. #1080-40-2) Processing Control Slide capacity Centrifuge speed Temperature Control Software-controlled by external touchscreen Holds up to 24 slides per batch 690 RPM ± 15 RPM Range: Ambient: +5 to 95°C (41 to 194°F) Regulation: ± 0.
Little Dipper® Processor for Agilent— USER MANUAL X. TROUBLESHOOTING Indication Probable Cause Corrective Action Instrument does not power ON. Power disconnected Main power switch is OFF. Fuse has blown. Check power connections. Turn main power switch ON. Replace fuse with same type. Instrument is receiving power but robot will not respond. Emergency stop button has been activated. Twist the red EMO button on the side of the instrument to release the emergency stop. Protocol does not run.
Little Dipper® Processor for Agilent— USER MANUAL XI. SERVICE A. Lockout Procedure If a malfunction or need for service occurs, comply with the following lockout procedure for restricting use of the instrument. All users, upon observing that the instrument is locked out for servicing or maintenance shall not attempt to start, energize, or use the equipment. 1.
Little Dipper® Processor for Agilent— USER MANUAL XII. DECLARATION OF CONFORMITY Little Dipper Processor, Model 650c SciGene 470 Lakeside Dr, Ste F Sunnyvale, CA 94085-4720 USA Declares that the above referenced product(s) meets the essential requirements of the following European Union Directives by using the relevant standards shown below to indicate compliance.