
Specifications


SCION tC 2005 - VSE SUBWOOFER (BAZOOKA
®
)
Procedure
(g) Attach wire harness with one (1) 4” wire tie at
the junction plug located underneath kick
well. (Fig.5-5)
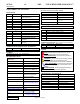
FRONT WASHER REAR WASHER
REA
R
LOC
K
NUT
FRONT
LOCK
NUT
Fig. 5-5
(1) Using the diagonal cutter pliers, clip the
4” wire tie. (Fig.5-5)
(h) Route wire harness up behind the dash and
secure wire harness to the dash reinforcement
bar using (1) 7” wire tie.
Fig. 5-6
(1) Using the diagonal cutter pliers, clip the 7”
wire tie. (Fig.5-6)
(i) Route remaining wire harness towards radio
opening and attach harness to the vertical dash
reinforcement using one (1) 4” wire tie.
Fig. 5-7
(1) Using the diagonal cutter pliers, clip the 4”
wire tie. (Fig.5-7)
6. Prepare VSE Subwoofer for Installation
NOTE: ALL SUBWOOFER COMPONENTS
THAT ARE REMOVED MUST BE PLACED ON A
CLEAN & PROTECTED SURFACE (i.e. Blanket)
Fig. 6-1
(a) Using a NRT, carefully remove the front
screen of the enclosure. (Fig.6-1)
(b) Remove the two (2) temporary shipping
Philips screws and discard.
Fig. 7-1
(c) Carefully remove the 10” driver.
7. Modify Rear Inner Quarter Panel
(a) Prepare the upper hardware assembly by
removing the front lock nut & first front
washer (leaving the second front washer
installed). Then remove the back lock nut and
flat washer. (Fig.7-1)
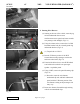
Fig. 7-2
(b) Install the hardware assembly through the
front side of the accommodation hole located
on the lower inner sheet metal panel; secure
the hardware assembly by fastening the back
Page 7 of 17 pages
Issue: A 04/15/04