
User manual
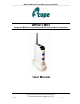


IMPACT MK3 Hand Held UHF Paging Transmitter
HHTXMK3 Issue 1
5
When full charge is achieved, the red light on the charger base will glow steady and the
transmitter display will now show “CHRG” with the battery icon filled. Upon removal
from the charger, the unit will transmit a “sign on” message indicating that it is now
available for operation.
Note: where cells are completely discharged, the unit should be placed in the charger
and the uppermost side-mounted blue button (A) pressed together with the uppermost
display scroll button until the display lights (this may take up to 50 seconds). Normal
charging will then resume. If the display blanks when the buttons are released, press
and hold the buttons for a further minute until normal charging resumes.
Precaution: to minimise any potential for malfunctioning of the unit in a severe static
electricity environment, users should avoid touching the charger contacts and aerial
mount collar. It is therefore recommended that the unit is placed in it’s carry case
immediately after charging.
Operation
Switching the Unit ON/OFF
To switch ON, press and hold the uppermost side-mounted blue button (A) and then
press the uppermost display scroll button. The display will activate and show the current
mode number and battery status.
To switch OFF, press and hold both the scroll buttons until the display flashes. Now
scroll down until FF is displayed. After 2 seconds, the unit will switch off. Note: if the unit
has been programmed in Mode 4, this prohibits user access and will bar the user from
switching the unit off.
Modes of Operation
The IMPACT has three manual call types selectable from two blue buttons (A & B)
located on the side of the unit, and a further two emergency alarms which consist of a
“snatch” lanyard and a motion detector. Whilst the manual button-initiated alarms are
always active, both the lanyard and the motion detector can be enabled or disabled by
selection of the relevant mode on the unit’s display.
This also allows different motion sensor countdown periods (short/medium/long) to be
selected.
The display will indicate which mode is active at any time, and the mode can be
changed by using the scroll keys located on the top of the unit (next to the display).
Both keys must be pressed and held for 2 seconds. This will cause the LCD display to
flash the two digits, and the scroll buttons can then be used to select the required Mode
number. After 2 seconds of no button activity, the displayed Mode will be set.